


New Report to Generate Hourly Report with Labor Data
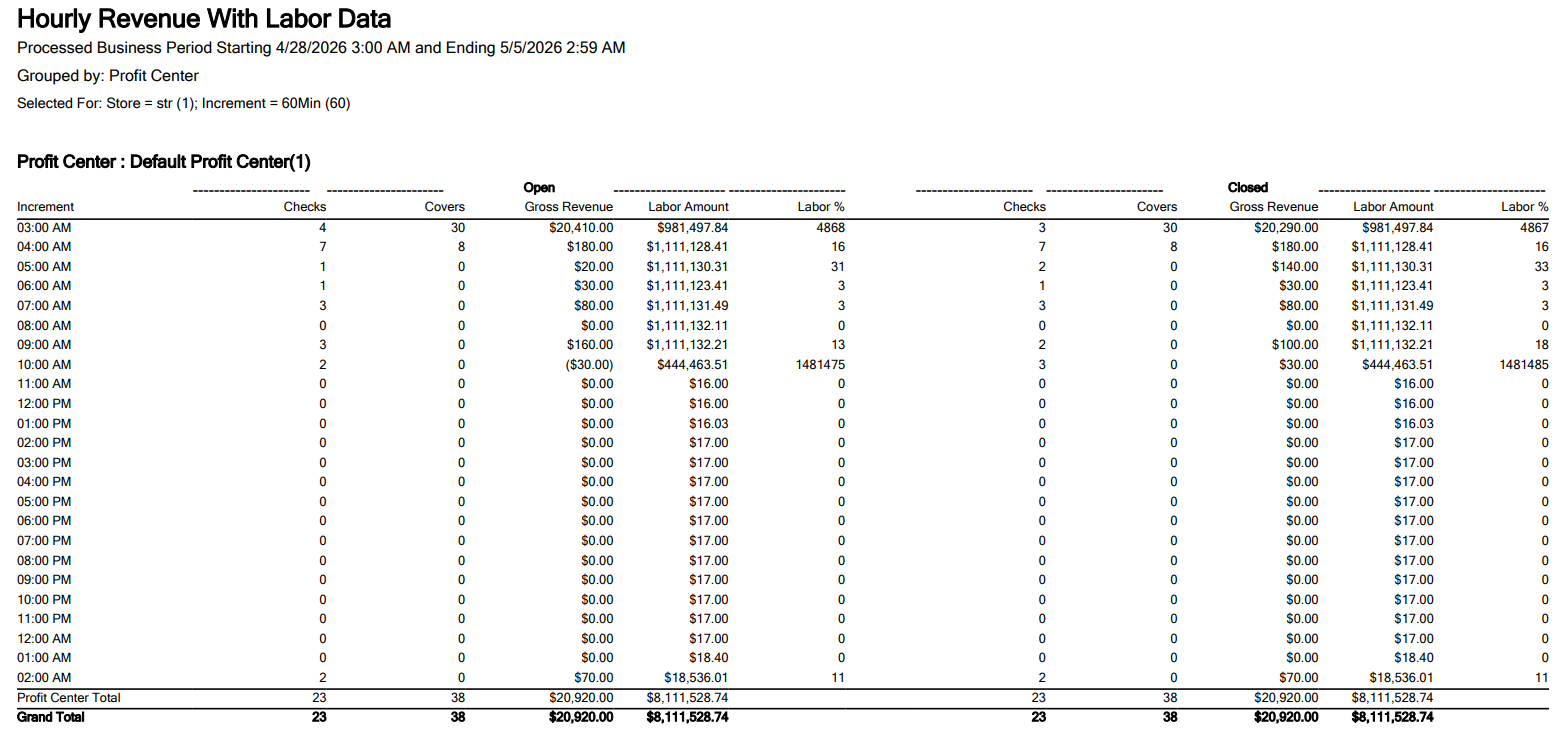
InfoGenesis POS has been enhanced to allow users to generate a combined report of sales and labor data. Previously, sales and labor details were available in separate reports, limiting the ability to analyse them together. With this enhancement, users can view sales and labor data in selected time intervals.
Important Points
-
Labor data is displayed only when employee clock-in data is available.
-
The latest labour rate is updated in the report only when the employee clocks out and clocks in.
-
Clock-in is calculated based on the profit center.
-
If an employee performs transactions in a different profit center without clocking in, the labor rate for that profit center is not considered.
-
Labor data is calculated cumulatively across multiple terminals when an employee is clocked in on different terminals, based on the labor rate of the assigned profit center.
-
If the terminal is offline and data is not synced, the report is generated only with the data available in the server.
-
For a fixed period, the report can be generated only for a maximum of 7 days.
-
The report is supported when the terminal is connected to LAS and GAS. It is recommended that certain terminals not be connected to the server through LAS.
-
If the selected date range exceeds the allowed limit of 7 days for a fixed period selection, the message, Date range exceeds allowed period will be displayed.
-
If an invalid filter option is selected, the message, Invalid filter selection will be displayed.
Report Details
Hourly Revenue with Labor Data Report
Refer to the following table for the fields displayed in the report:
|
Field |
Description |
|---|---|
|
Processed Business Period Starting and Ending |
Displays the start and end date and time of the business period for which the report is generated. |
|
Grouped by |
Displays the selected grouping for the report. |
|
Selected for |
Displays the selected store and increment interval. |
|
Profit Center |
Displays the profit center name. |
|
Open |
|
|
Increment |
Displays the selected time interval. |
|
Checks |
Displays the number of checks recorded within the time interval. |
|
Covers |
Displays the number of covers associated with the checks within the time interval. |
|
Gross Revenue |
Displays the total gross revenue generated within the time interval. |
|
Labor Amount |
Displays the total labor cost associated with the time interval. Labor Amount = Sum of individual labor rates of clocked in employees. |
|
Labor% |
Displays the percentage of labor cost against the gross revenue for the time interval. Labor % = [LaborRate * 100 / Gross Revenue]. |
|
Closed |
|
|
Checks |
Displays the number of closed checks within the time interval. |
|
Covers |
Displays the total covers associated with closed checks within the time interval. |
|
Gross Revenue |
Displays the total gross revenue from closed checks within the time interval. |
|
Labor Amount |
Displays the labor cost associated with the time interval for closed data. |
|
Labor% |
Displays the labor percentage calculated against gross revenue for closed data. |
Changes made in IGCM
To support this, a new report, Hourly Revenue with Labor Data, has been added to the Report Setup menu in IGCM (Reports ➜ Reporting ➜ Report Setup).
Configurations in IGCM
Navigate to Reports ➜ Reporting ➜ Report Setup.
Select the Hourly Revenue with Labor Data record from the screen and select Edit to modify it.
Refer to the following table and fill in the fields:
|
Field |
Description |
|---|---|
|
Basic Details |
|
|
Report Template |
This field cannot be edited. |
|
Report Name |
Enter the report name. |
|
Description |
Enter a description for the report. |
|
Report Access |
Select any of the following options:
|
|
Created By |
This field cannot be edited. |
|
Modified By |
This field cannot be edited. |
|
Date Range |
|
|
Report Time Type |
Select one of the following options:
|
|
Date Range Selections |
Select one of the following options:
|
|
Limit Date Range to business period start and end times |
Enable or disable this checkbox. |
|
Period |
Select the preferred period from the drop-down list:
Note: This field is displayed only when Dynamic is selected. Additionally, Previous Day option will be selected by default when Limit Date Range to business period start and end times checkbox is enabled |
|
Start Date |
Select the preferred start date. This field is displayed only when Fixed Period is selected. |
|
Start Time |
Select the preferred start time. This field is displayed only when Fixed Period is selected. |
|
End Date |
Select the preferred end date. This field is displayed only when Fixed Period is selected. |
|
End Time |
Select the preferred end time. This field is displayed only when Fixed Period is selected. |
|
Current Selected Date Range |
The values for the following fields are auto populated based on the selected date range options:
Note: This field cannot be edited. |
|
Filters |
|
|
Store |
Select the preferred store from the drop-down list. |
|
Meal Period |
Select the meal period from the drop-down list. By default, All will be selected. |
|
Check Type |
Select the check type from the drop-down list. By default, All will be selected. |
|
Select Your Preference |
Select any of the following options:
|
|
Profit Center |
Select the preferred profit center from the drop-down list when the Profit Center Group option is selected. By default All is selected. |
|
Profit Center Group |
Select the preferred profit center group from the drop-down list when the Profit Center Group option is selected. By default All is selected. |
|
Increment |
Select preferred time from the drop-down list.
|
|
Format |
|
|
Sort By |
Select an option from the drop-down list. |
|
Group By |
Select an option from the drop-down list. |
|
Then By |
Select an option from the drop-down list. |
|
Then By |
Select an option from the drop-down list. |
|
Report Groups |
|
|
Report Groups |
Select the preferred report group from the drop-down list. Note: This submenu is enabled only when Public Reports is selected. |
Select Save As.
Select RUN NOW to download the report.