Split Checks
The Split Checks function is used to split a check. This function can be performed on open checks only. The check must not have any tips or tenders, else, it cannot be split. This function is not supported in the Mobile mode.
The POS terminal allows the user to split a check in the following ways:
-
Even Split
-
Split All Items
-
Split Payment
-
Split Check
Even Split
The Even Split function is used to split a check evenly. A receipt is printed for each split. Each receipt shows the total number of splits and the split amount due.
Start a new check and add items, if necessary.
Navigate to Jump Bar ➜ Function Screen. The Function Screen appears.
Select the Even Split function. If there is no check available in the Check View, the Select Open Check prompt appears from which a check can be selected. Else, the Even Split prompt appears.
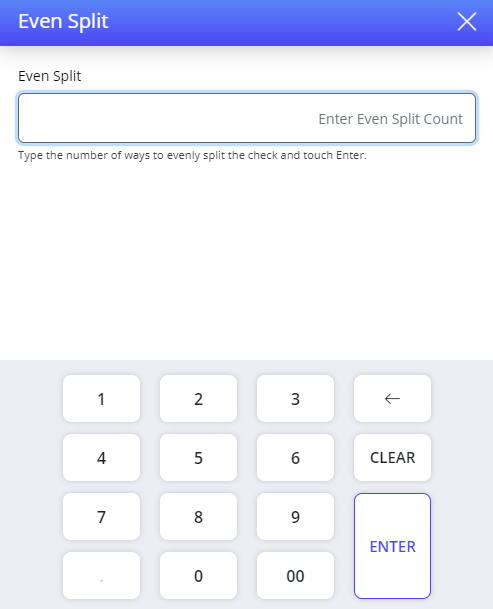
Enter the number of splits. The check can be split evenly anywhere between 2 to 32 times. If the value entered exceeds 32, a message, The check cannot be split more than 32 ways appears. The user can also enter odd values such as 5 or 7 for the number of splits.
For example, if there is one item in a check that is split 7 times, all the 7 split checks have the same item. The item is split evenly amongst all the 7 checks.
Select ENTER. The Even Split Set prompt appears. It displays the number of splits. In this case, the number of splits is 4.
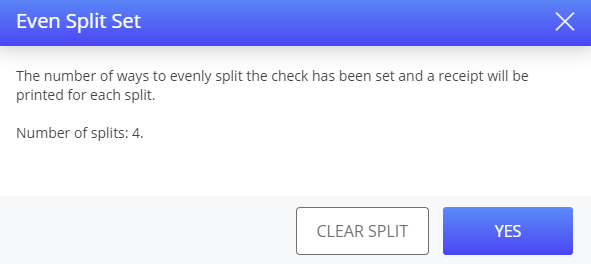
Select Yes. The check is split evenly for the specified number of times, and 4 receipts are printed for each split.
Split All Items
The Split All Items function is used to split an item between multiple checks. This function is suitable for a large group dining scenario.
Start a check and add items.
Navigate to Jump Bar ➜ Function Screen. The Function Screen appears.
Select the Split All Items function.
If there is no check available in the Check View, the Select Open Check prompt appears from which a check can be selected. Else, the Split All Items prompt appears.
Sample Split All Items Screen
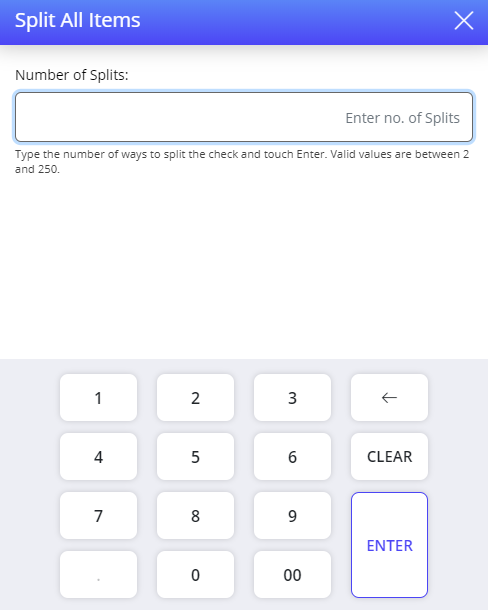
Enter the number of splits. An item can be split anywhere between 2 to 25 checks. When the value entered is invalid, a message, 2 and 25 appears. A confirmation prompt appears.
Select Yes. A confirmation screen appears.
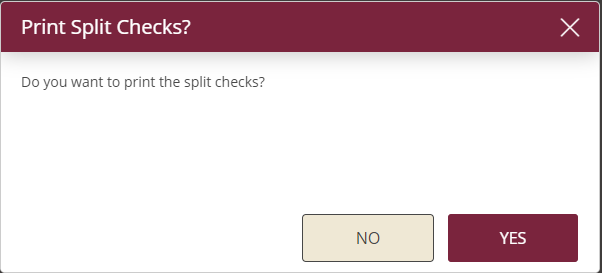
Select Yes. The items in the check are split across different checks successfully.
The POS terminal allows an item to be split across a maximum of 25 checks only as of now.
The Split Check Actions can be performed by a user with any security level and does not require manager override.
When the Terminal Option 1320 (Allow Check Edit after Split All Items Function) is enabled, the following functions can be performed on a check after splitting items in the check:
-
Modify Check Type
-
Modify Grat %, Modify Grat $
-
Modify SvcCharge %, Modify SvcCharge $
-
Modify Table
-
Add Item
-
Reorder item
-
Void item
-
Discount
-
Check label
-
Cancel check
-
Hold/Fire item
The Split All Items (#313) function is not supported in portrait mode.
The Split All Items (#313) function is not supported in mobile mode.
Split Payment
The Split Payment function is used to split the check based on the number of splits entered. There are different options to split payment unevenly with split by amount and split by percentage.
Start a check and add items.
Navigate to Jump Bar ➜ Function Screen. The Function Screen appears.
Select the Split Payment function. If there is no check available in the Check View, the Select Open Check prompt appears from which a check can be selected. Else, the Split Payment prompt appears.
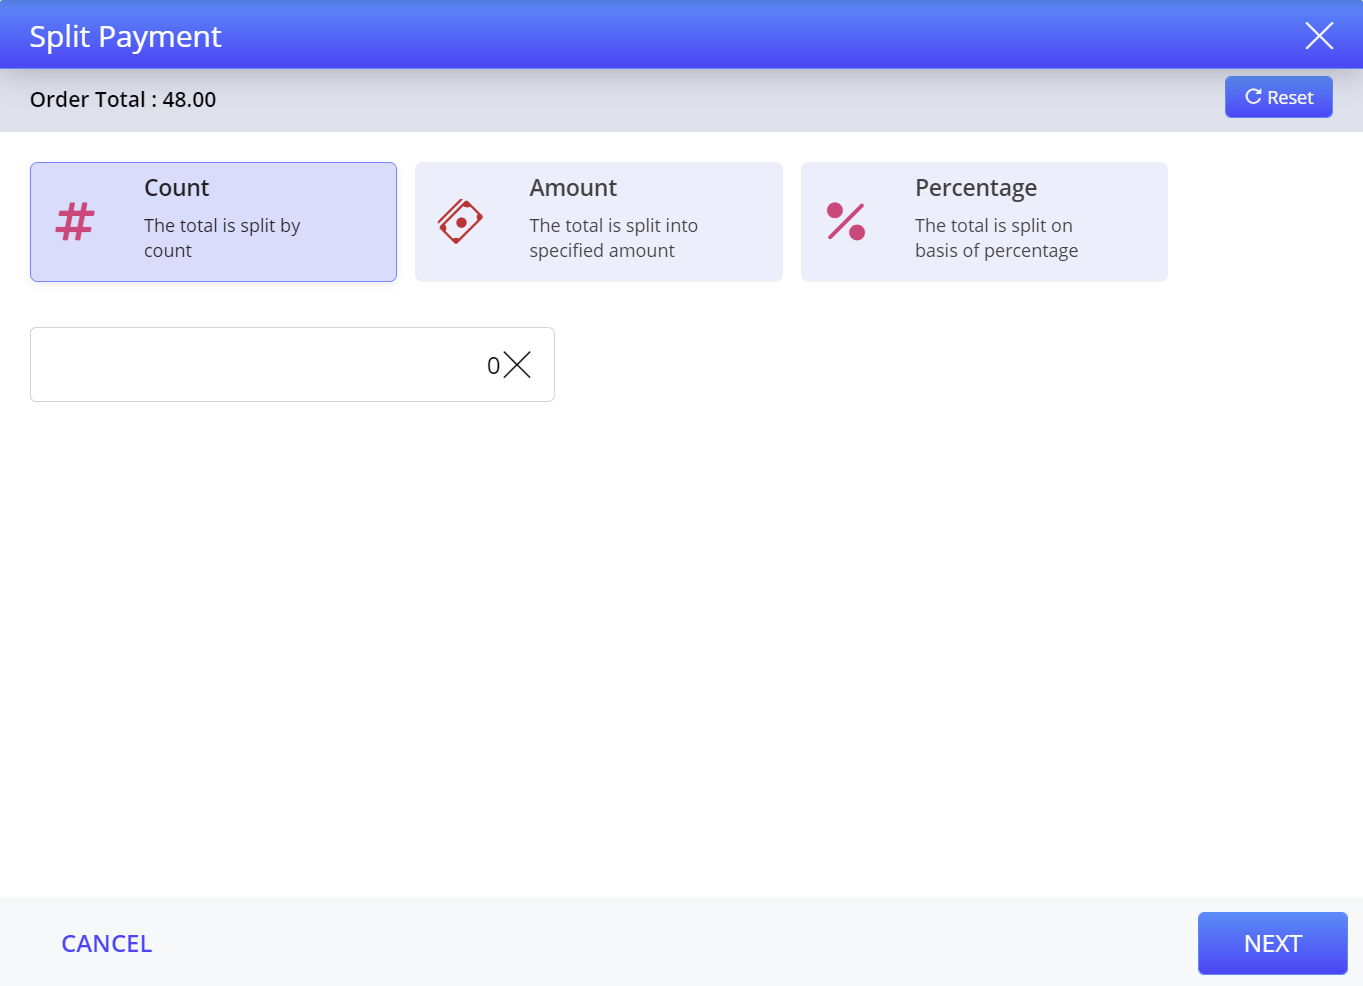
Voiding partially tendered check is not supported when Split by Amount and Split by Percentage types of Split Payment function is performed.
Split Payment for Selling Gift Card
The POS terminal supports accepting split payment when selling a gift card. The payment can be split by amount or percentage.
Important Points
-
If Terminal Option 1402 (Allow sale of multiple gift cards on a single check) is enabled or disabled, the split payment option will be shown or hidden accordingly.
-
This feature is supported for the Add Funds (#334) function.
-
The Adjust Tip Gift Card Check (#2085) function is not supported for split payments.
-
The receipt displays all the split payments used.
-
Employees without permissions require Manager Override to perform split payment.
-
If part of the split payment is completed and the user selects the Split Payment option again, the system will automatically split the remaining balance.
Configurations in IGCM
Configure Terminal Option
Navigate to POS Configuration ➜ Terminals ➜ Terminal Option Group.
Select the appropriate record and select Edit.
Navigate to the Terminal Options submenu.
Enable Terminal Option 1402 (Allow sale of multiple gift cards on a single check).
-
When enabled, multiple gift cards can be sold in a single transaction. The sale can only be processed once all split payments are completed.
-
When disabled, multiple gift cards cannot be sold in a check.
Implementation at the POS Terminal
Navigate to Functions screen and select the Gift Card Sale (#516) function. The Tender screen is displayed.
Select the Split Payment option. The Split Payment prompt is displayed.
Refer to the following table for examples on how split payment is applied to sell a gift card:
|
Split Payment Option |
Example Scenario |
Details |
|---|---|---|
|
Amount |
Customer buys a $100 gift card, wants to pay $60 by credit card and $40 by cash. |
- $60 paid by credit card. |
|
Count |
Customer buys a $100 gift card, wants to split the amount between 2 gift cards. |
- 2 gift cards. |
|
Percentage |
Customer buys a $100 gift card, wants to pay 70% by credit card and 30% by cash. |
- 70% of $100 = $70 (credit card). |
Select one of the following options:
-
Count
-
Amount
-
Percentage
Enter the preferred value and select Apply to confirm the split. A summary of the split details is displayed.
Split by Count
Navigate to Jump Bar ➜ Function Screen. The Function Screen appears.
Select Split Payment function ➜ Count.
Enter the number of splits and select Enter. The Split Summary prompt is displayed with a preview of the split check total amount. In this case, the check total is split into 2. So, the preview displays the split amount, which is 24.
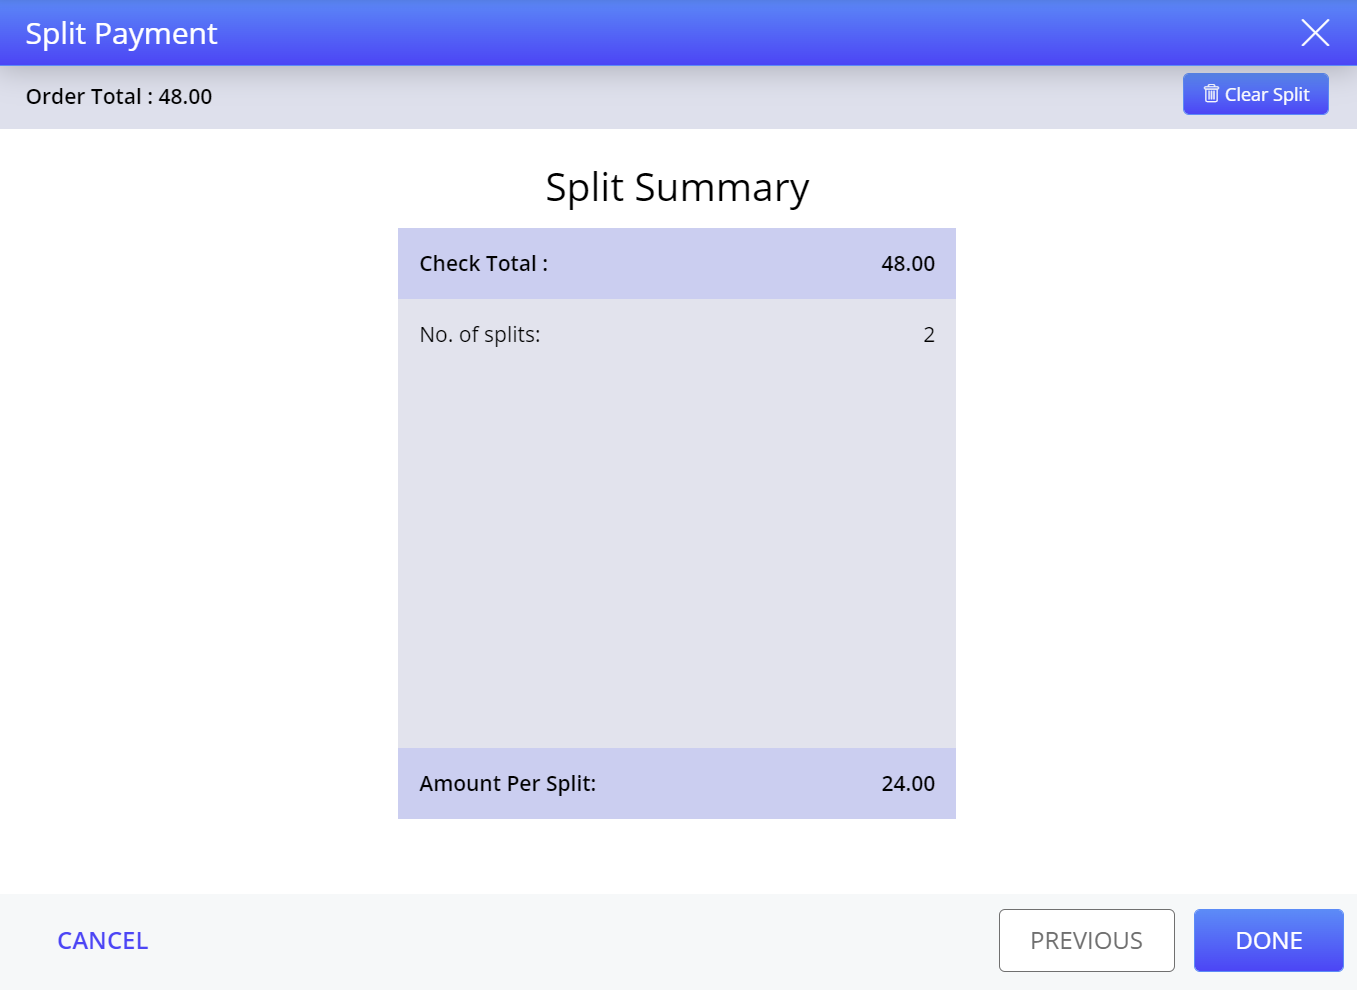
Select Done. The check total is split successfully. When the check is tendered, the Apply Split Amount prompt appears. It displays the split payment amount.
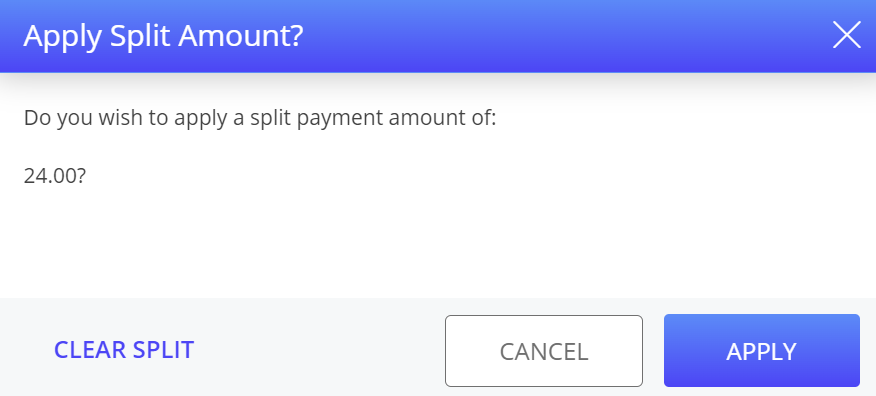
Select Apply. The check is partially tendered with the split payment amount.
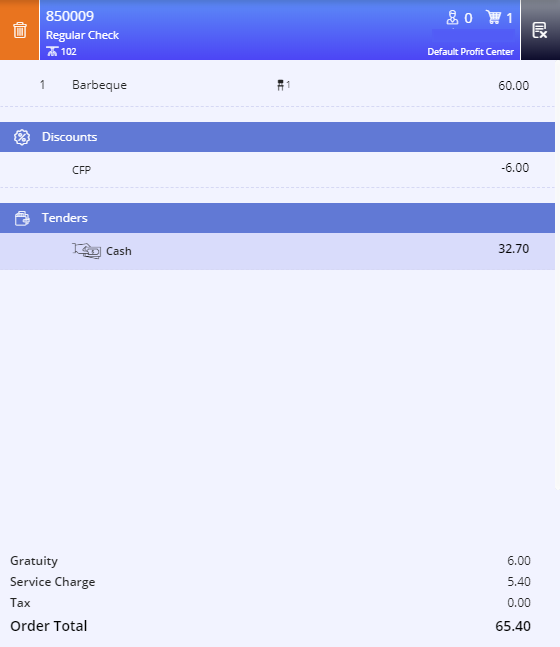
The check is tendered completely only when it is tendered the same number of times as the number of splits. In this example, the check with a total of $48 is split twice and is partially tendered for $24, the check must be tendered again for the remaining amount. Thus, the check is tendered twice in order to be tendered completely since the number of splits is 2.
Split by Amount
Create a check by adding items.
Navigate to Jump Bar ➜ Function Screen. The Function Screen appears.
Select Split Payment function ➜ Amount.
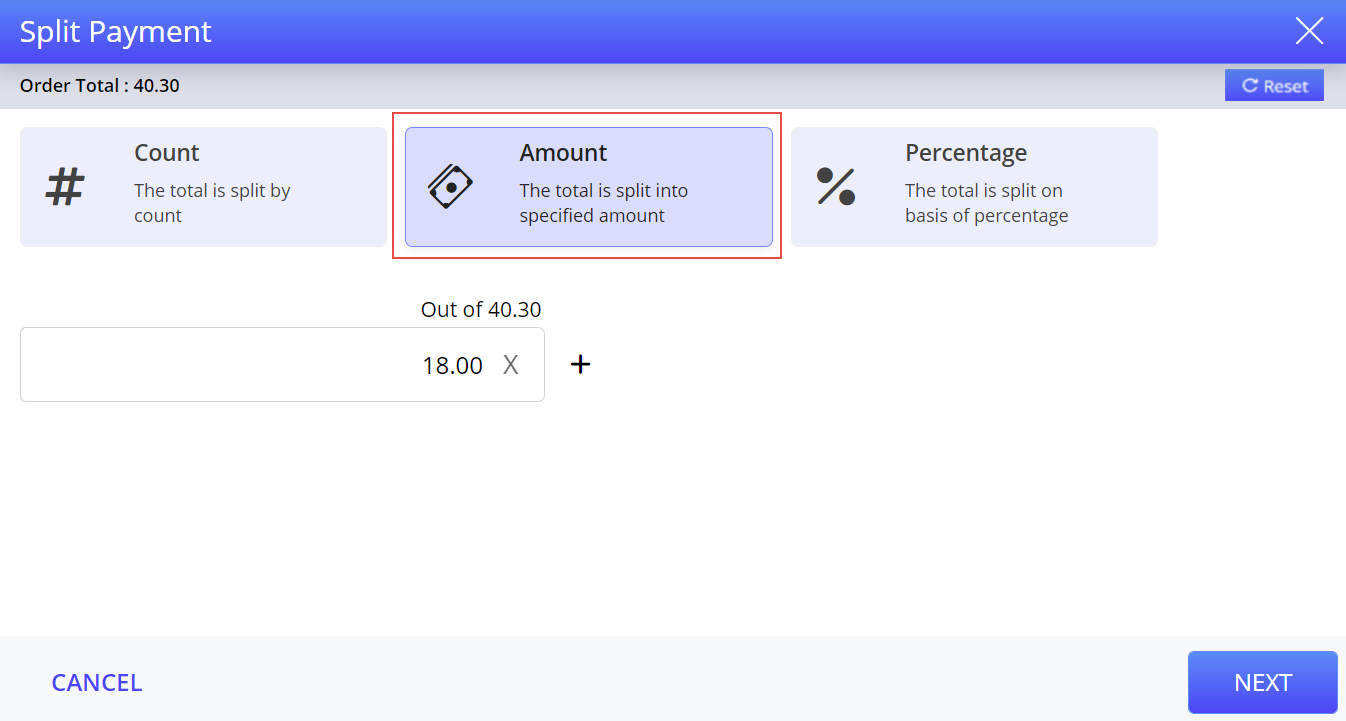
Enter the preferred amount.
Select Reset to undo the values entered in the split fields.
Select Add icon to add another split of the amount. A new field appears:
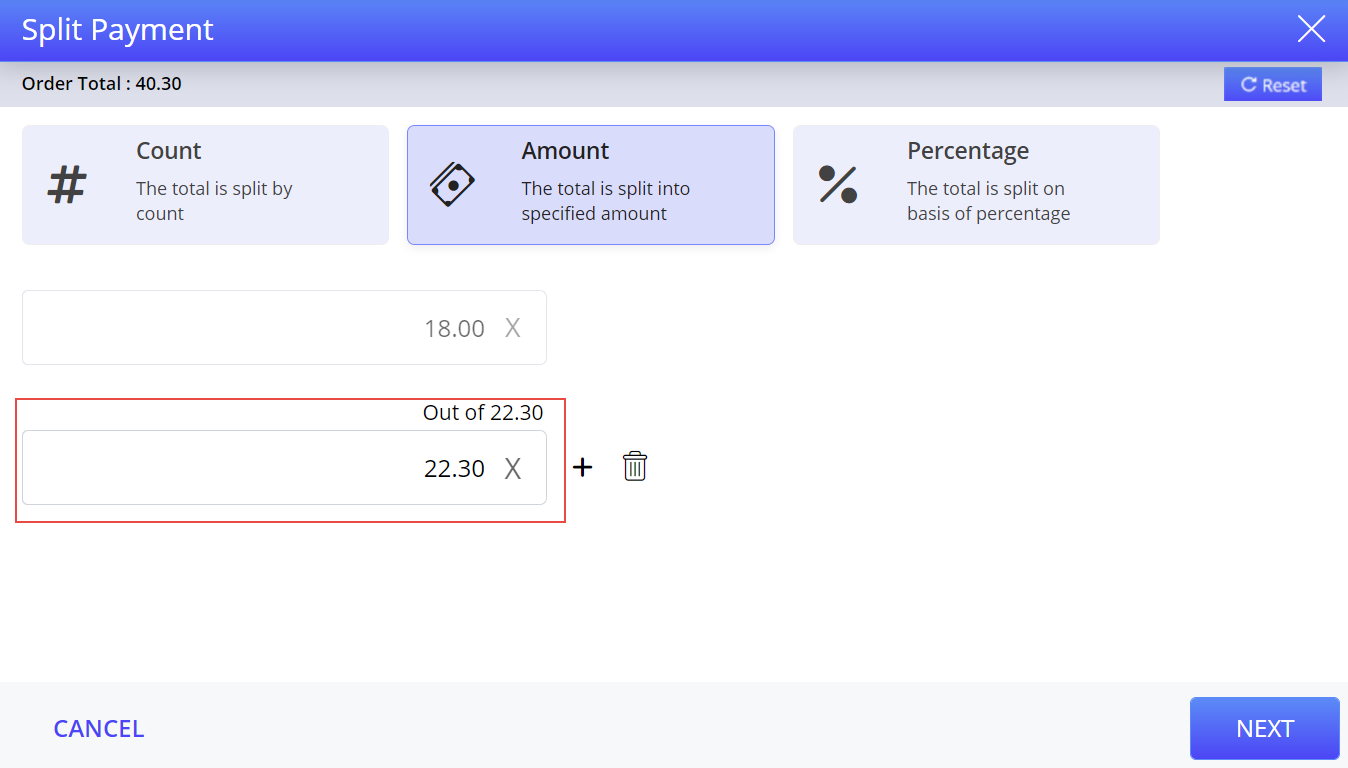
The user must add the amount from the remaining total balance.
For instance, the total amount is $40.30. The first split of the amount is $18. Now the remaining total balance out of $40.30 is $22.30. The split amount must be $22.30 or less. If the entered amount exceeds the remaining total balance, a message Incorrect split amount appears on the screen.
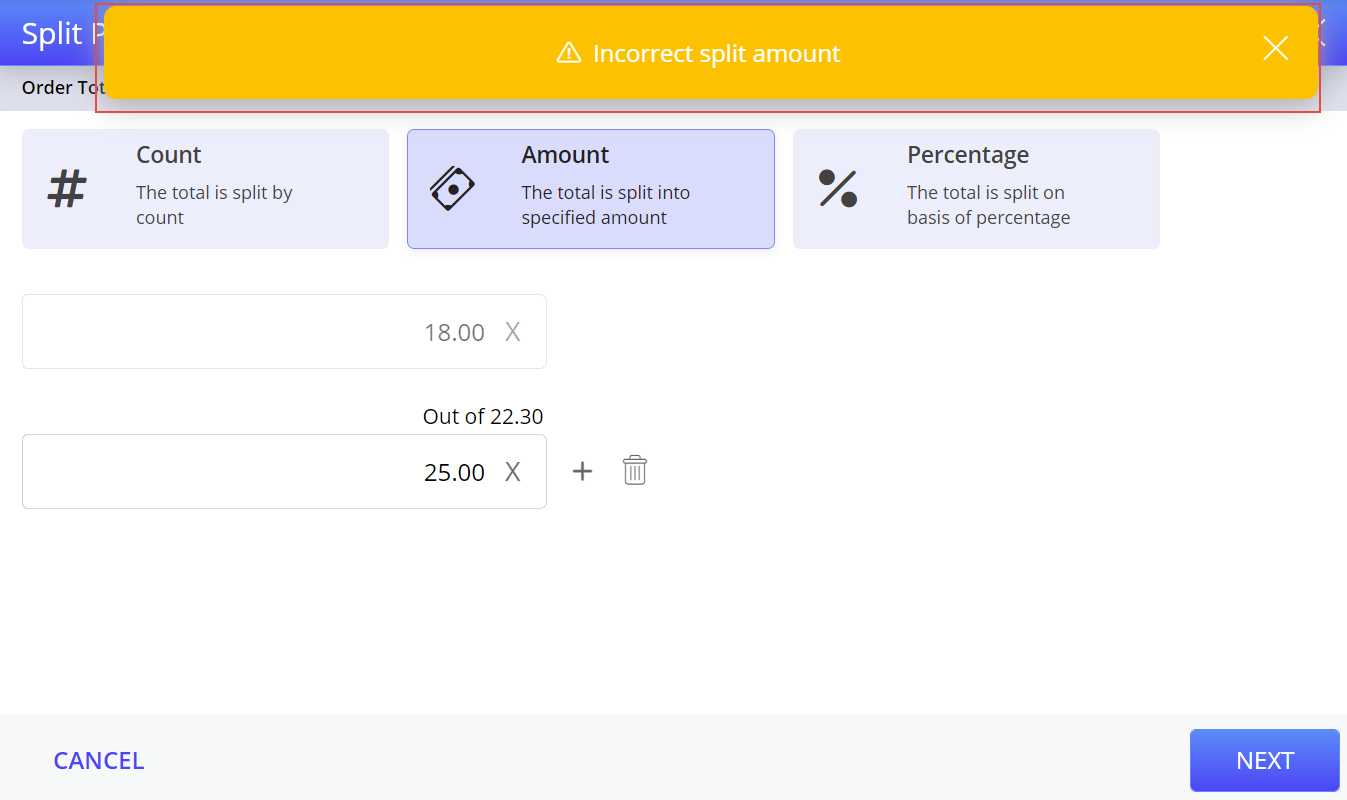
The user can proceed only when the amount entered in the field is from the remaining total balance or less.
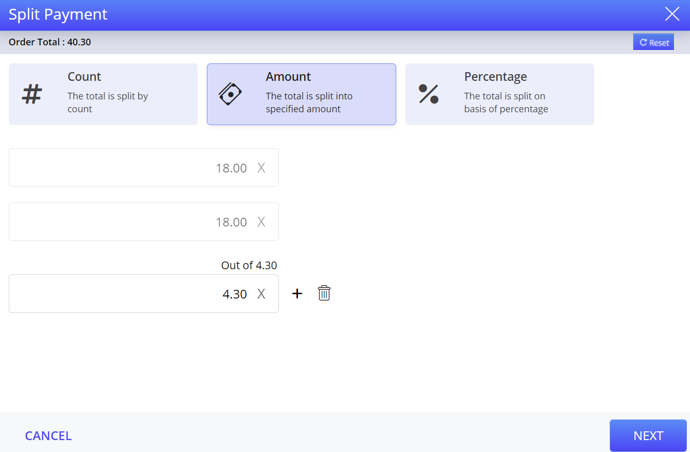
Select Next once the splits are entered. The Split Summary appears:
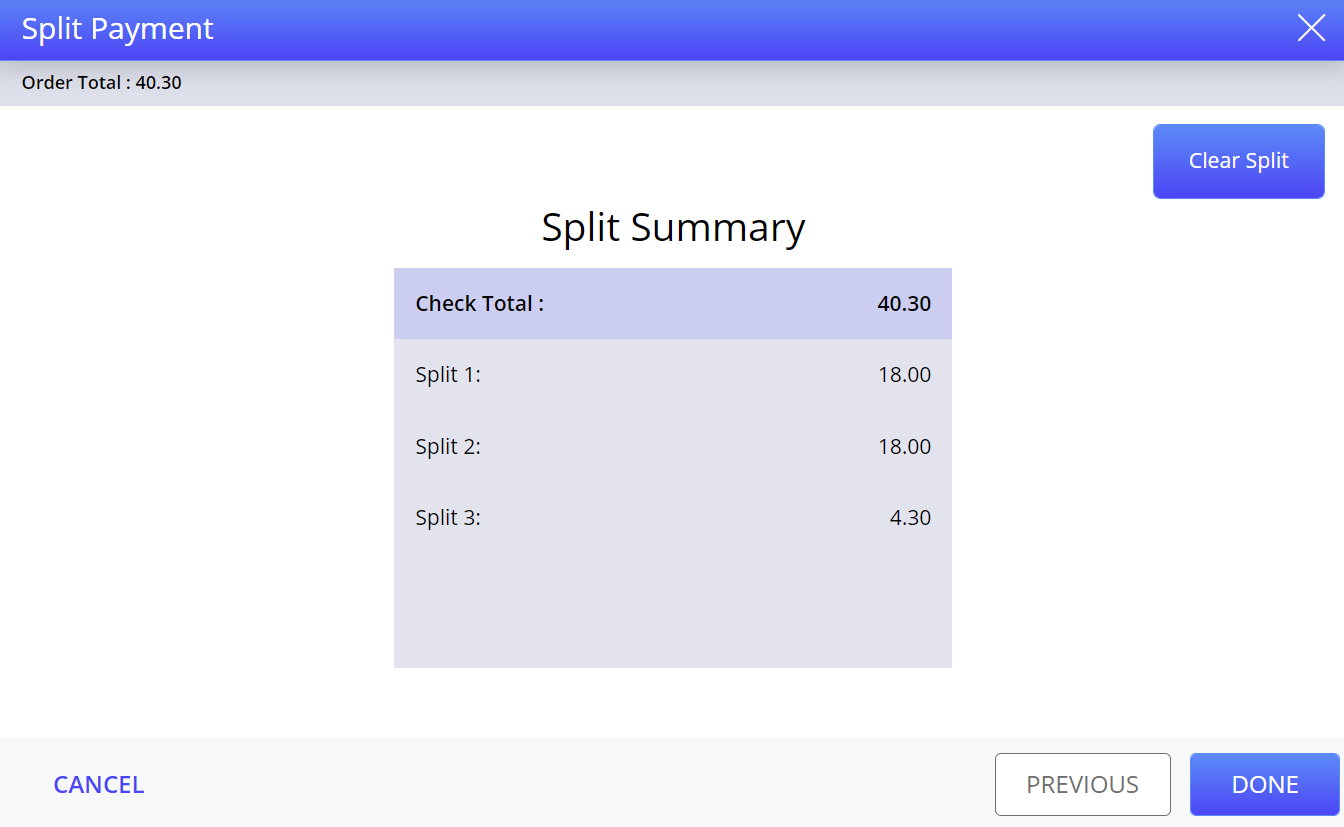
Select Done to proceed with the split payment.
Select Previous to make changes to the splits entered.
Select Clear Split to remove the payment in splits.
Split by Percentage
Create a check by adding items.
Navigate to Jump Bar ➜ Function Screen. The Function Screen appears.
Select Split Payment function ➜ Percentage.
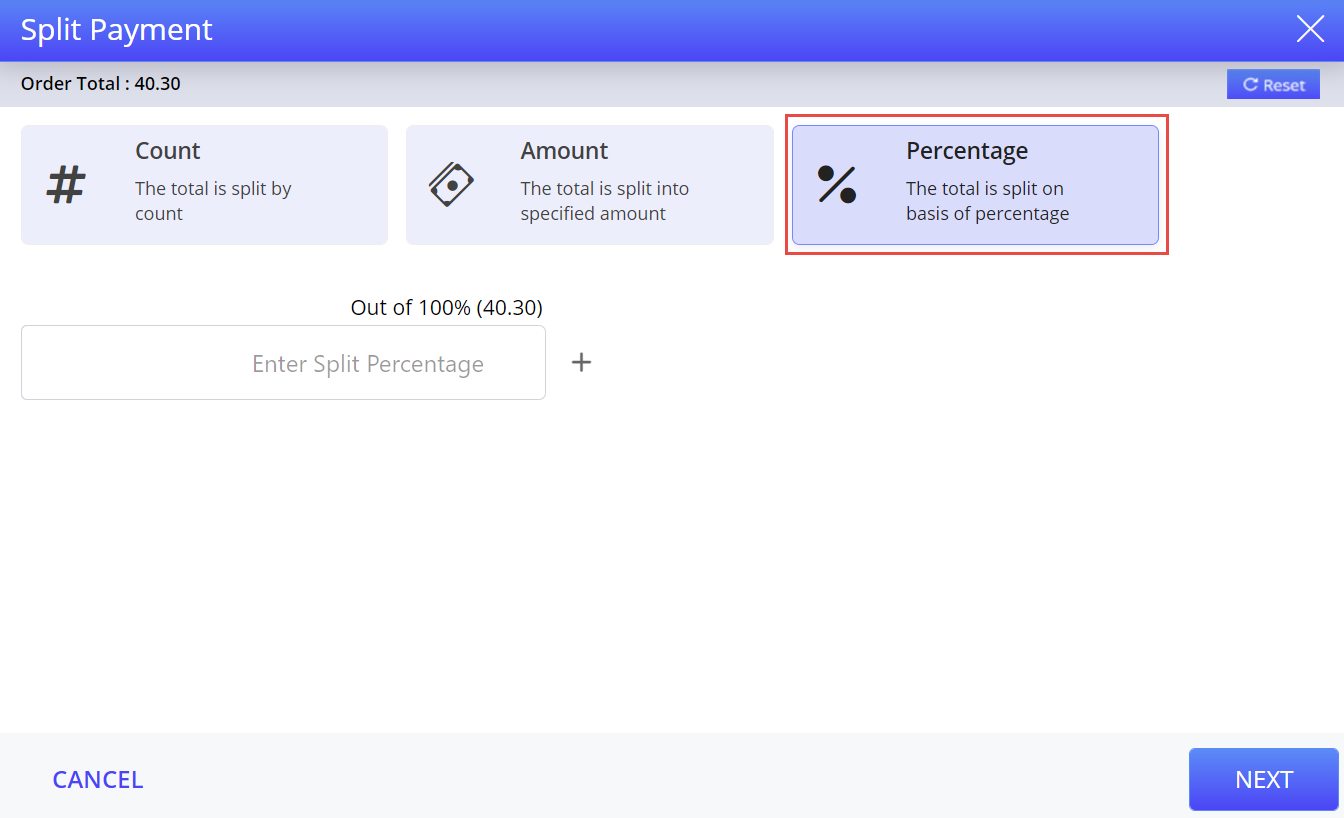
Enter the preferred percentage in the field.
Select Reset to undo the values entered in the split fields.
Select Add icon to add another split of the percentage. A new field appears:
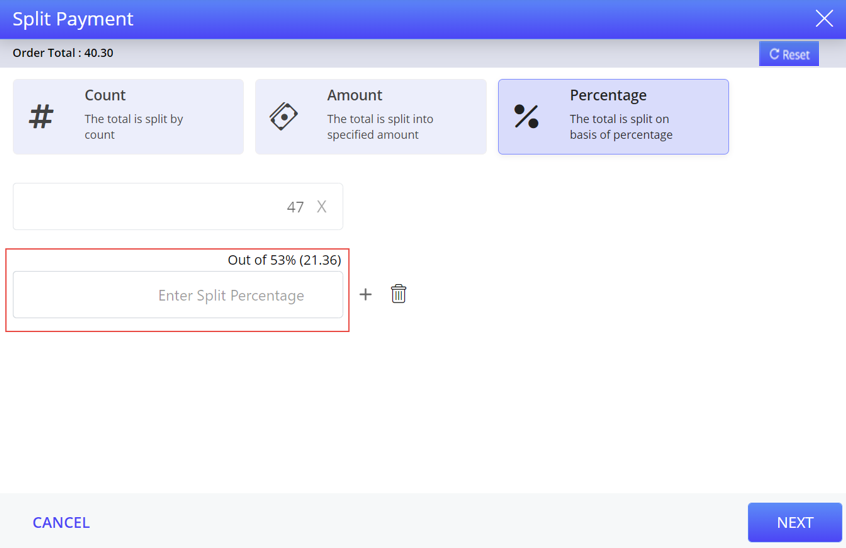
The user must add the split percentage from the remaining percentage after entering the first field.
Select Next after adding the splits. The Split Summary appears:
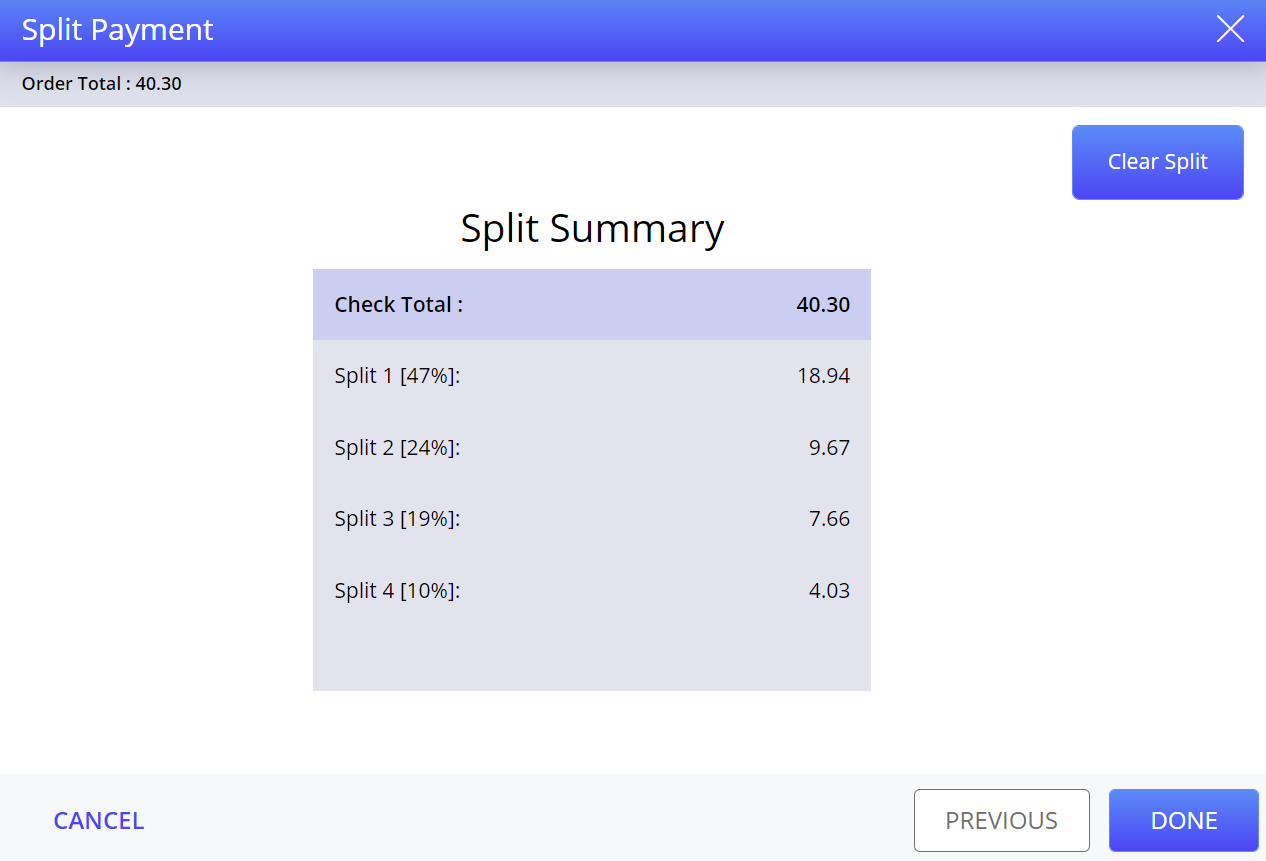
Select Done to proceed split payment.
Select Previous to go back to the previous screen.
Select Clear Split to remove the payment in splits.
Split Check
The Split check function is used to split single check into two or more checks. A check can split using the following options:
-
Split by Seat
-
Split by Course
-
Split by Item
-
Assign to Seat
Split by Seat
Start a check and add items. All the items are assigned to seat 1 by default.
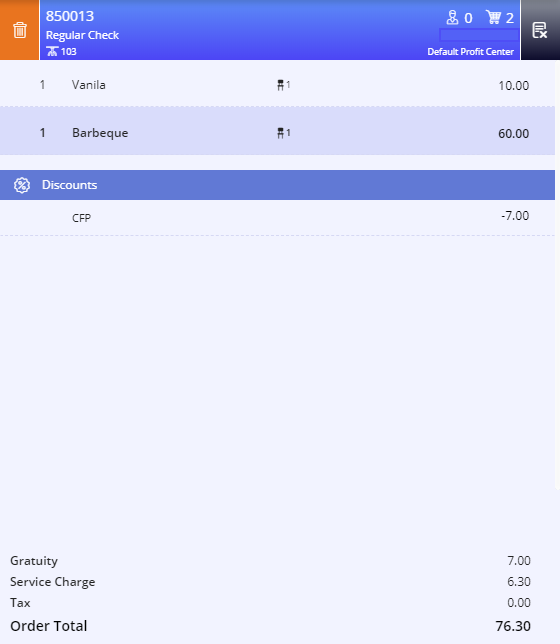
Alter the seats assigned to each item by selecting the Modify Seat function. It is required to alter the seats assigned to each item since the Split by Seat function works only if the items in the check belong to different seats. Else, the user is not allowed to split the check by seat since all the items in the check are assigned to seat 1 by default. In this example, the item, Barbeque is moved to seat 3.
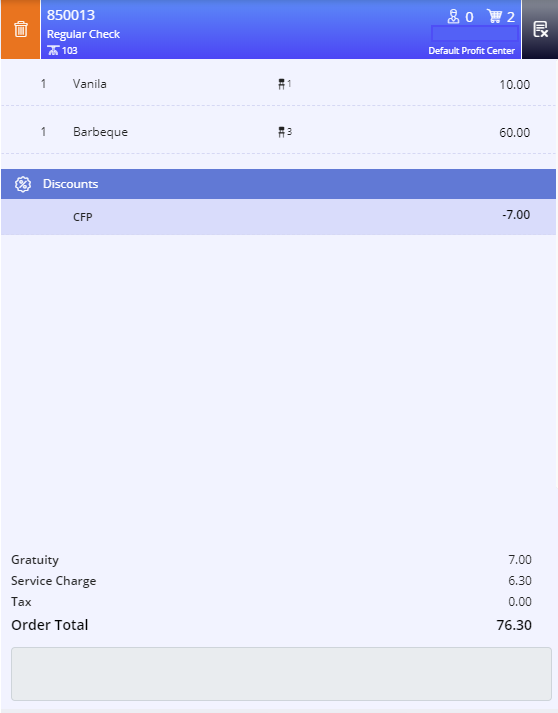
Navigate to Jump Bar ➜ Function Screen. The Function Screen appears.
Select the Split Check function button. The Split Check prompt appears. It displays the following options:
-
Split by Seat
-
Split by Course
-
Split by Item
-
Assign to Seat
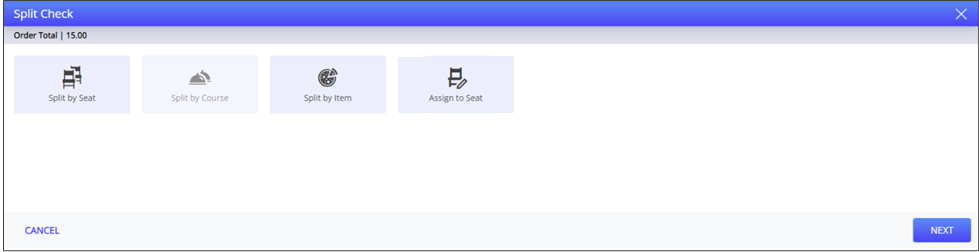
Select the Split by Seat option. This option is disabled if the items in the check belong to the same seat.
To assign seats, select Assign to Seat option. The
Select Next. A preview of the checks split by seat appears. In this example, there are two seats, seat #1 and seat # 2. So, the check is split twice. Split #1 has the item Vanilla assigned to seat 1 and Split #2 has the item Barbeque assigned to seat 3.
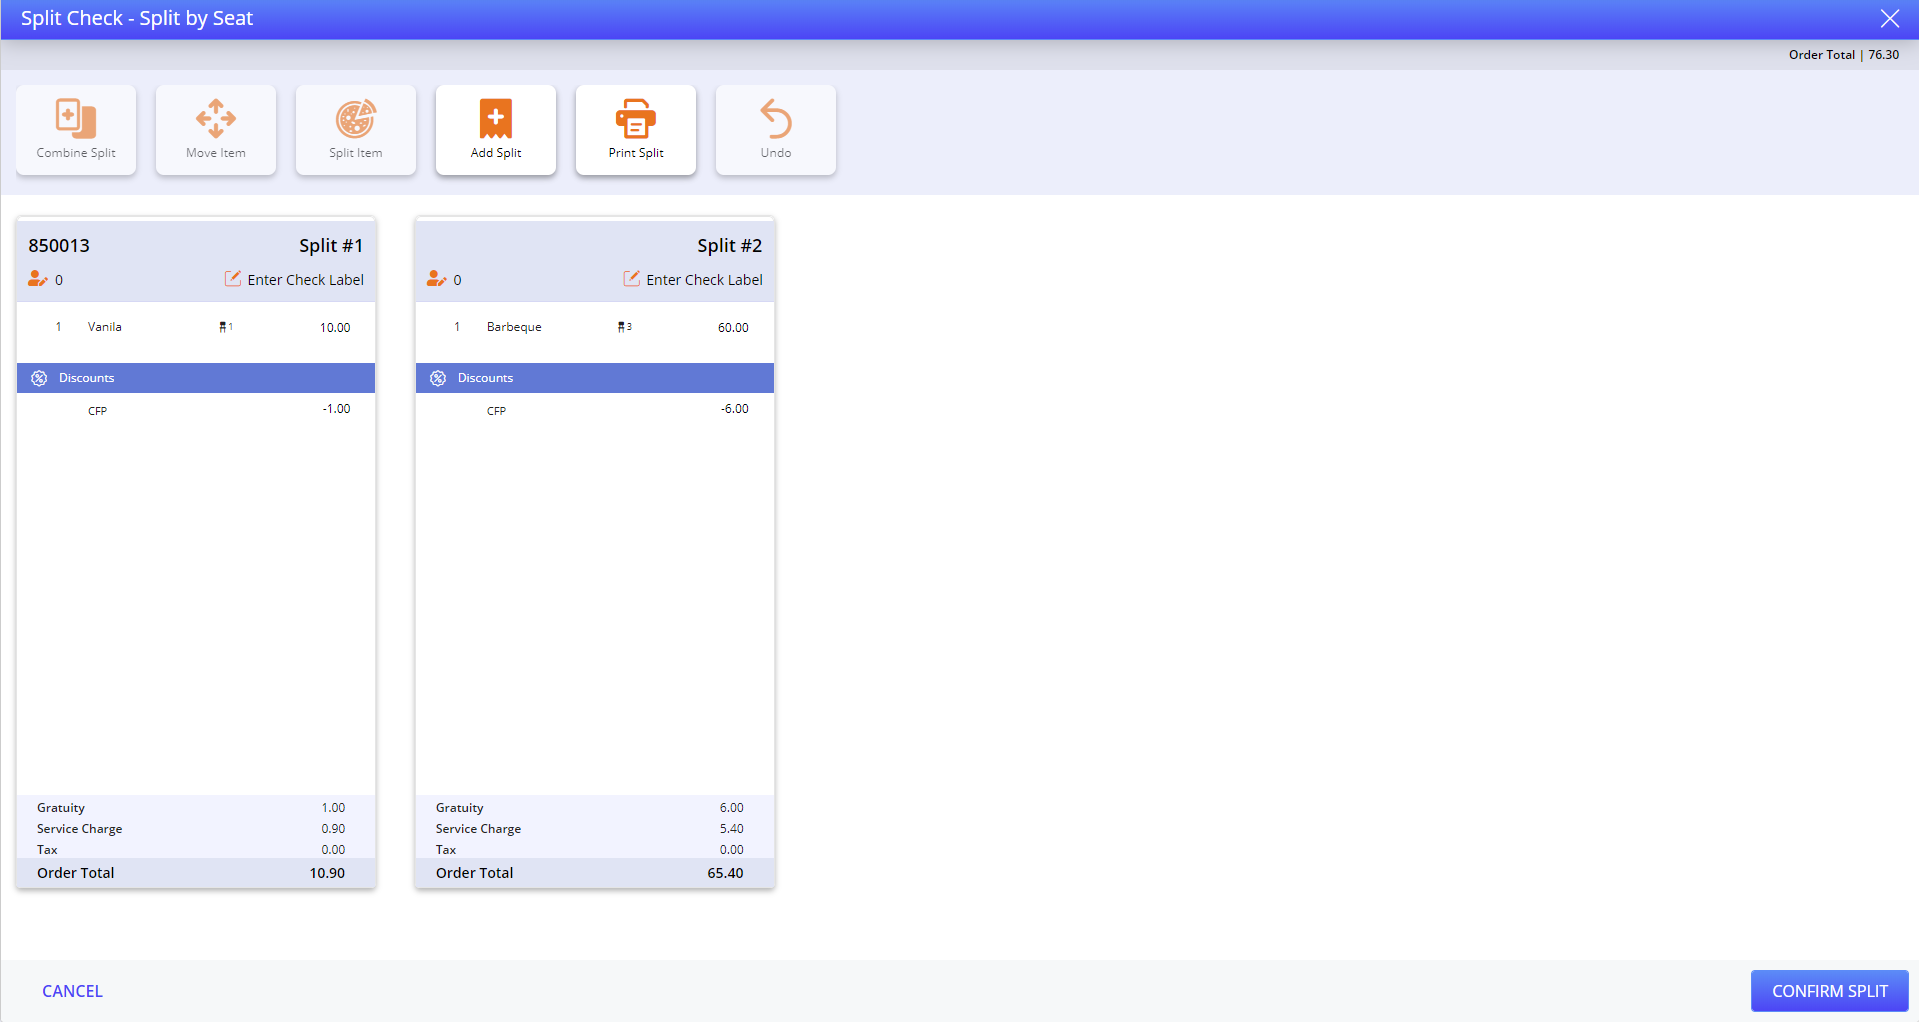
Select Confirm Split. The Print Split Check prompt appears.
Select OK. A preview of the checks split by seat appears.
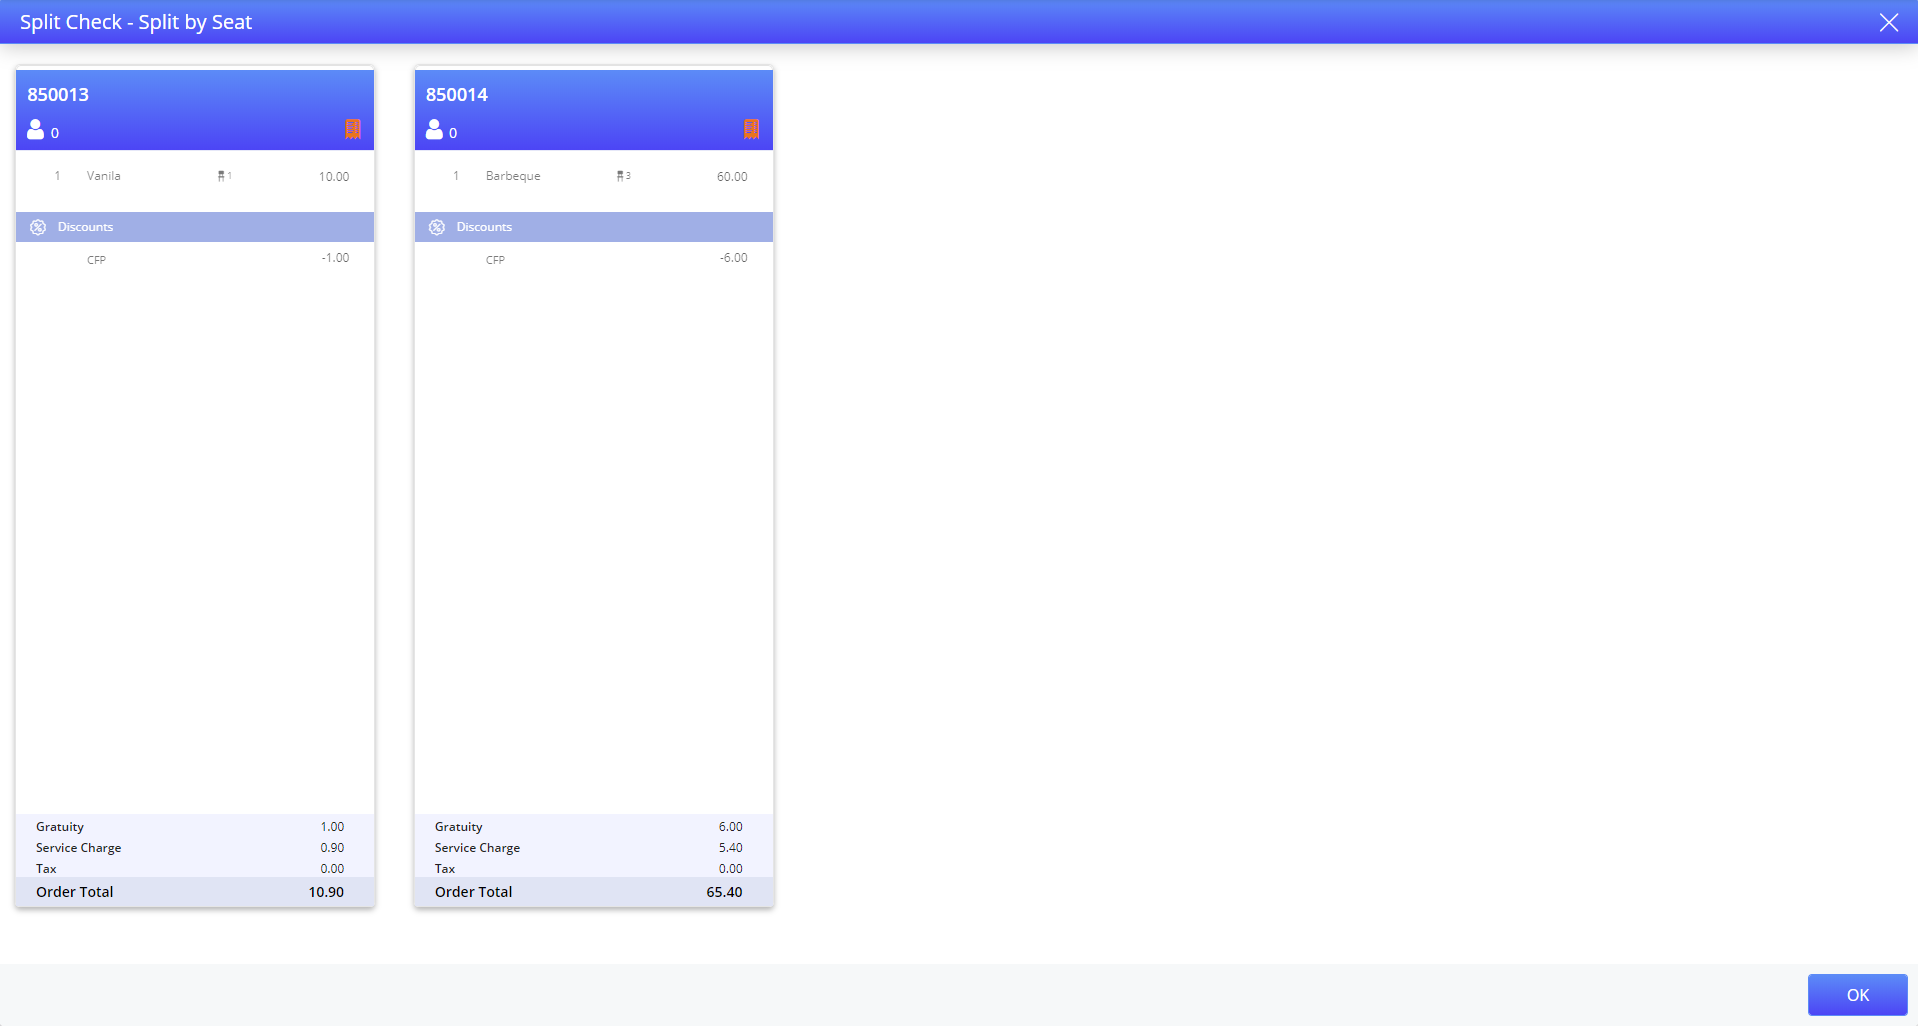
Select OK. The split checks are saved and printed.
Important Points
-
Refer to the Split Check Actions table to perform the various actions displayed in the Split Check prompt.
-
When a check which has items assigned to multiple seats is split by seat, the items belonging to seat 2 are assigned to Split #2. When this split is recalled, and a new item is added to check, it is still added to seat 1 instead of being added to seat 2.
Split by Course
Start a check and add items in separate courses. In this example, there are 2 courses available in the check.
Sample Check Screen
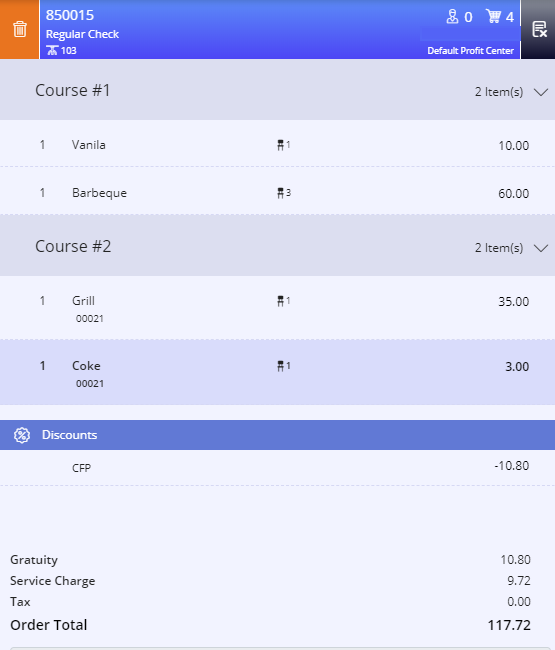
Navigate to Jump Bar ➜ Function Screen. The Function Screen appears.
Select the Split Check function button. The Split Check prompt appears.
Select Split by Course. This option is not enabled if there are no courses available in the check.
Select Next. The check is split by course. In this example, Split #1 has the items in course #1 and Split 2 has the items in course #2.
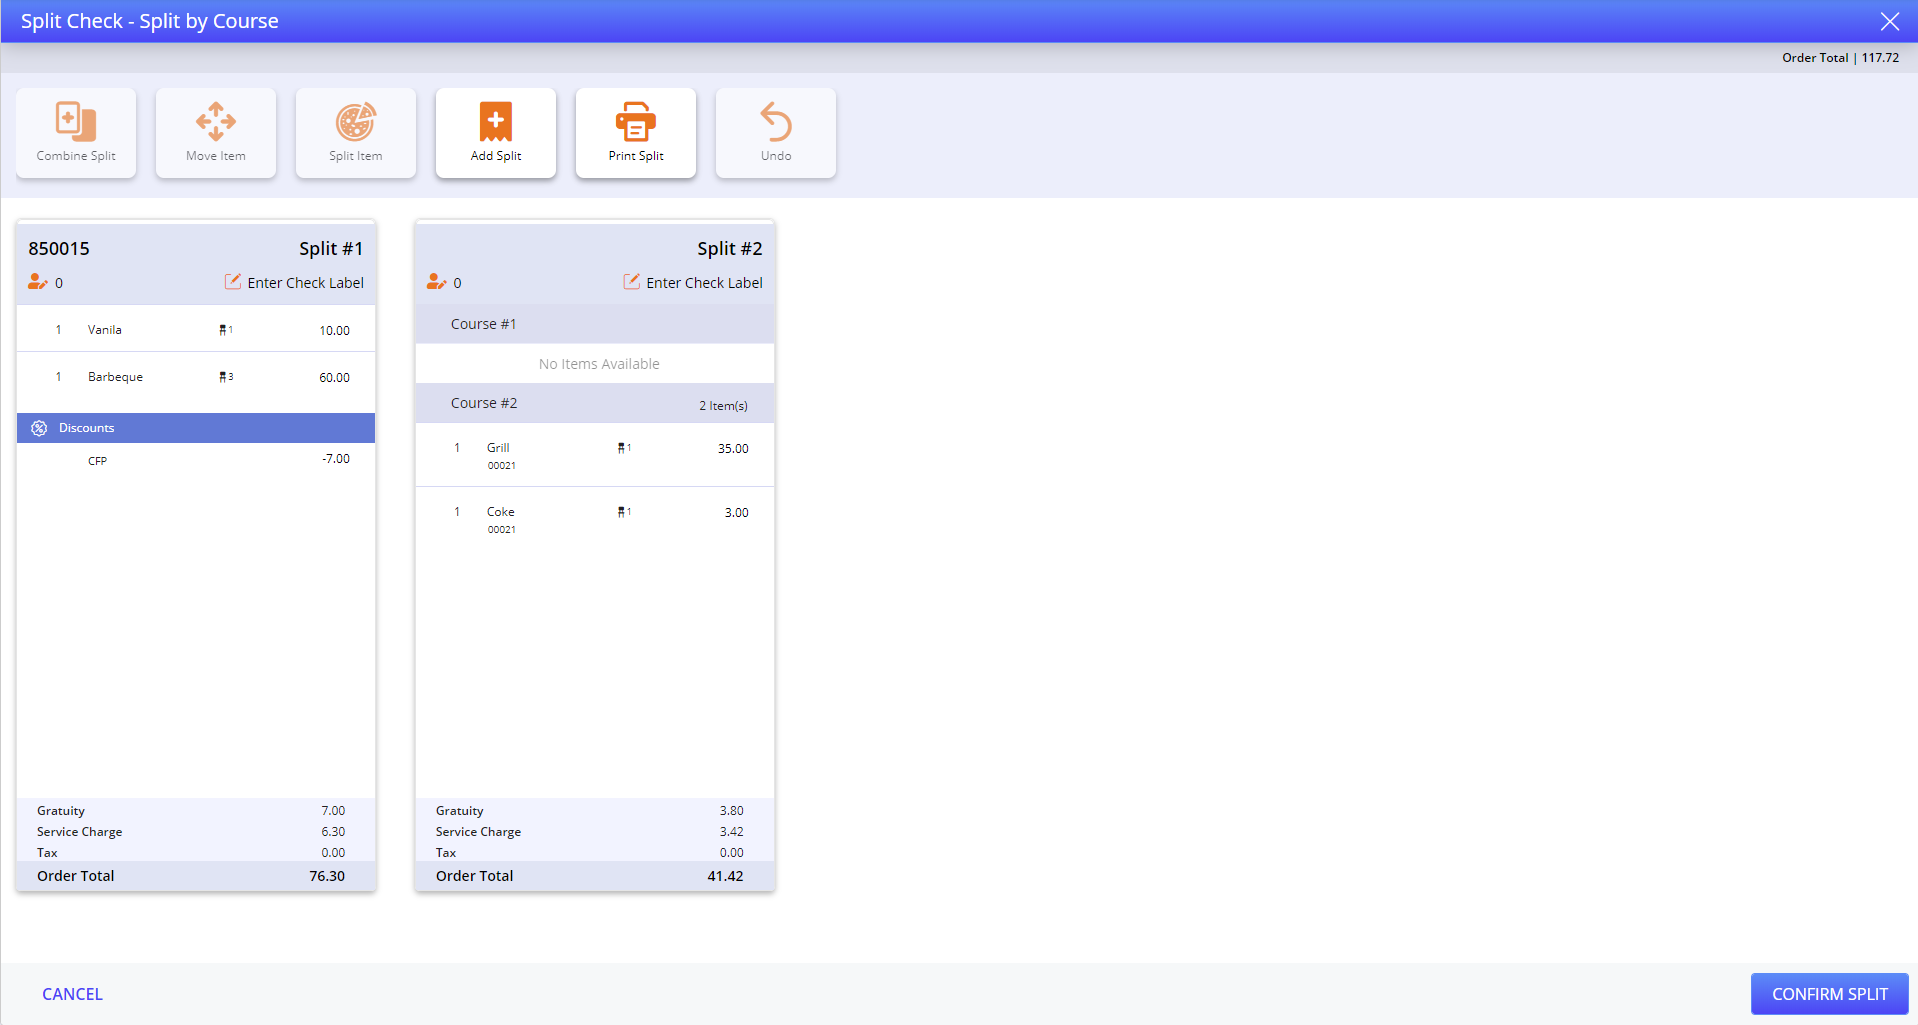
Select Confirm Split. The Print Split Check prompt appears.
Select OK. A preview of the checks split by course appears.
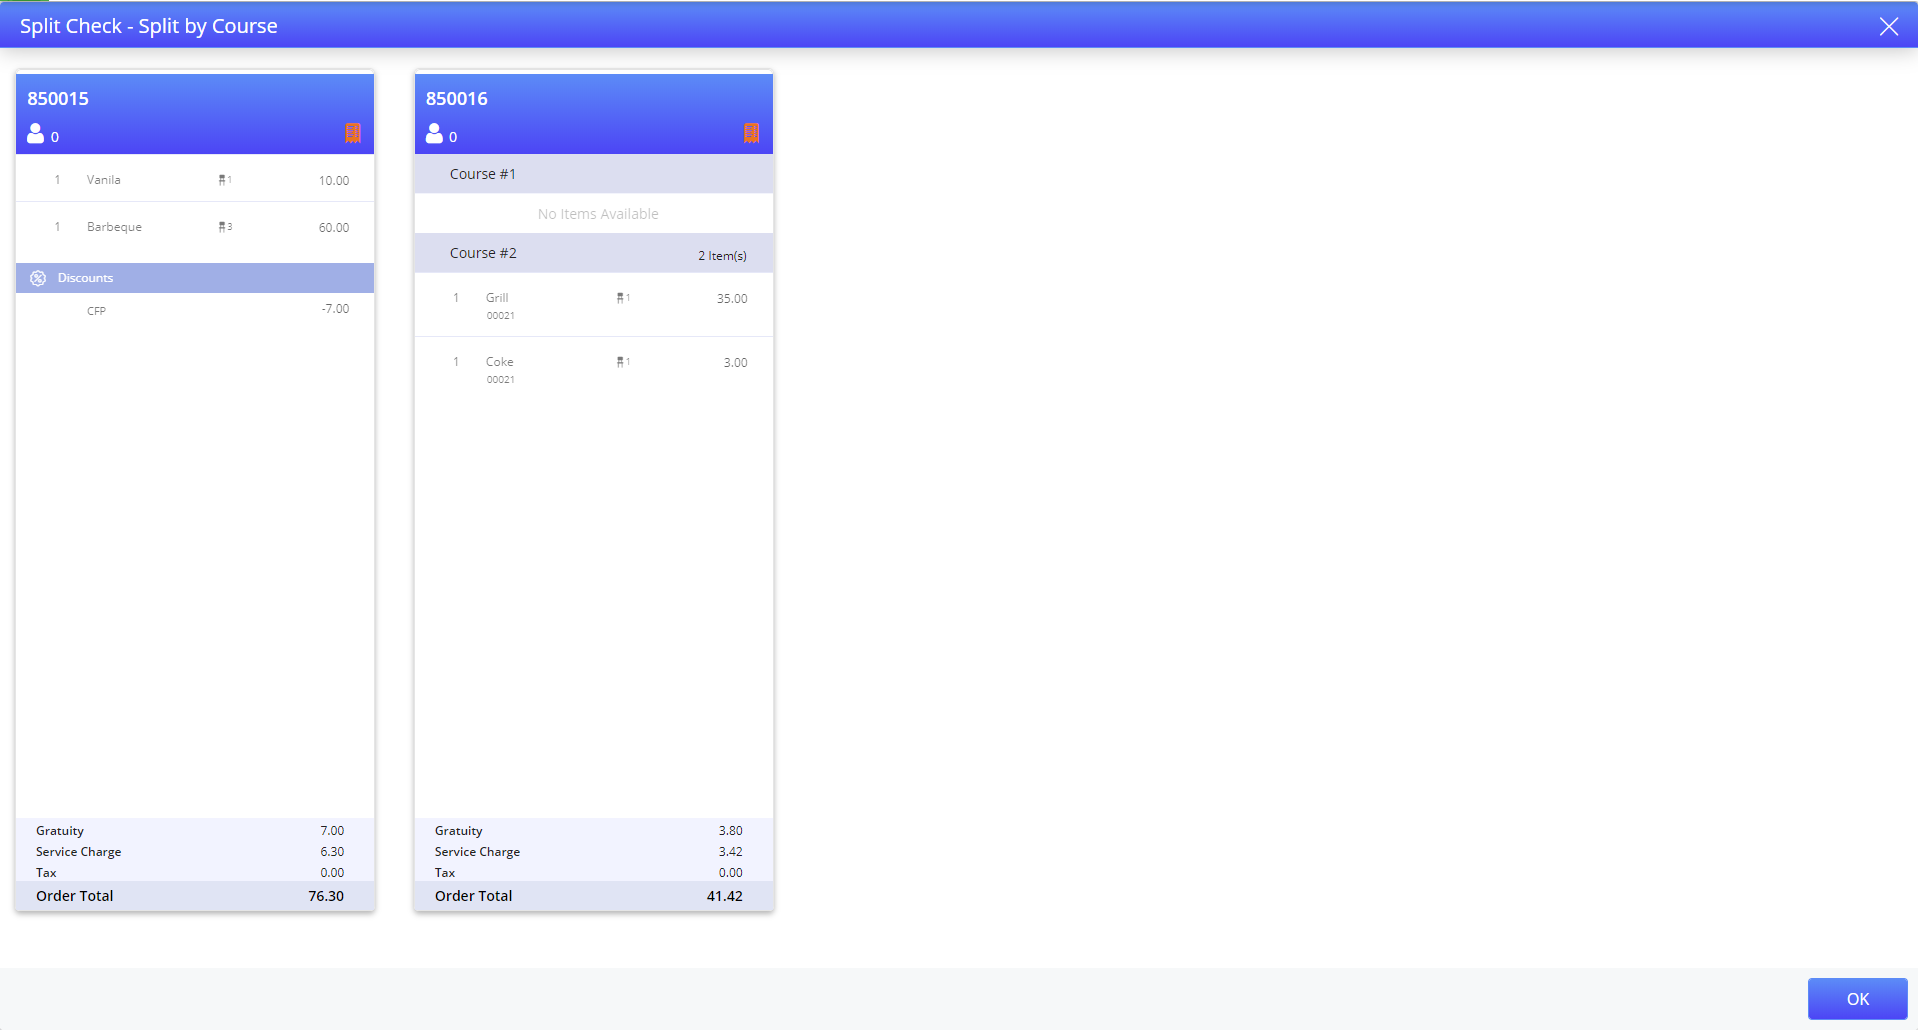
Select OK. The checks are split and saved successfully.
Important Points
-
Refer to the Split Check Actions table to perform the various action displayed in the Split Check prompt.
-
While splitting a check by course, an item can be moved from one split check to another. This does not alter the course assigned to the item. For example, Coke which belongs to Course #2 in Split #2 will still be assigned to Course #2 even after it is moved to Split #1.
Split by Item
Start a check and add items.
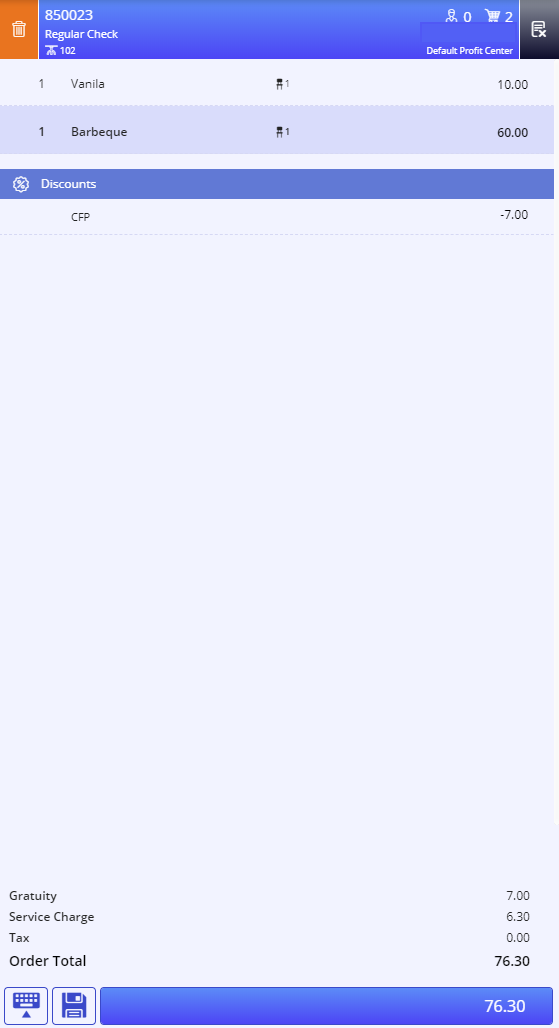
Navigate to Jump Bar ➜ Function Screen. The Function Screen appears.
Select the Split Check function button. The Split Check prompt appears.
Select Split by Item and select Next. The check is displayed as two splits. The number of splits is not proportional to the number of items in the check.
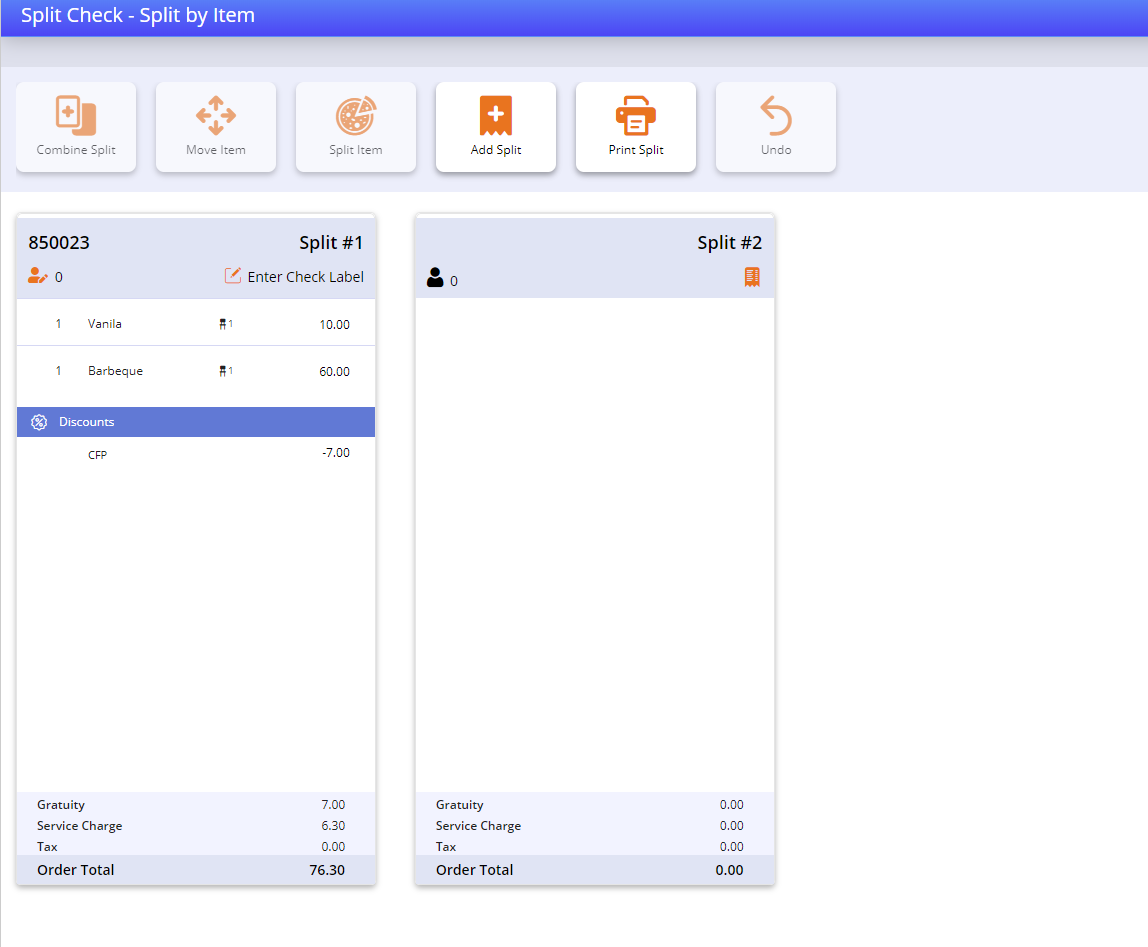
Select an item to move it to another split or retain all the items in the same split.
Select Confirm Split. The Print Split Check prompt appears.
Select OK. A preview of the checks split by items appears.
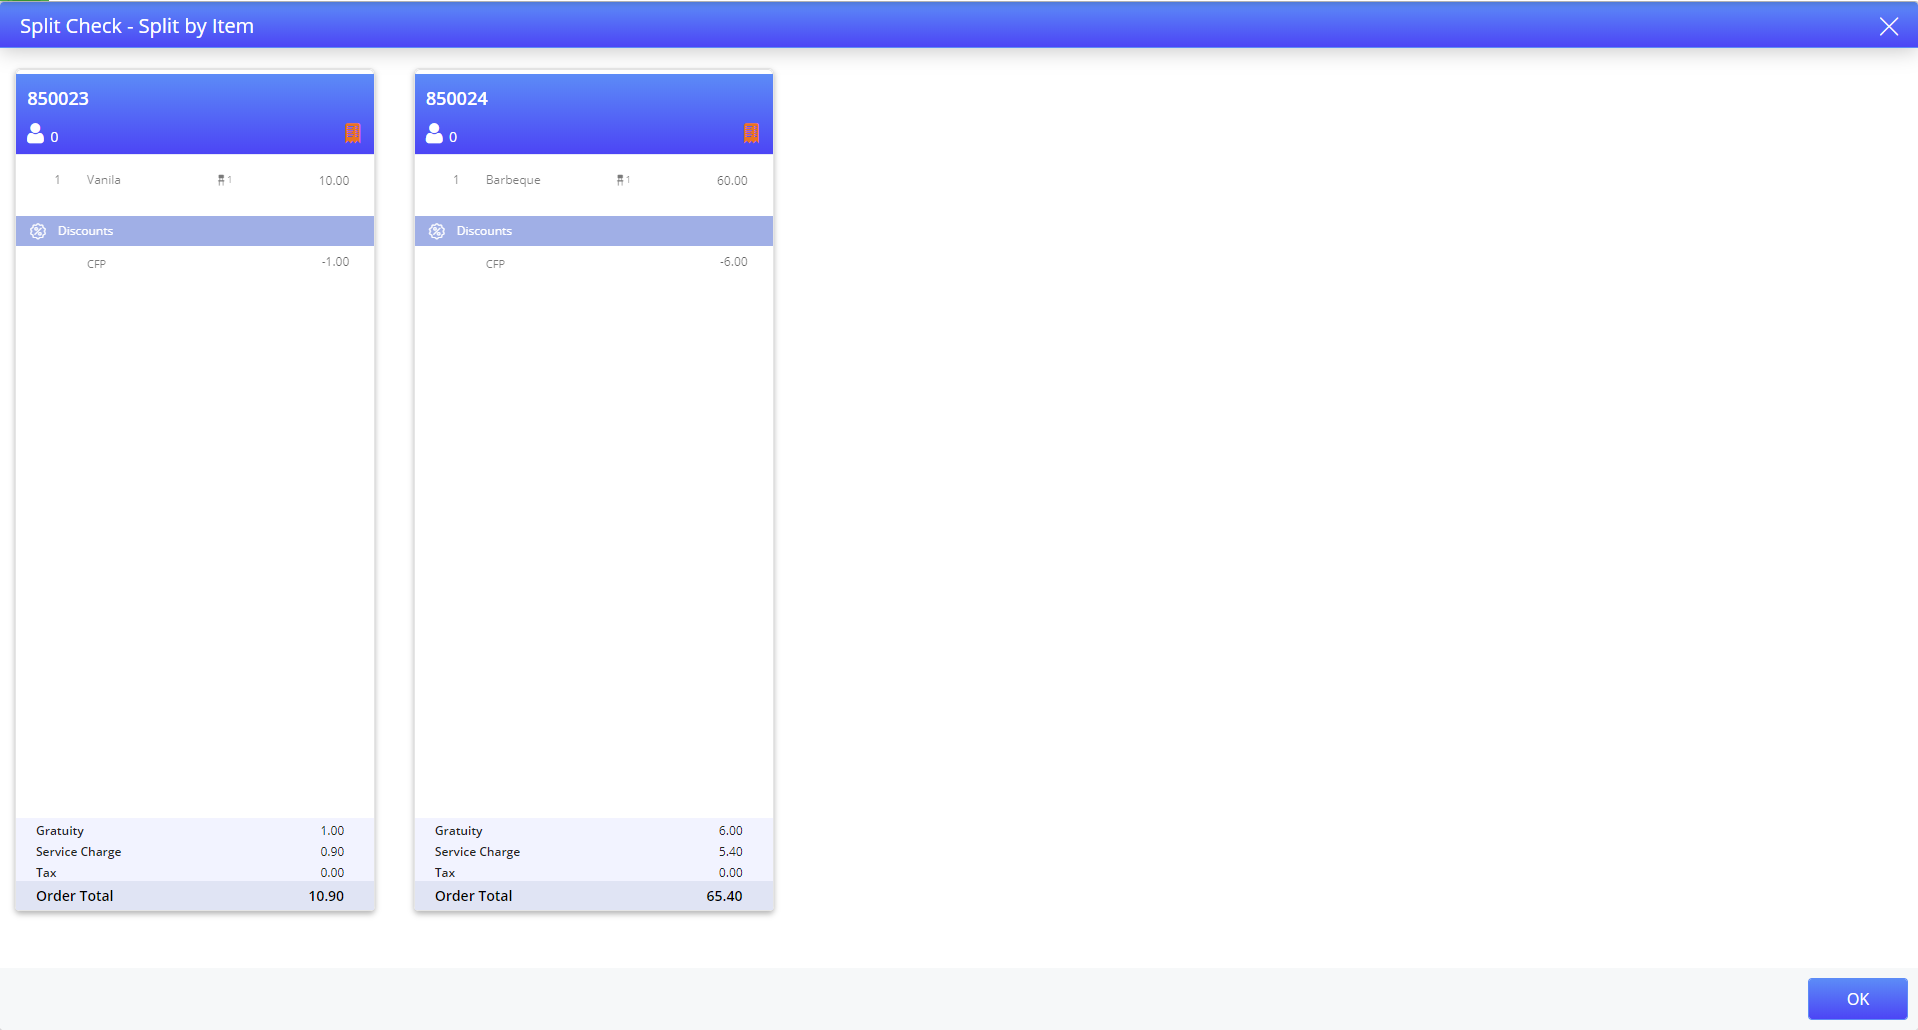
Select Ok. The checks are saved and printed successfully.
Important Points
-
Refer to the Split Check Actions table to perform the various action displayed in the Split Check prompt.
-
If a check contains any tips, partial tender, or GA Auth, it cannot be split. A message, The check can’t be split because the check includes tips or tenders appears.
Terminal Options Supported
|
Terminal Option |
Description |
|---|---|
|
340 (Do not prompt for covers) |
If this terminal option is enabled, cover prompts is prevented except for GUEST COUNT button when in use. This option gives accurate information on cover counts while tracking them by an item. When this option is enabled, the terminal considers the cover count as zero while performing a split check and then adds any "per item" cover counts. When this option and Terminal Option 92 is disabled, the terminal considers the cover count as 1 based on each split check and divides cover counts evenly. If the cover counts cannot be evenly divided, the user is prompted for covers upon splitting the check. This option overrides options 92 and 315. |
|
490 (Automatically split check when using restricted tenders) |
If this terminal option is enabled, restricted tender is prevented from being paid for restricted items by automatically splitting the check at the time of tender. When the option is disabled and the restricted tenders are configured, the check is not automatically split at the time of tender. Related terminal options: 491 and 492 |
|
1369 (Allow restricted tenders to apply for adding funds) |
When this terminal option is enabled, the check splits to restricted and unrestricted items when a restricted tender is applied while performing a credit transaction such as adding funds to a gift card using the Add Funds (#334) function button. |
|
1003 (Print Open Check only once) |
If this terminal option is enabled, open check is prevented from being printed more than once by employees with a security level of 2 or less. They require a manager override to print an open check more than once. Employees with security level of 3 or higher can ‘override’ this option. Enabling this option affects Save Print, Save Check, Split Check, Combine Check and Transfer Check but does not affect tendering. |
Assign to Seat
Assign to Seat option enables users to update seats numbers on the check. The seat numbers of the items are updated in ascending order in the split checks. Even if an item has seat number assigned as 1 in the main check, when the item is moved to a split check, seat number gets updated to 2.
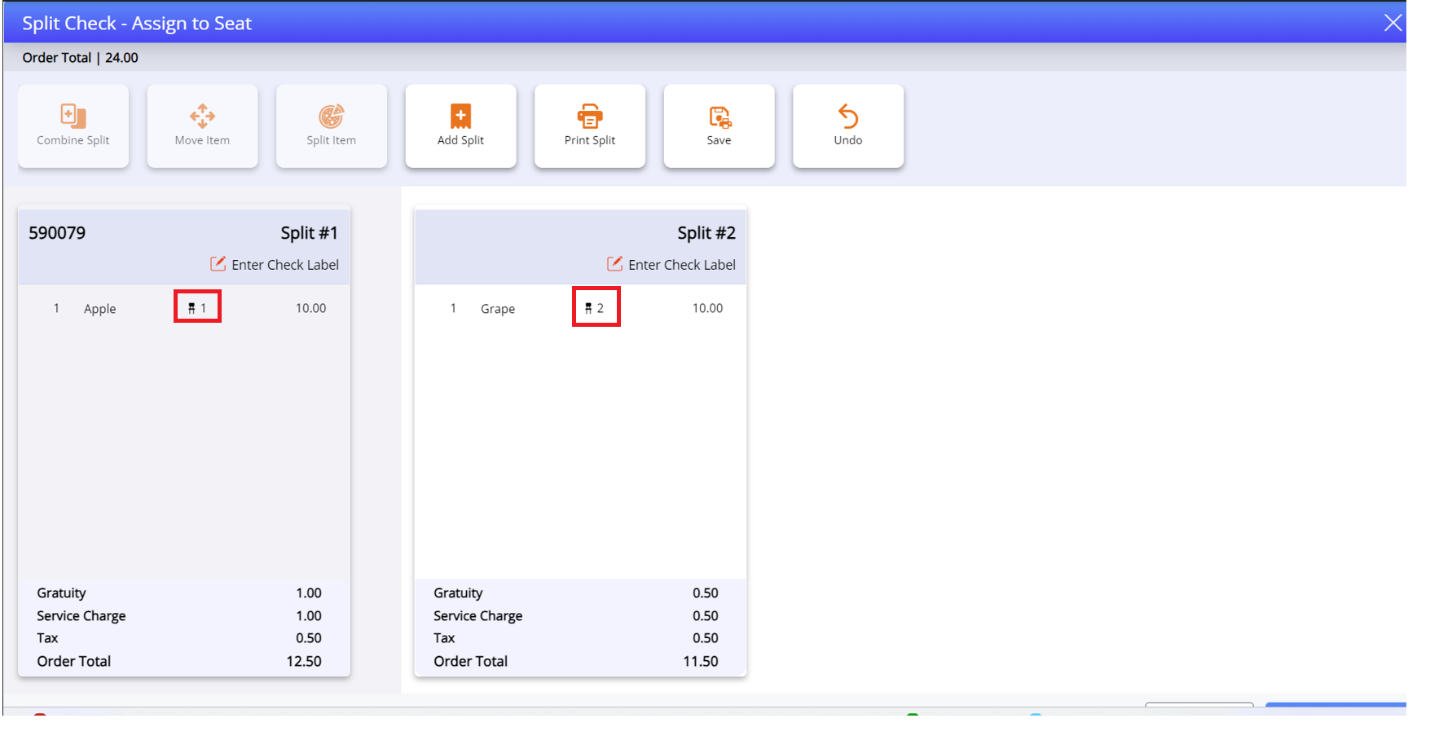
The Assign to Seat option is only displayed at the terminal when EnableAssigntoSeat (POS Configuration ➜ Profiler ➜ POS Terminal ➜ Files ➜ Settings.ini ➜ Settings) is set to True. By default, this field is set to False
Select Save to save the updated seat information. When Save is selected, checks are not split but the updated seat information based on the split checks is saved and a Print Seat Receipts prompt is displayed.
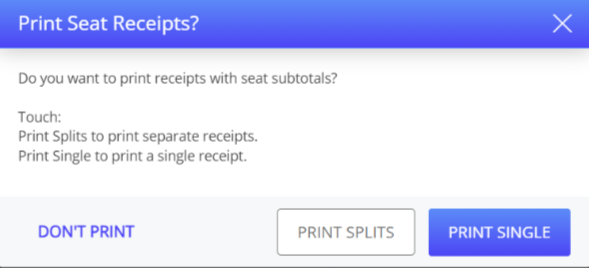
The Print Seat Receipts prompt displays the following options:
|
Option |
Description |
|---|---|
|
Print Single |
Select this to print a single chit with items grouped by seat. |
|
Print Splits |
Select this to print all splits. |
|
Don’t Print |
Select this to not print anything. |
Assign to Seat function also enables users to move items between checks and the item’s seat information is updated on the split check.
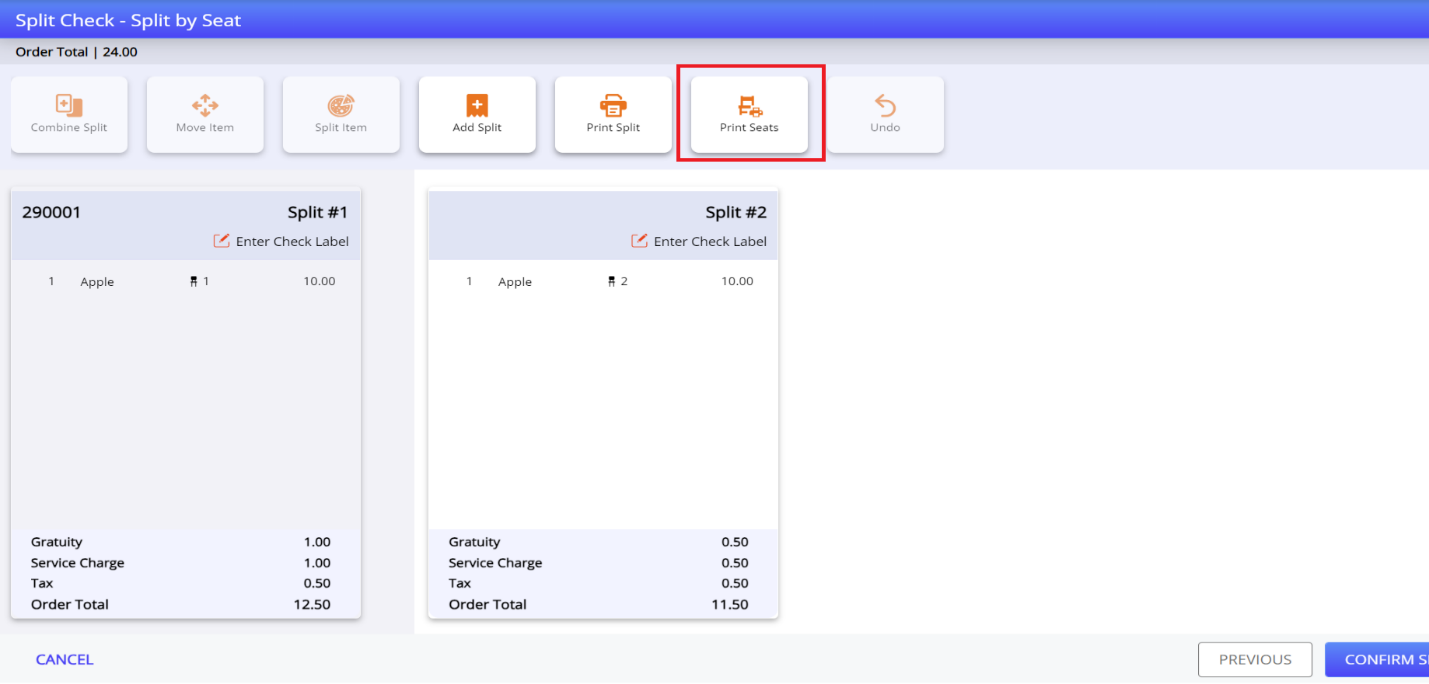
Select Print Seats option to print receipt with all the items segregated and grouped by their seats along with their financial information. The checks are not actually split but the cumulative data of all splits are printed in a single receipt.
Select Confirm Split to split the checks.
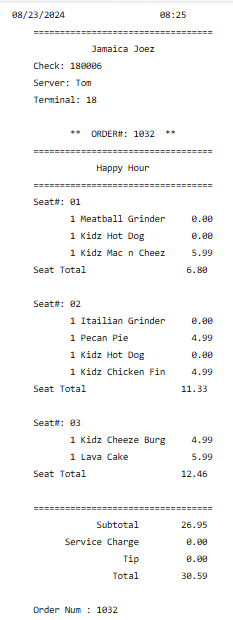
Sample Receipt