POS Terminal Reports
The following reports are supported in the Agilysys InfoGenesis POS Terminal Application as of now:
Server Shift Reset
The Server Shift Reset button allows the user to reset their shift and generate the server shift report.
Navigate to Jump Bar ➜ Report Screen. The Reports screen appears.
Select Server Shift Reset button. A confirmation prompt appears.
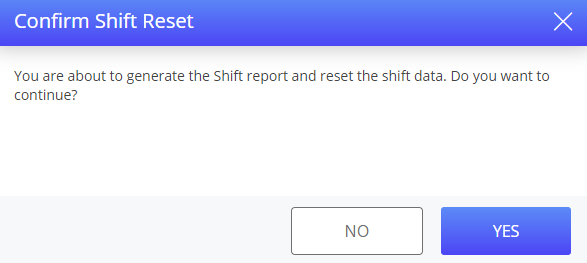
Select Yes. The Server Shift Reset wizard appears.
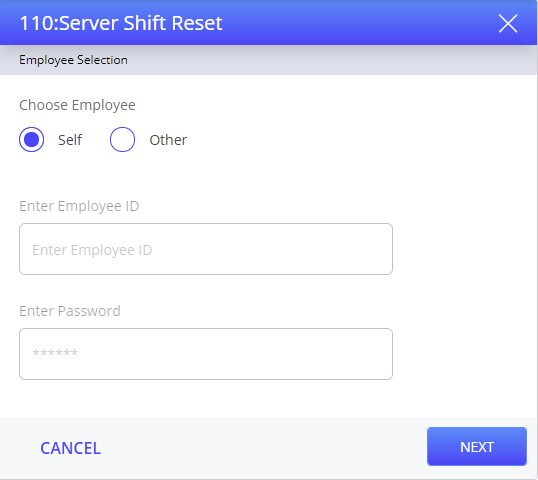
Select Self or Other based on the requirement.
Enter credentials if generating the report for another employee.
Select Next. The Open Check Verification wizard appears if the employee has any open checks.
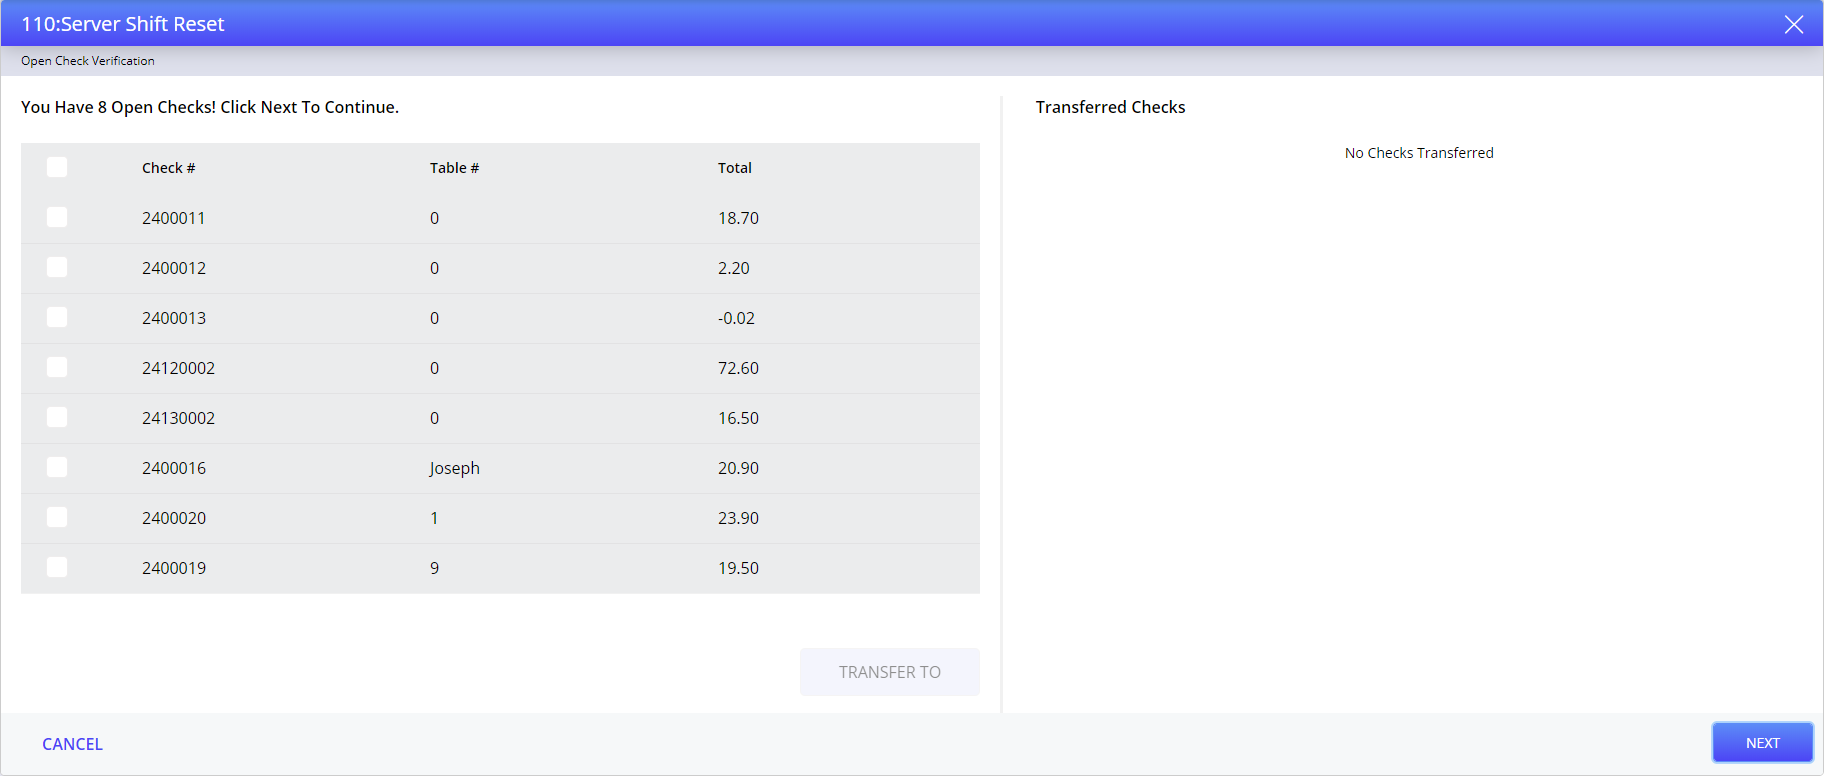
To skip check transfer step, select Next.
Select the checks to be transferred to another employee. The Transfer To button gets enabled.
Select Transfer To. The Transfer Server prompt appears.
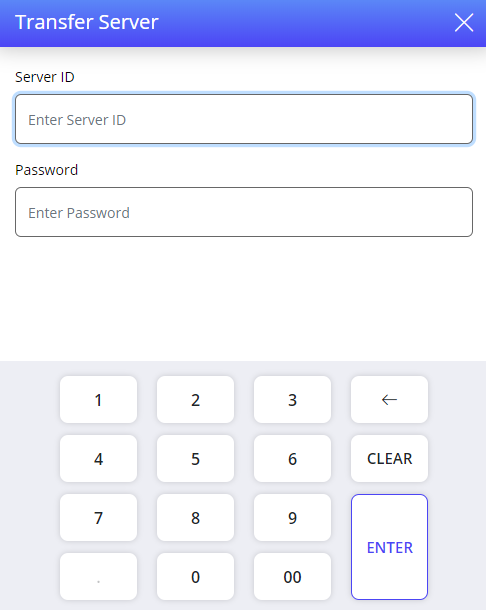
Refer to the following table and fill in the fields to transfer the open checks:
|
Field |
Description |
|---|---|
|
Server ID |
The unique ID of the server to whom the checks must be transferred. |
|
Password |
The password of the server. It is an optional field; the user must enter password only if it is configured in IGCM for the respective server. |
Select Enter. The selected checks are moved under Transferred Checks wizard appears.
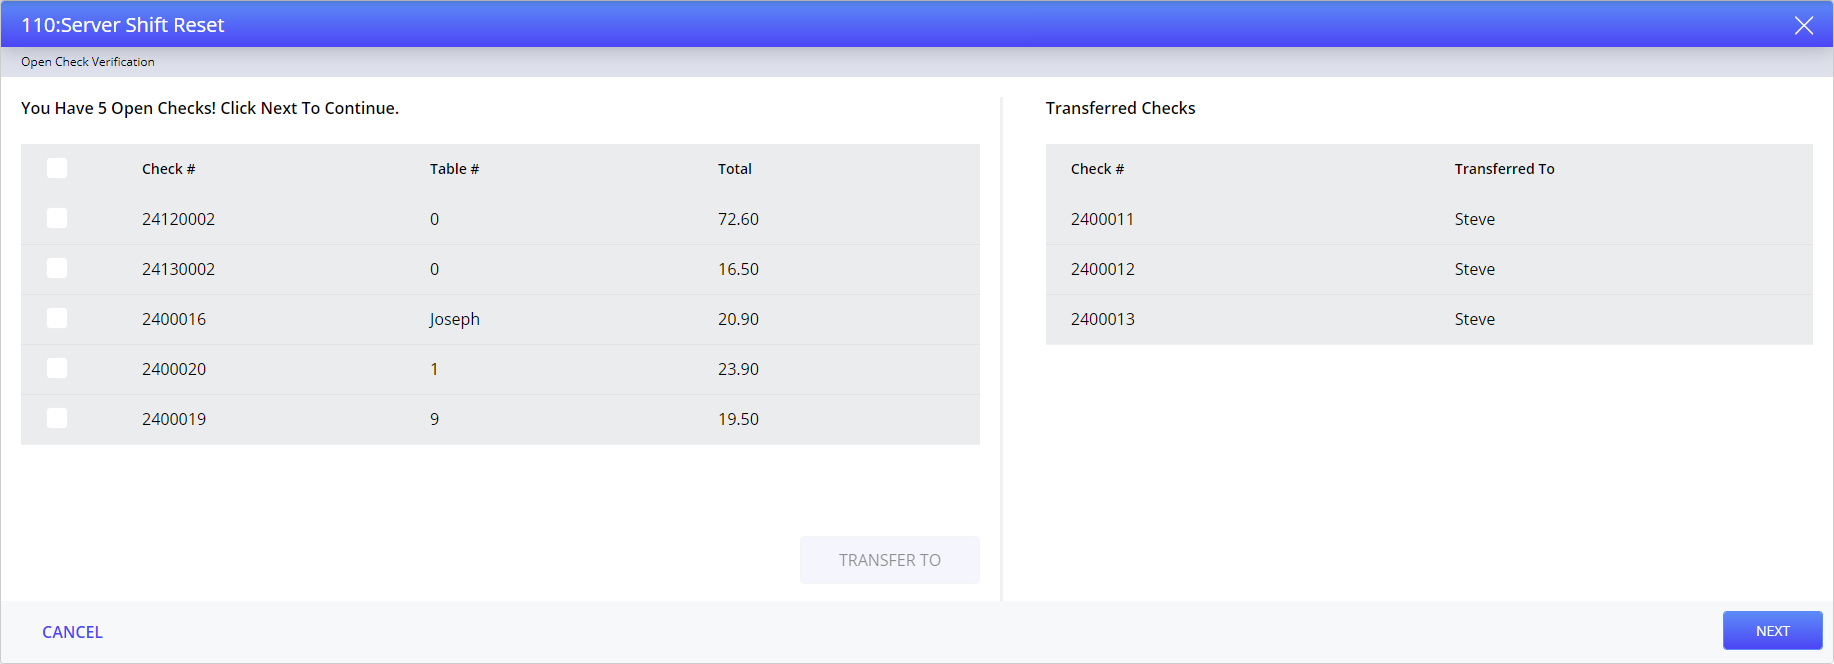
Select Next. The Shift Reset: Declare Cash Tip prompt appears.
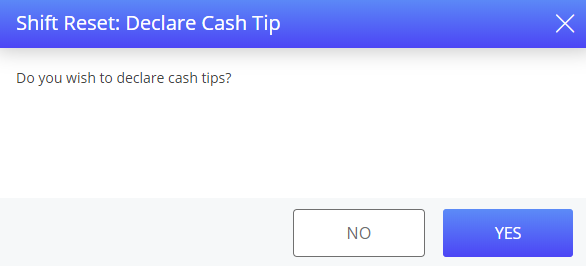
The Shift Reset: Declare Cash Tip prompt appears only if the Declare cash tips checkbox is enabled for the respective job code in the Job Code menu in IGCM. The Declare Cash Tips applicable only for Server Shift Reset and Shift Reset.
Select Yes. The Declare Cash Tips prompt appears.
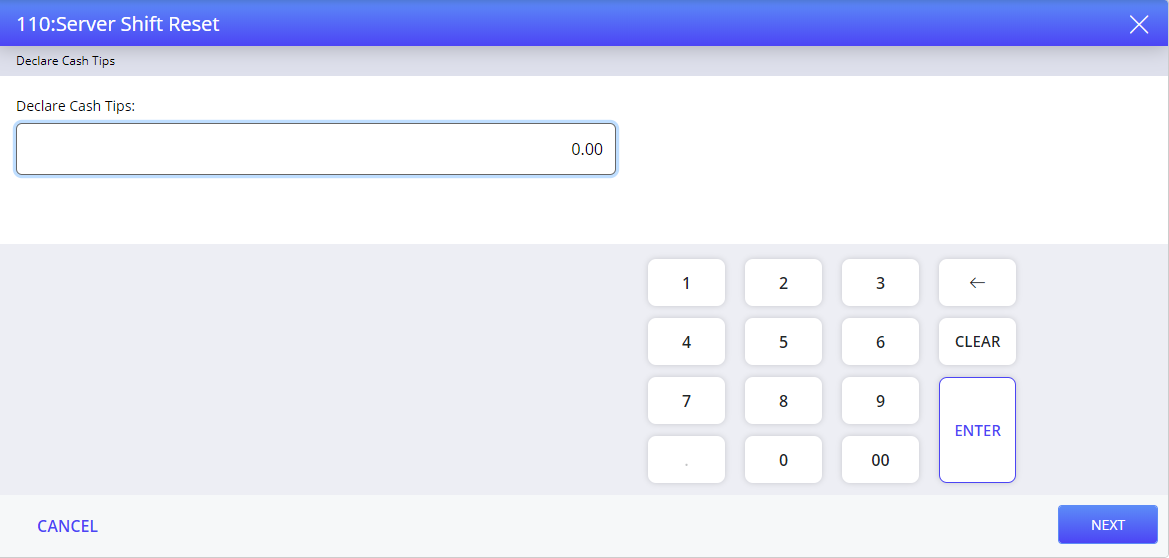
Enter cash tip amount.
Select Enter or Next. A confirmation prompt appears.
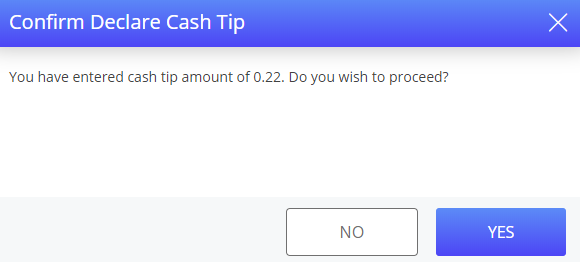
Select Yes. The Tip Transfer wizard appears.
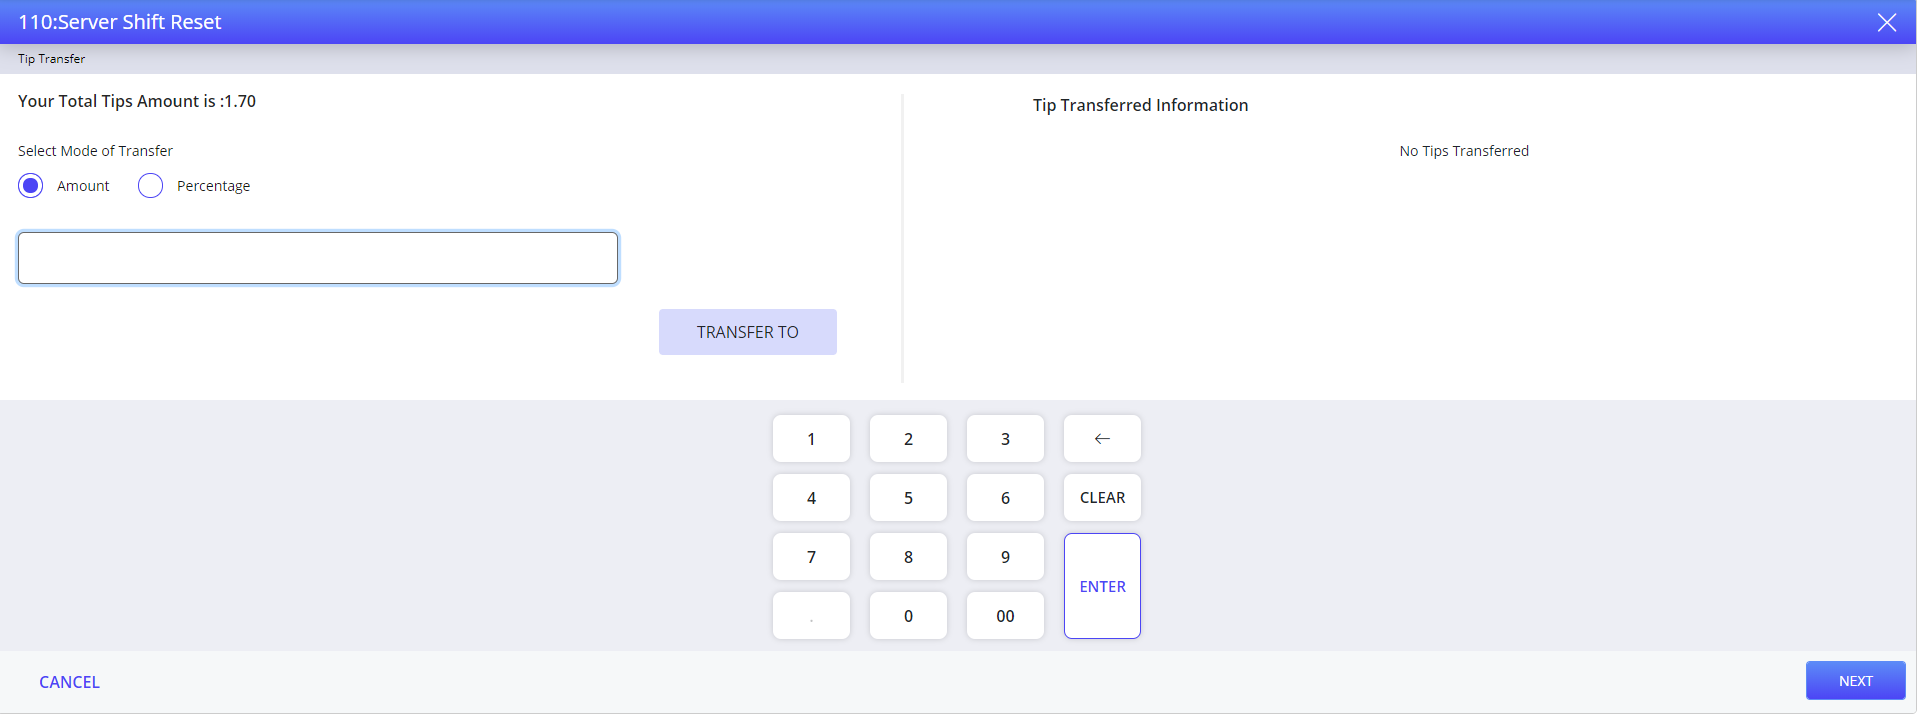
The Tip Transfer wizard appears only if the logged-in employee has any tips, and Terminal Option 210 (Shift Reset: Automatically prompt for tip transfer and tip payout) is enabled.
Refer to the following table and fill in the fields to transfer the tip amount:
|
Field |
Description |
|---|---|
|
Select Mode of Transfer |
|
|
Amount |
Transfers tip amount in amount. |
|
Percentage |
Transfers tip amount in percentage. |
|
Tips Amount |
Enter total tip amount to be transferred to another employee. |
|
Tips Percentage |
Enter total tip amount in percentage to be transferred to another employee. |
To skip Tip Transfer step, select Next.
Select Transfer To or Enter. The Tip Transfer prompt appears.
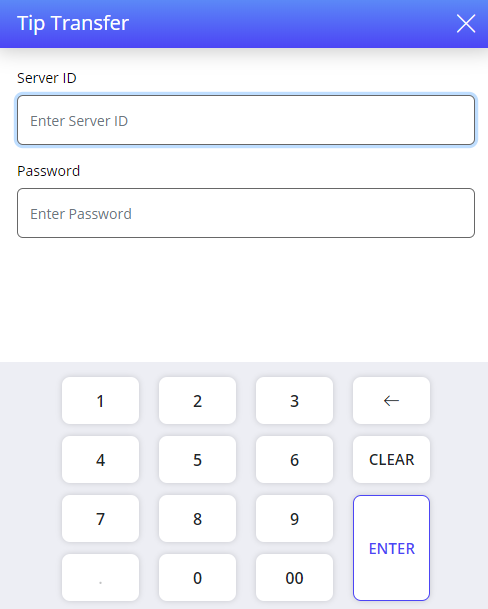
Refer to the following table and fill in the fields to transfer tip amount:
|
Field |
Description |
|---|---|
|
Server ID |
The unique ID of the employee to whom the tips must be transferred. |
|
Password |
The password of the employee. It is an optional field; the user must enter password only if it is configured in IGCM for the respective employee. |
Select Enter. A confirmation prompt appears.
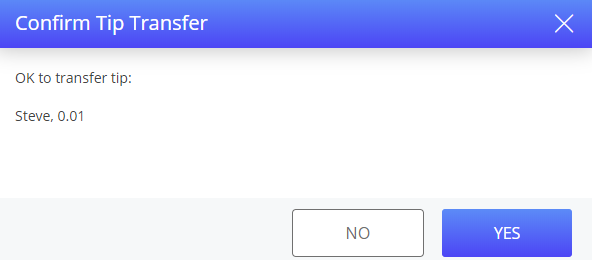
Select Yes to confirm the tip transfer. The tip amount is transferred and the employee to whom the tip is transferred is added under Tip Transferred Information.
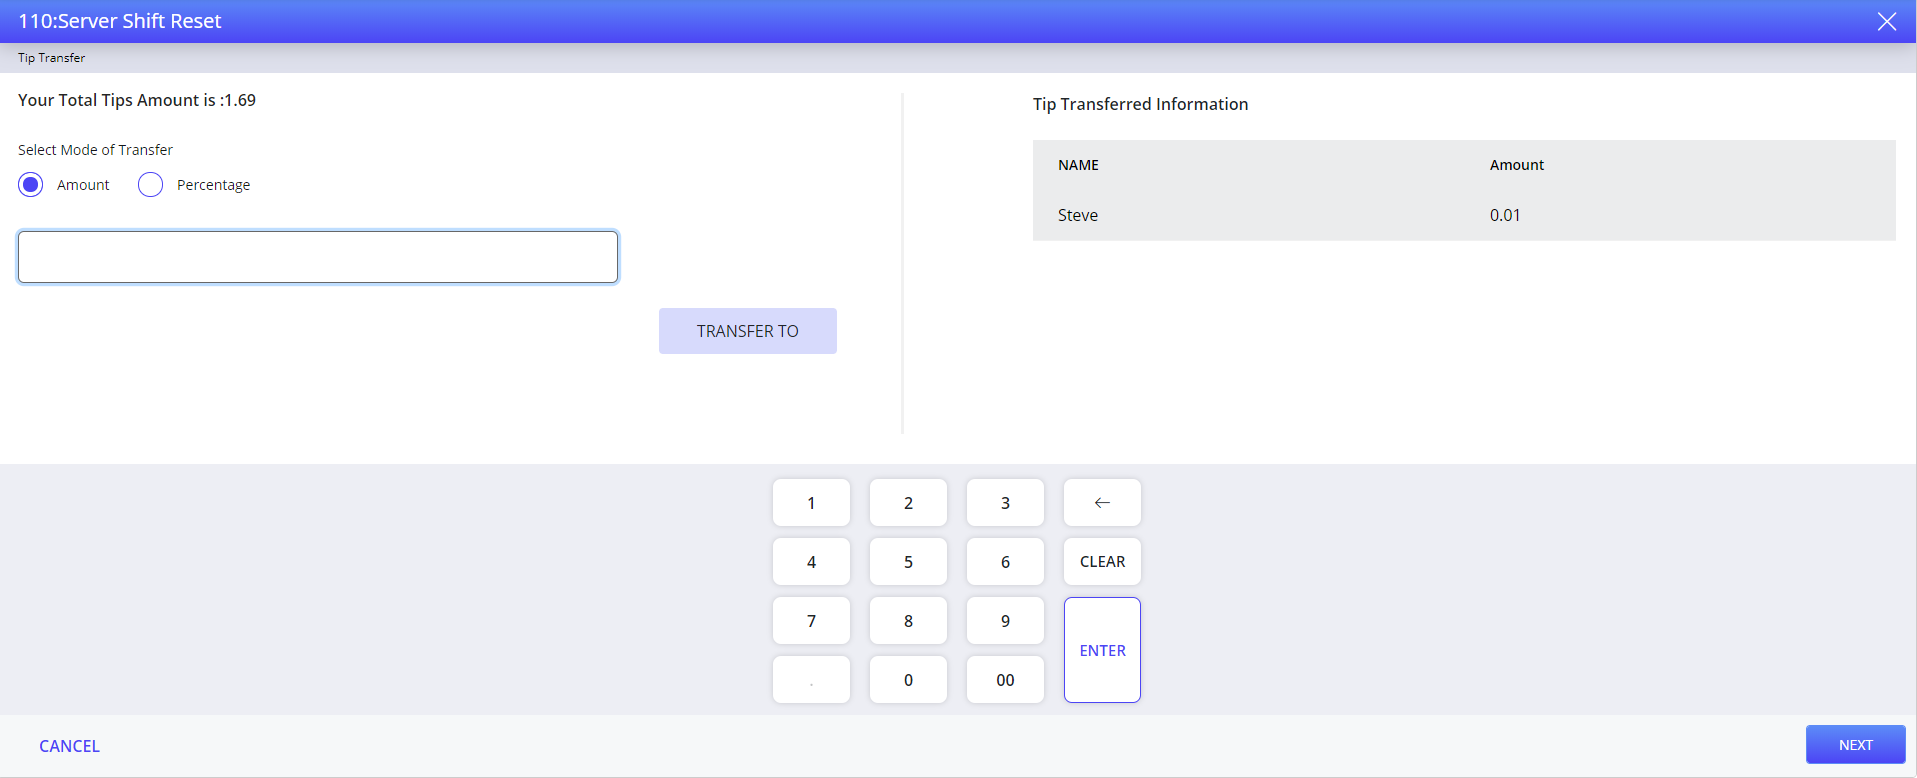
Select Next. The Tip Payout wizard appears.
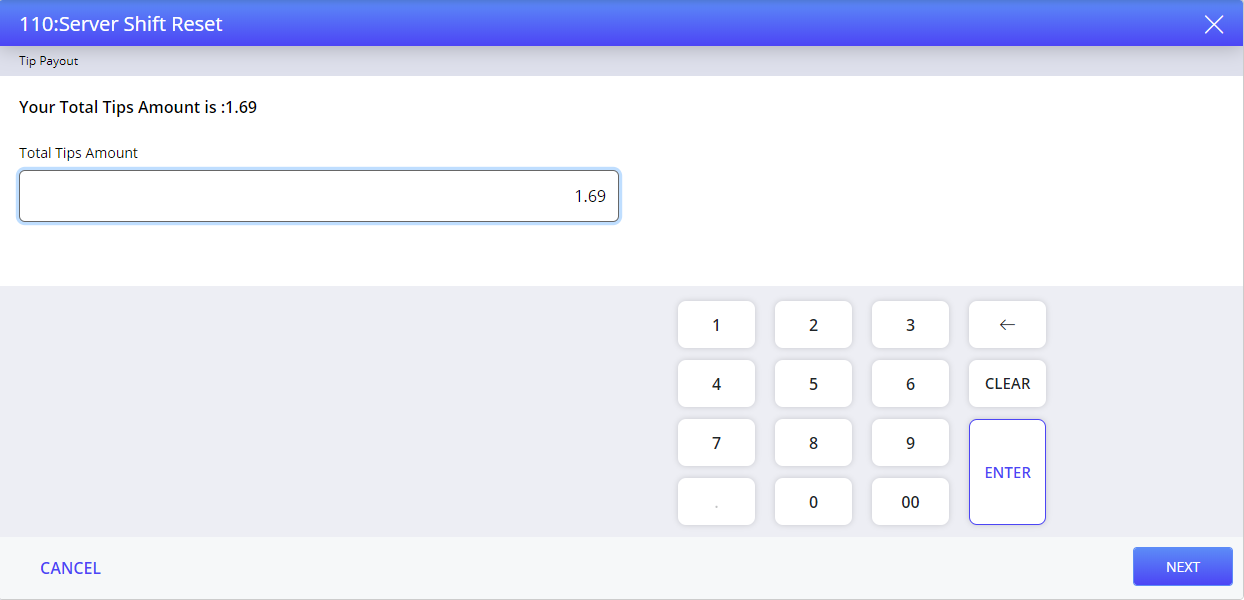
The Tip Payout wizard appears only if the logged-in employee has any tips, and Terminal Option 210 (Shift Reset: Automatically prompt for tip transfer and tip payout) is enabled.
The total tips amount of the server is automatically appearing in the Total Tips Amount field.
Select Enter or Next to payout total tips amount, else enter total tips amount. The Tip Payout: Print Chit? prompt appears.
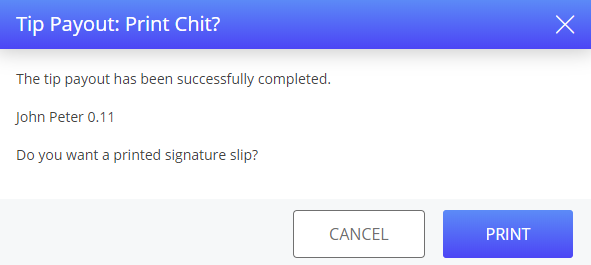
Select Print to print the signature slip. The Server Shift Reset Summary appears.
Select Done. The Server Shift Reset Summary is printed successfully, and a confirmation prompt appears.
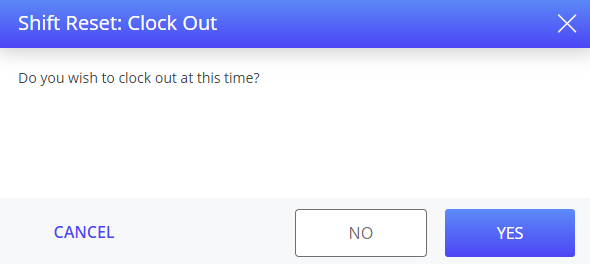
The Clock Out confirmation prompt appears only if the Terminal option 211 (Shift Reset: Automatically prompt for clock-out) is enabled.
Select Yes to clock out. The server shift reset is completed successfully.
Sample Report
|
When the terminal is Online |
When the terminal is LSS |
|---|---|
|
|
|
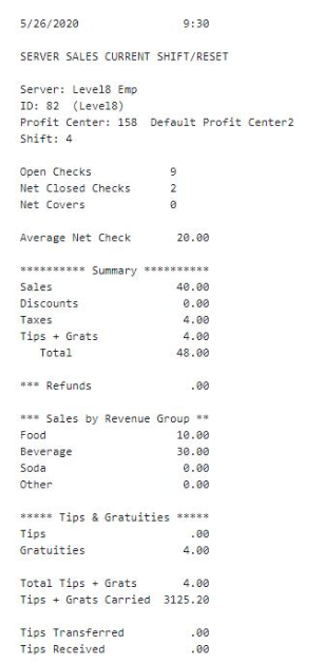
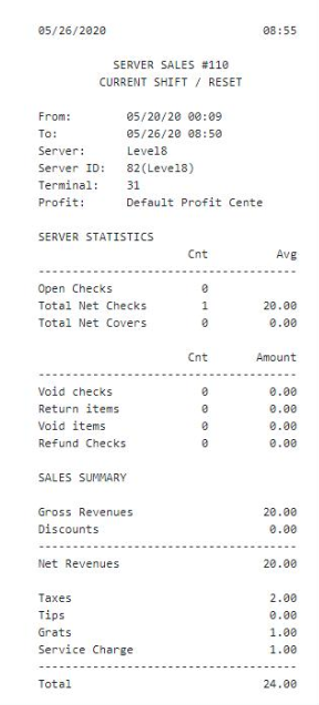
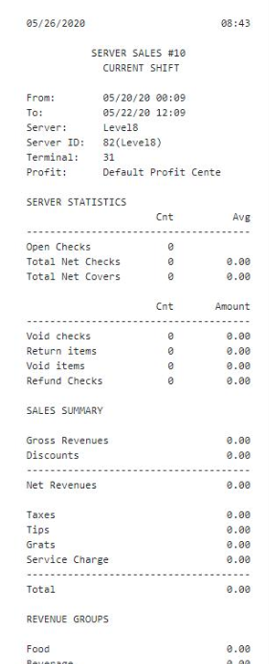
Server Shift Report
The Server Shift Report button allows the user to generate the server shift report.
Select the Server Shift Report button. The Server Shift Report wizard appears.
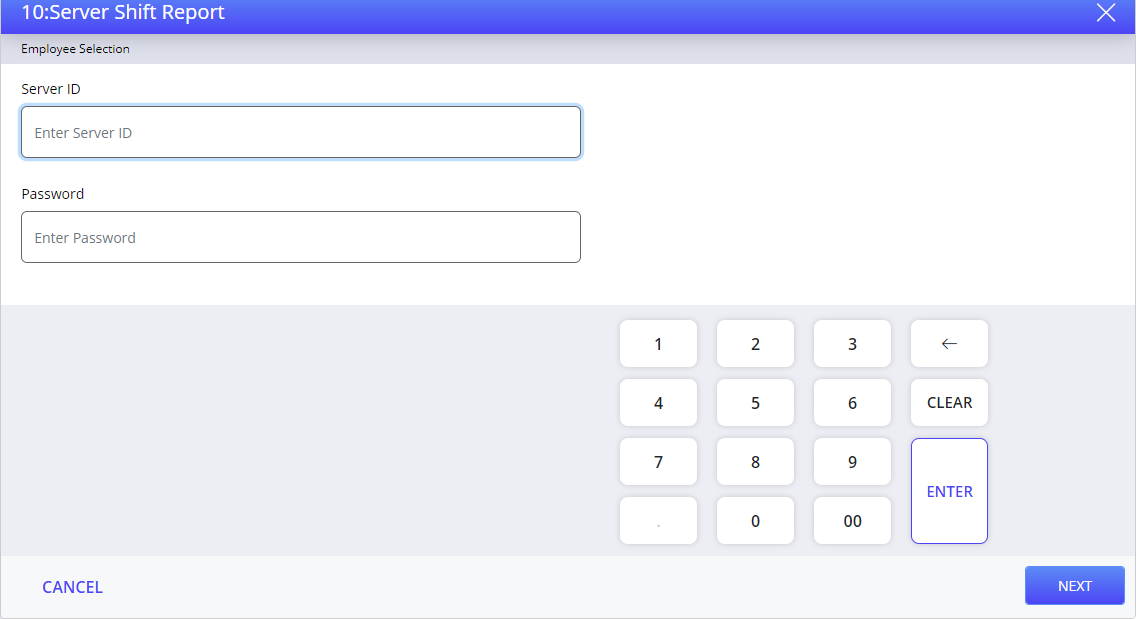
Refer to the following table and fill in the fields to generate the server shift report:
|
Field |
Description |
|---|---|
|
Server ID |
The unique ID of the server who is generating the server shift report. |
|
Password |
The password of the server. It is an optional field; the user must enter password only if it is configured in IGCM for the respective server. |
Select Enter or Next. The Server Shift Report Summary appears.
Select Done
Sample Report
|
When the terminal is Online |
When the terminal is LSS |
|---|---|
|
|
|
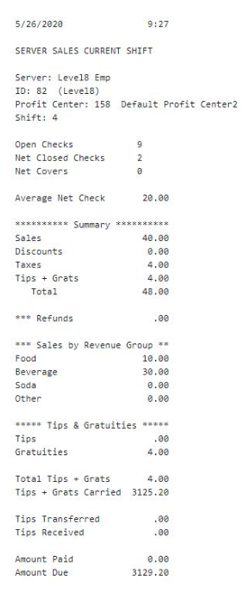
Terminal Option Supported
|
Terminal Option |
Description |
|---|---|
|
207 (Print coupon data on shift report) |
If this terminal option is enabled, the coupon data is included in the Server Shift Report. |
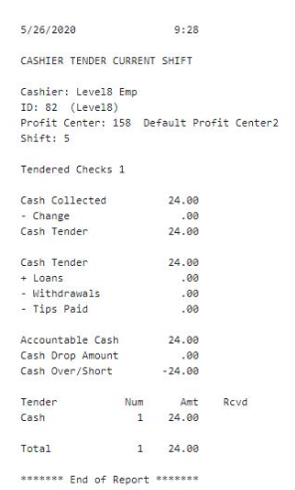
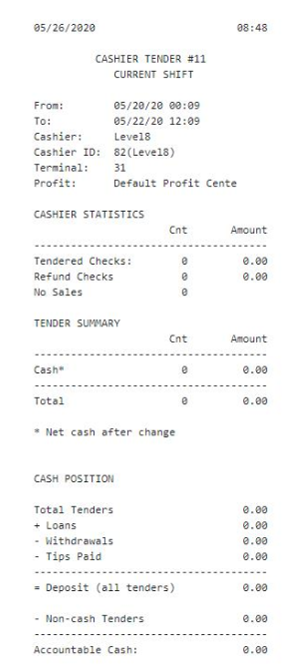
Cashier Shift Report
The Cashier Shift Report button allows the user to generate the cashier shift report.
Select Cashier Shift Report button. The Cashier Shift Report wizard appears.
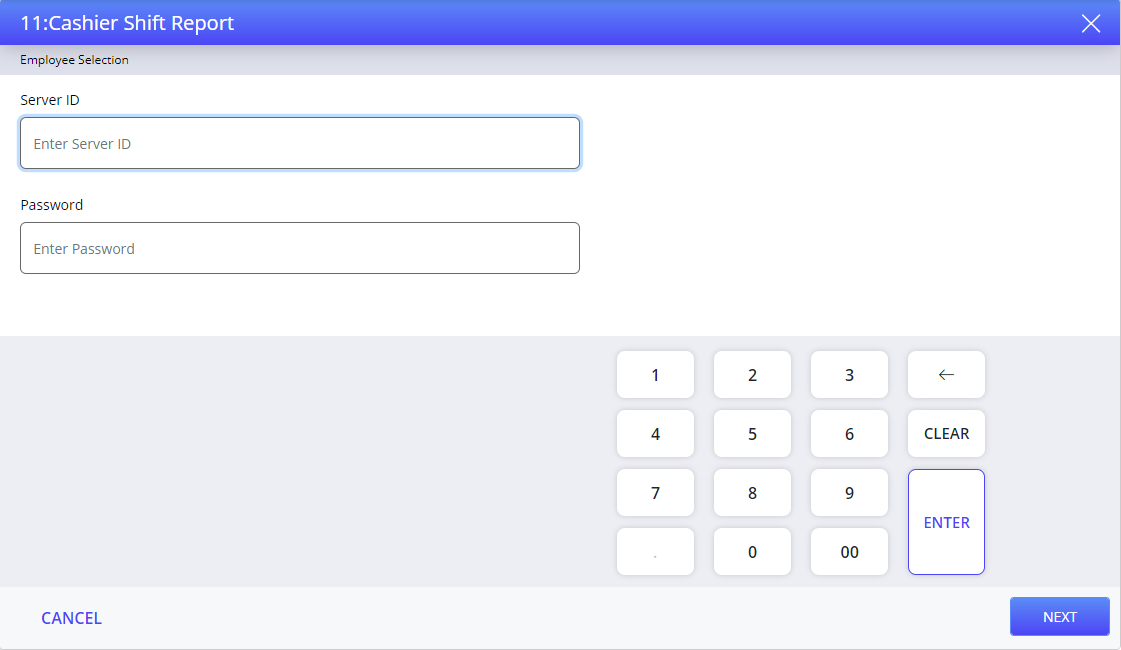
Refer to the following table and fill in the fields to view the cashier shift report:
|
Field |
Description |
|---|---|
|
Server ID |
The unique ID of the server to generate cashier shift report. |
|
Password |
The password of the server. It is an optional field; the user must enter password only if it is configured in IGCM for the respective server. |
Select Enter or Next. The Cashier Shift Report Summary appears.
Select Done.
Sample Report
|
When the terminal is Online |
When the terminal is LSS |
|---|---|
|
|
|
Shift Cashier Reset
The Shift Cashier Reset button allows the user to reset their shift and generate the cashier shift report.
Select Shift Cashier Reset button. A confirmation prompt appears.
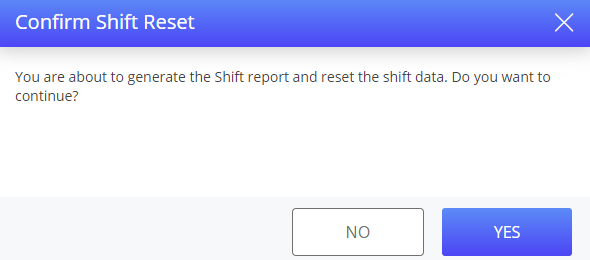
Select Yes. The Shift Cashier Reset wizard appears.
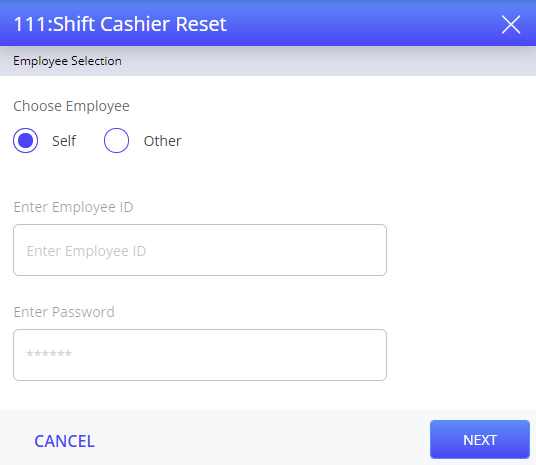
Select Next to reset the cashier details of the logged-in employee.
Select Other radio button to reset the cashier details of another employees.
Refer to the following table and fill in the fields to reset the shift details of another employee:
|
Field |
Description |
|---|---|
|
Choose Employee |
|
|
Self |
|
|
Enter Employee ID |
This field is disabled since the employee is the logged in employee. |
|
Enter Password |
This field is disabled since the employee is the logged in employee. |
|
Other |
|
|
Enter Employee ID |
The unique ID of the employee to reset the shift cashier. |
|
Enter Password |
The password of the employee. It is an optional field; the user must enter password only if it is configured in IGCM for the respective employee. |
Select Next. The Open Check Verification wizard appears if the employee has any open checks.
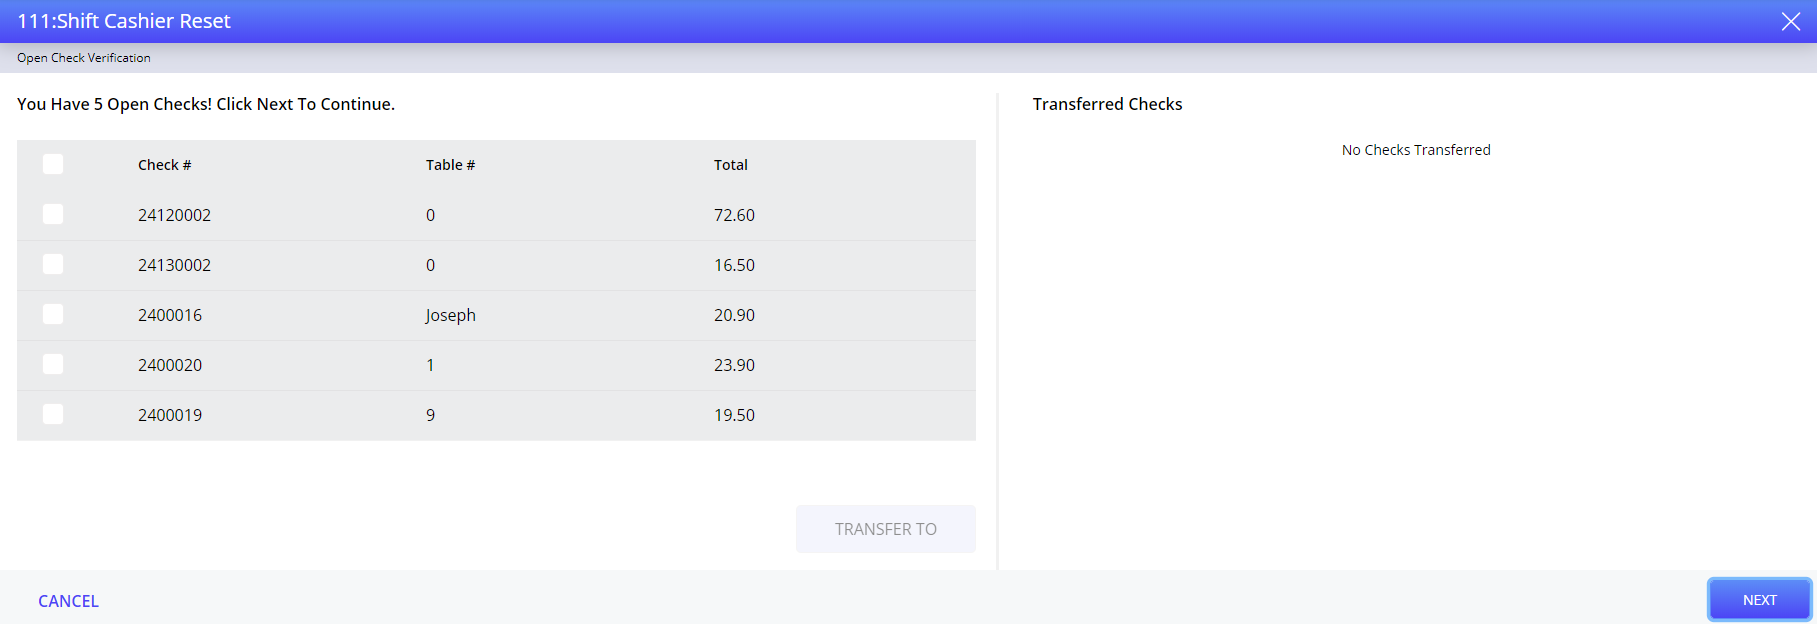
Select the required open checks to transfer to another server.
Select Transfer To. The Transfer Server prompt appears.
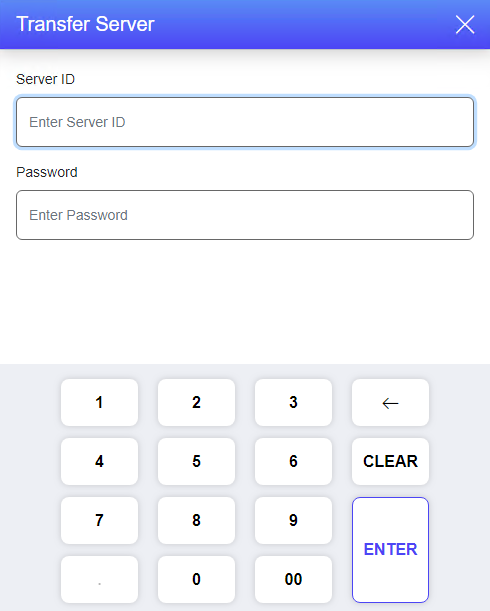
Refer to the following table and fill in the fields to transfer the open checks:
|
Field |
Description |
|---|---|
|
Server ID |
The unique ID of the server to whom the checks must be transferred. |
|
Password |
The password of the server. It is an optional field; the user must enter password only if it is configured in IGCM for the respective server. |
Select Enter. The selected checks are moved under Transferred Checks wizard appears.
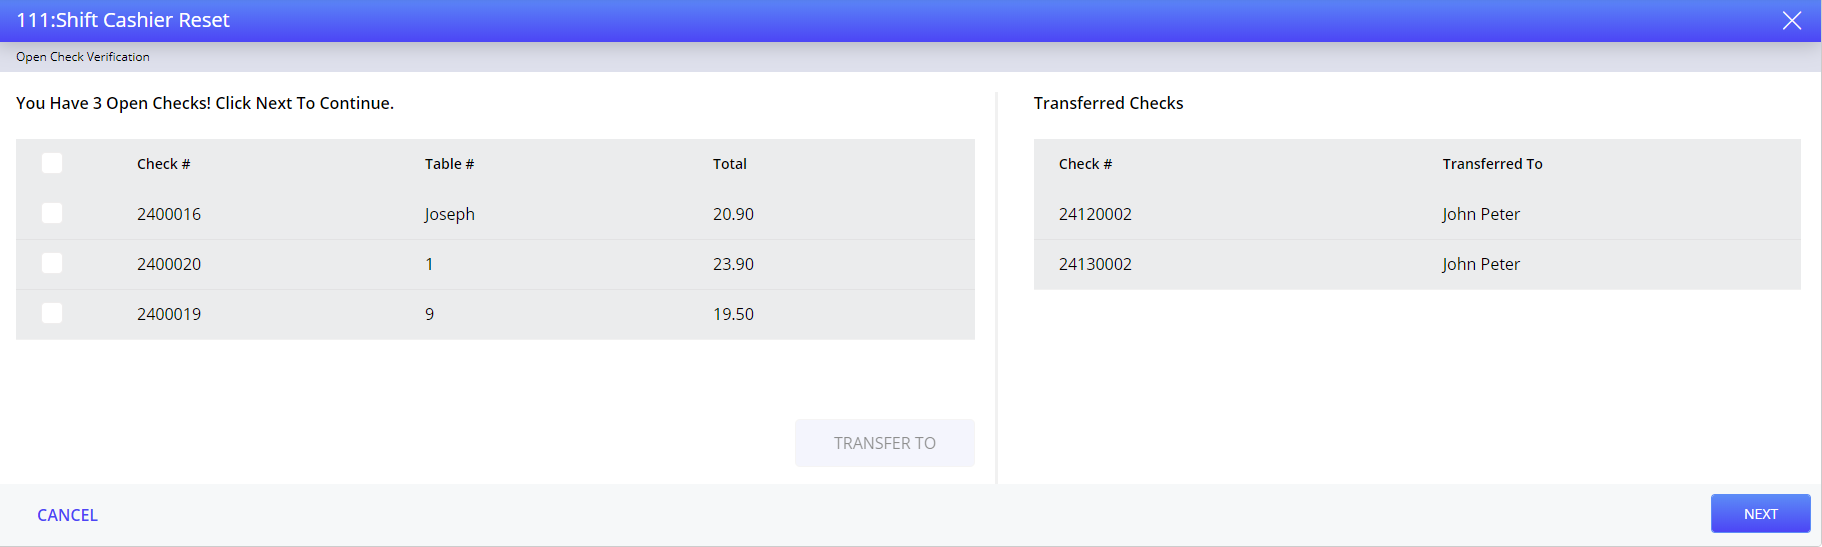
Select Next. The Tip Transfer wizard is displayed.
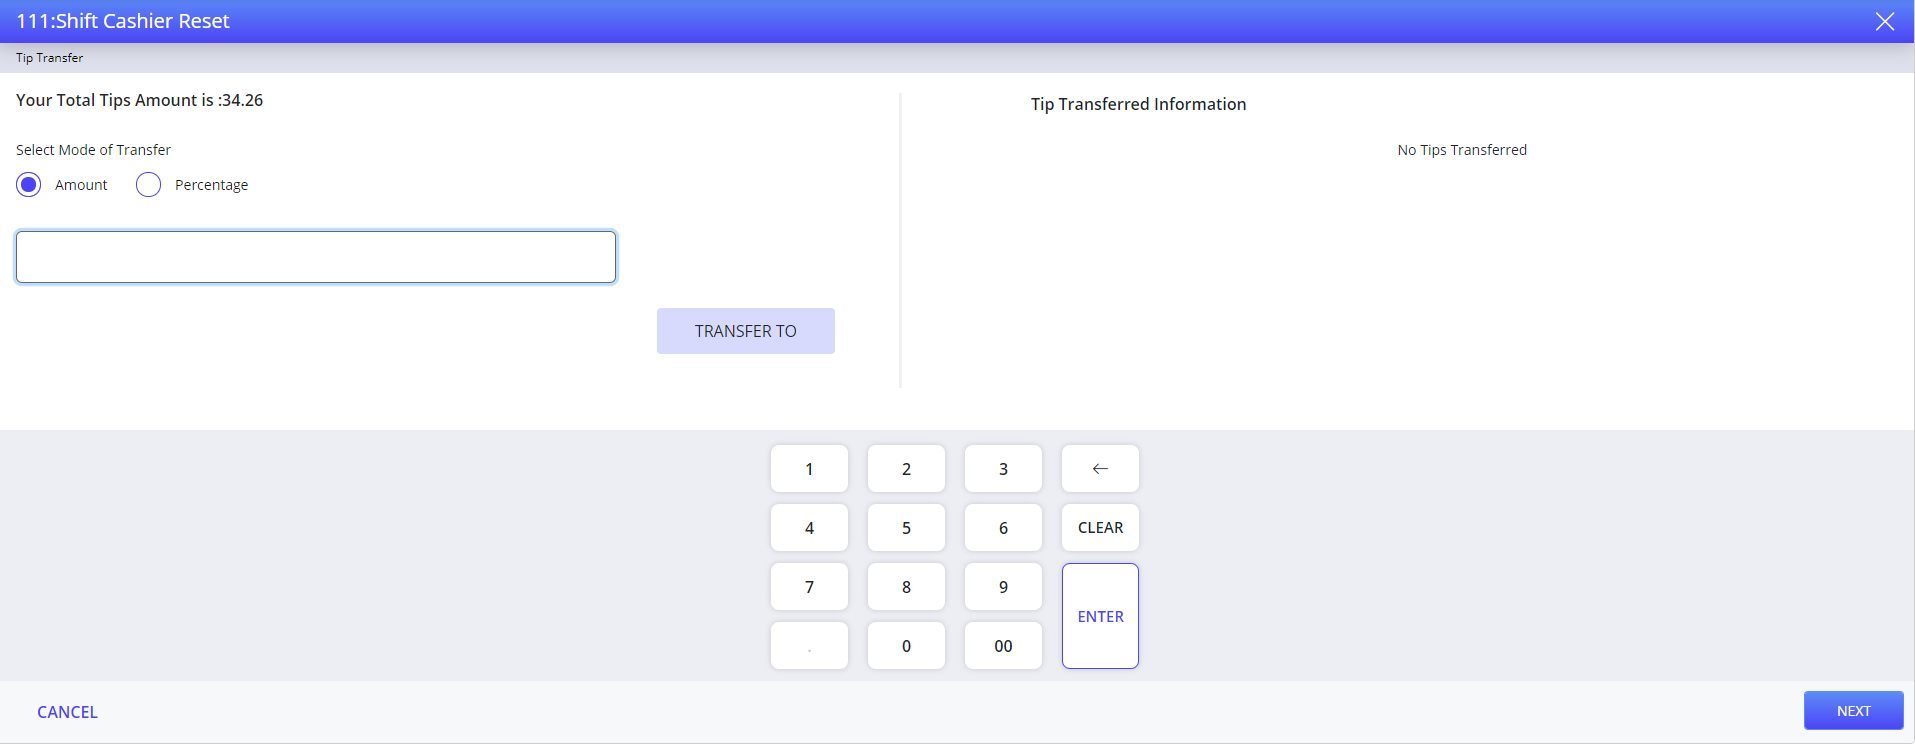
The Tip Transfer wizard appears only if the logged-in employee has any tips, and Terminal Option 210 (Shift Reset: Automatically prompt for tip transfer and tip payout) is enabled.
Refer to the following table and fill in the fields to transfer the tip amount:
|
Field |
Description |
|---|---|
|
Select Mode of Transfer |
|
|
Amount |
Transfers tip amount in amount. |
|
Percentage |
Transfers tip amount in percentage. |
|
Tips Amount |
Enter total tip amount to be transferred to another employee. |
|
Tips Percentage |
Enter total tip amount in percentage to be transferred to another employee. |
Select Transfer To or Enter. The Tip Transfer prompt appears.
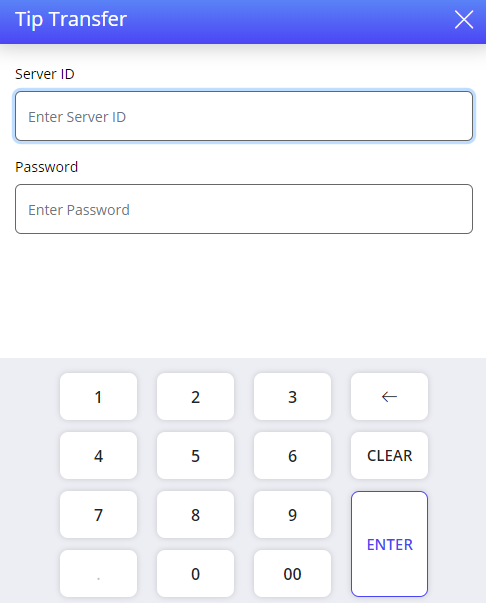
Refer to the following table and fill in the fields to transfer tip amount:
|
Field |
Description |
|---|---|
|
Server ID |
The unique ID of the employee to whom the tips must be transferred. |
|
Password |
The password of the employee. It is an optional field; the user must enter password only if it is configured in IGCM for the respective employee. |
Select Enter. A confirmation prompt appears.
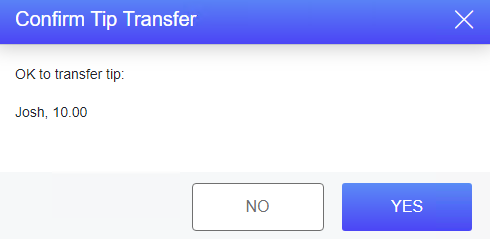
Select Yes to confirm the tip transfer. The tip amount is transferred and the employee to whom the tip is transferred is added under Tip Transferred Information.
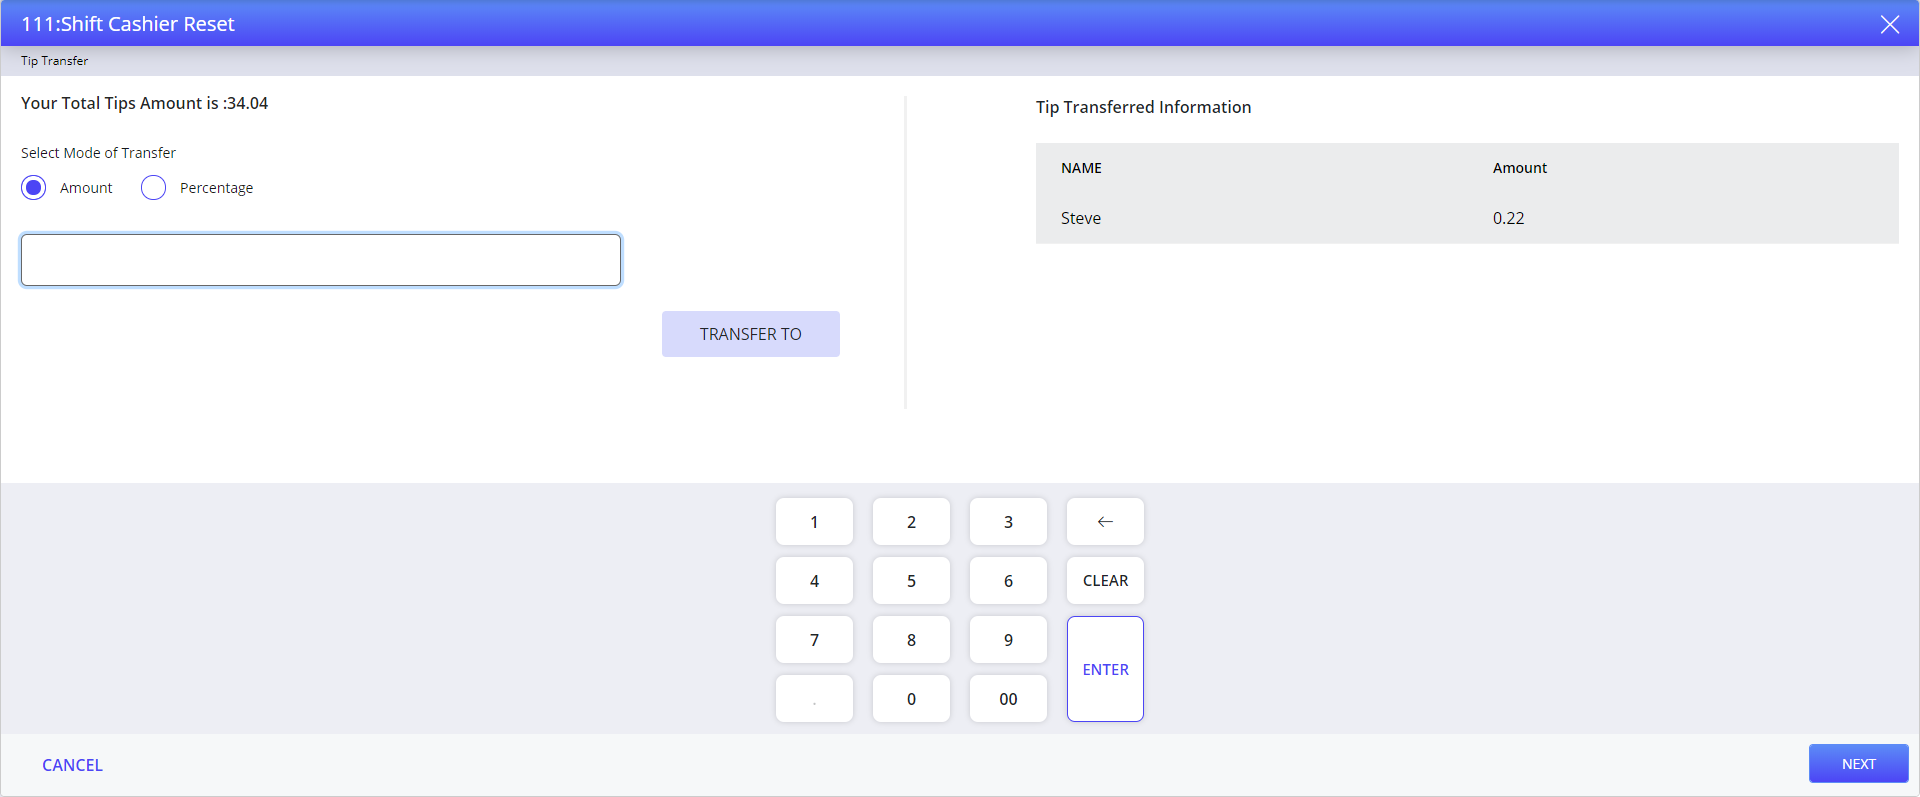
Select Next. The Tip Payout wizard appears.
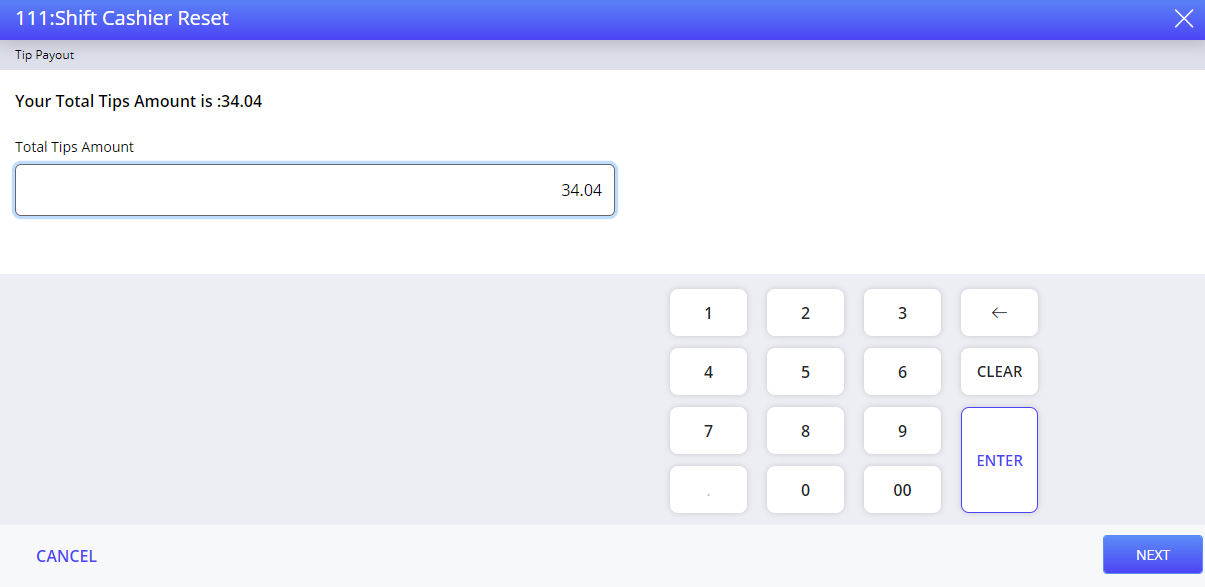
The Tip Payout wizard appears only if the logged-in employee has any tips, and Terminal Option 210 (Shift Reset: Automatically prompt for tip transfer and tip payout) is enabled.
Enter total tips amount.
Select Enter or Next. The Tip Payout: Print Chit? prompt appears.
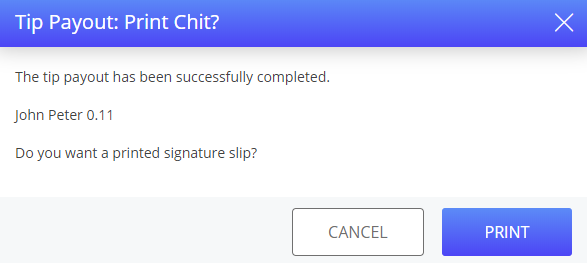
Select Print to print the signature slip. The Cash Drop wizard is displayed.
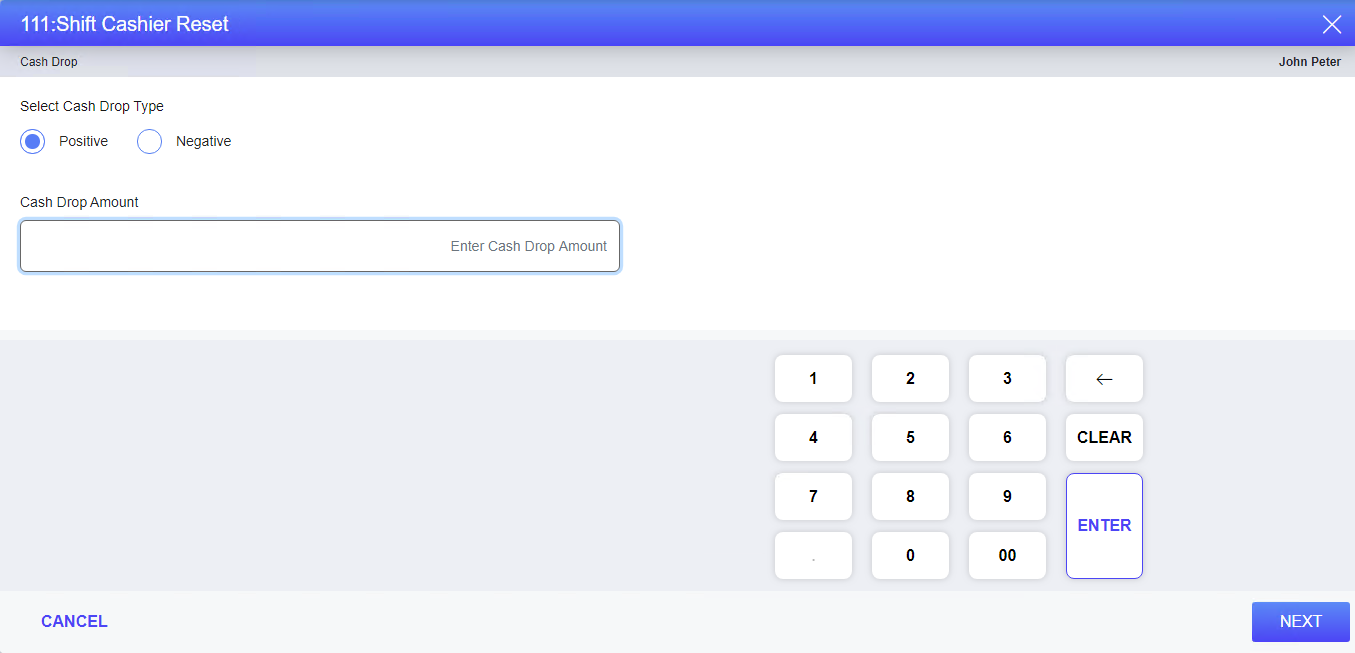
Select the cash drop type: Positive or Negative.
Enter cash drop amount.
Select Enter or Next. A confirmation prompt appears.
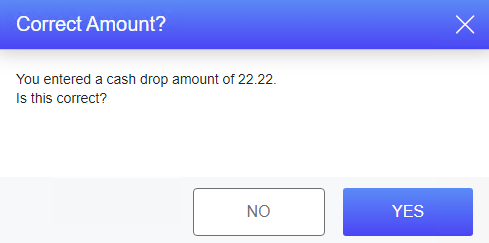
Select Yes to confirm the cash drop amount. The Shift Cashier Reset Summary appears.
Select Done.
Sample Report
|
When the terminal is Online |
When the terminal is LSS |
|---|---|
|
|
|
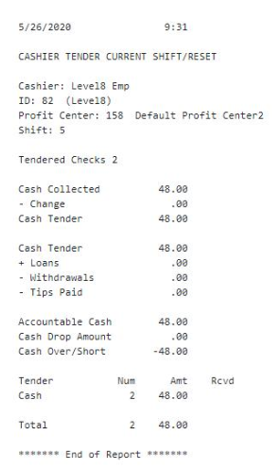
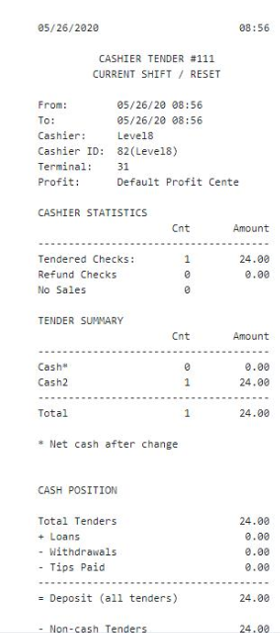
The cash drop amount equals cash in hand at the end of the shift minus the cash amount in the beginning of the shift.
Shift Report
The Shift Report button allows the user to generate the shift report.
Select the Shift Report button. The Shift Report wizard appears.
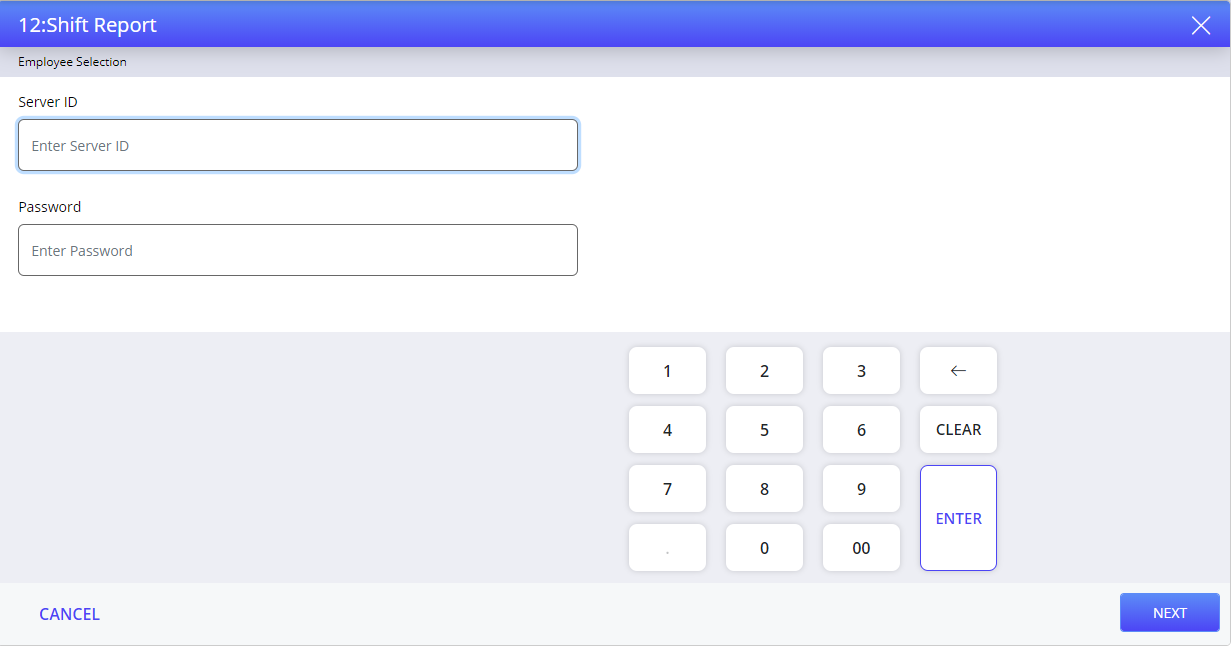
Refer to the following table and fill in the fields to generate shift report:
|
Field |
Description |
|---|---|
|
Server ID |
The unique ID of the server to generate shift report. |
|
Password |
The password of the server. It is an optional field; the user must enter password only if it is configured in IGCM for the respective server. |
Select Enter or Next. The Shift Report Summary appears.
Select Done.
Sample Report
|
When the terminal is Online |
When the terminal is LSS |
|---|---|
|
|
|
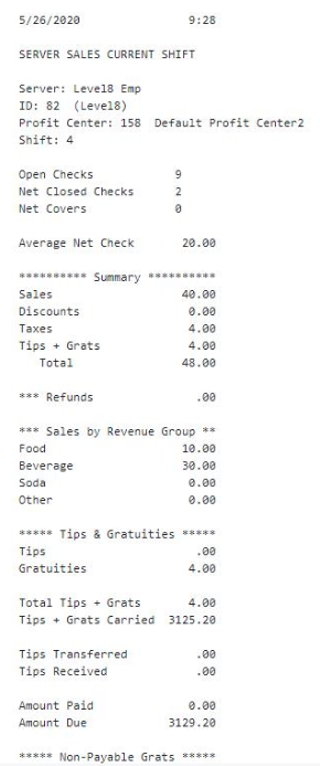
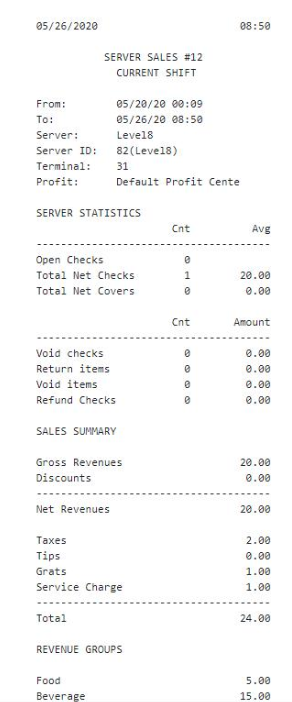
Shift Reset
The Shift Reset button allows the user to reset their shift and generate shift report.
Select the Shift Reset button. A confirmation prompt appears.
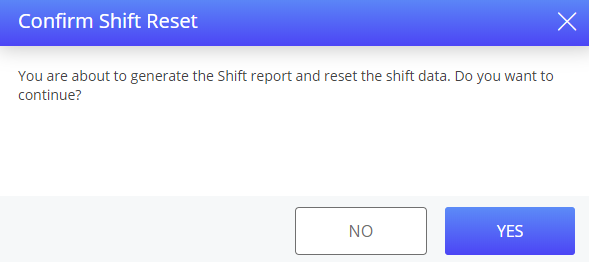
Select Yes. The Shift Reset wizard appears.
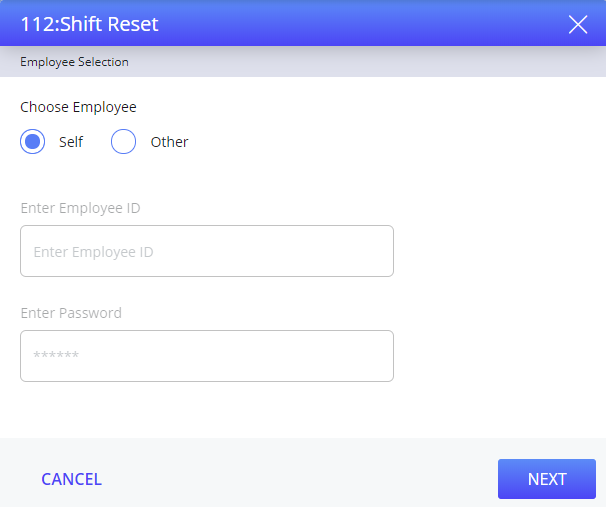
Refer to the following table and fill in the fields to reset shift details:
|
Field |
Description |
|---|---|
|
Choose Employee |
|
|
Self |
|
|
Enter Employee ID |
This field is disabled since the employee is the logged in employee. |
|
Enter Password |
This field is disabled since the employee is the logged in employee. |
|
Other |
|
|
Enter Employee ID |
The unique ID of the employee to reset the shift. |
|
Enter Password |
The password of the employee. It is an optional field; the user must enter password only if it is configured in IGCM for the respective employee. |
Select Next. The Open Check Verification wizard appears if the employee has any open checks.
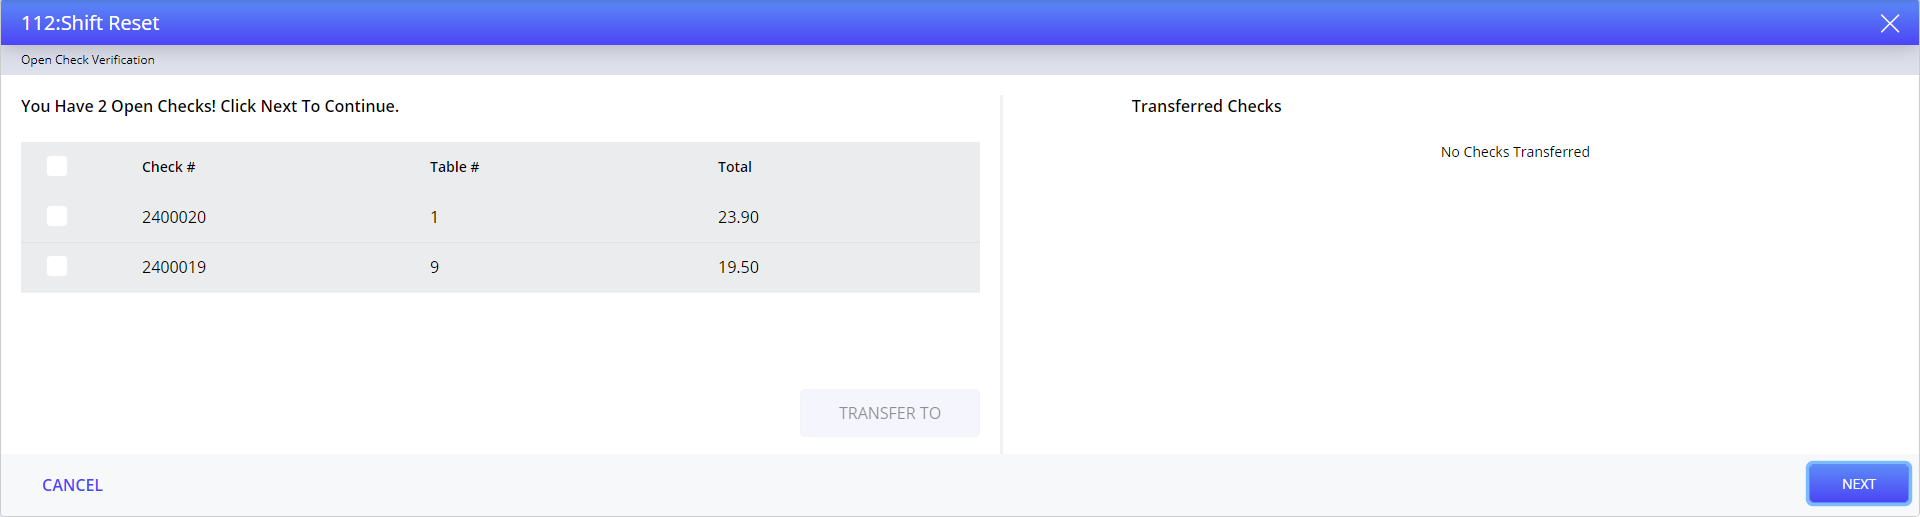
Select the required open check to transfer.
Select Transfer To. The Transfer Server prompt appears.
Refer to the following table and fill in the fields to transfer open checks to server:
|
Field |
Description |
|---|---|
|
Server ID |
The unique ID of the server to whom the checks must be transferred. |
|
Password |
The password of the server. It is an optional field; the user must enter password only if it is configured in IGCM for the respective server. |
Select Enter. The selected checks are moved under Transferred Checks wizard appears.
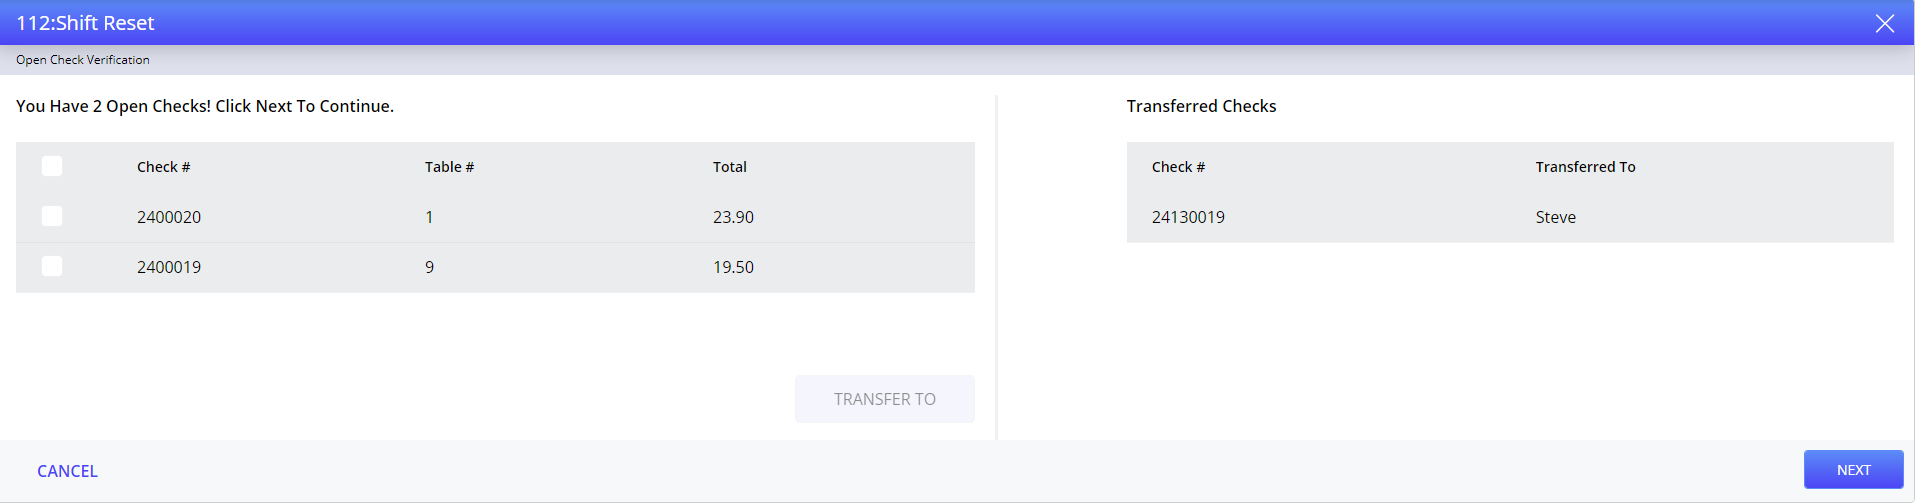
Select Next. The Shift Reset:Declare cash tip prompt appears.
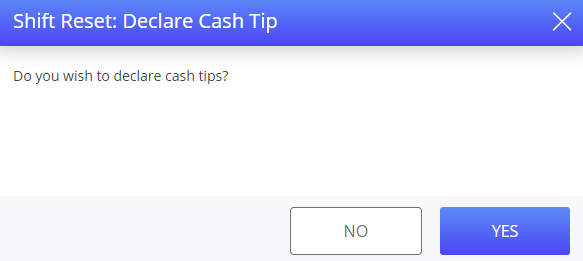
The Shift Reset: Declare Cash Tip prompt appears only if the Declare cash tips checkbox is enabled for the respective job code in the Job Code menu in IGCM. The Declare Cash Tips applicable only for Server Shift Reset and Shift Reset.
If the Declare Cash Tips checkbox is enabled for the job code in the Job Code menu in IGCM, the Shift Reset:Declare cash tip prompt appears.
Select Yes. The Declare Cash Tip wizard appears.
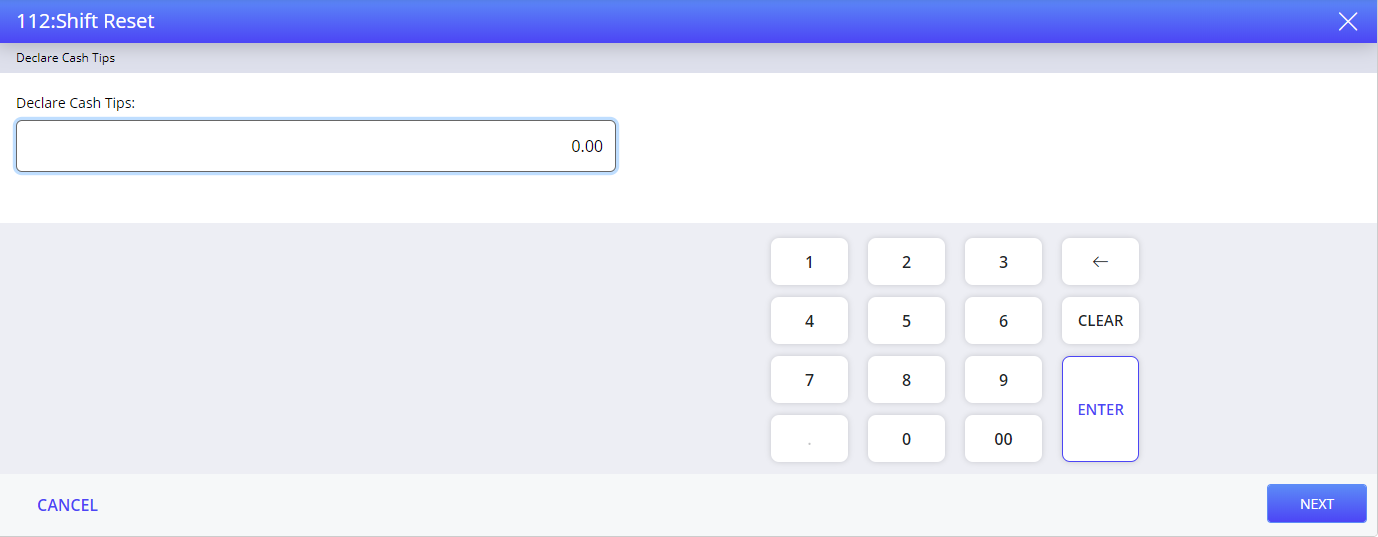
Enter cash tip amount.
Select Enter or Next. The Confirm Declare Cash Tip prompt appears.
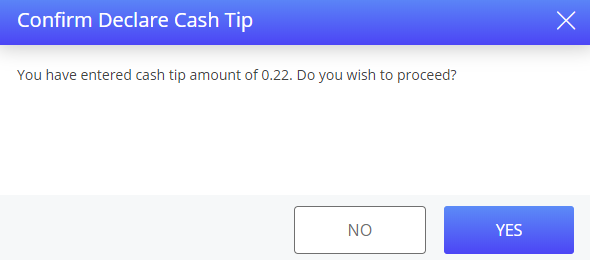
Select Yes. The Tip Transfer wizard appears.
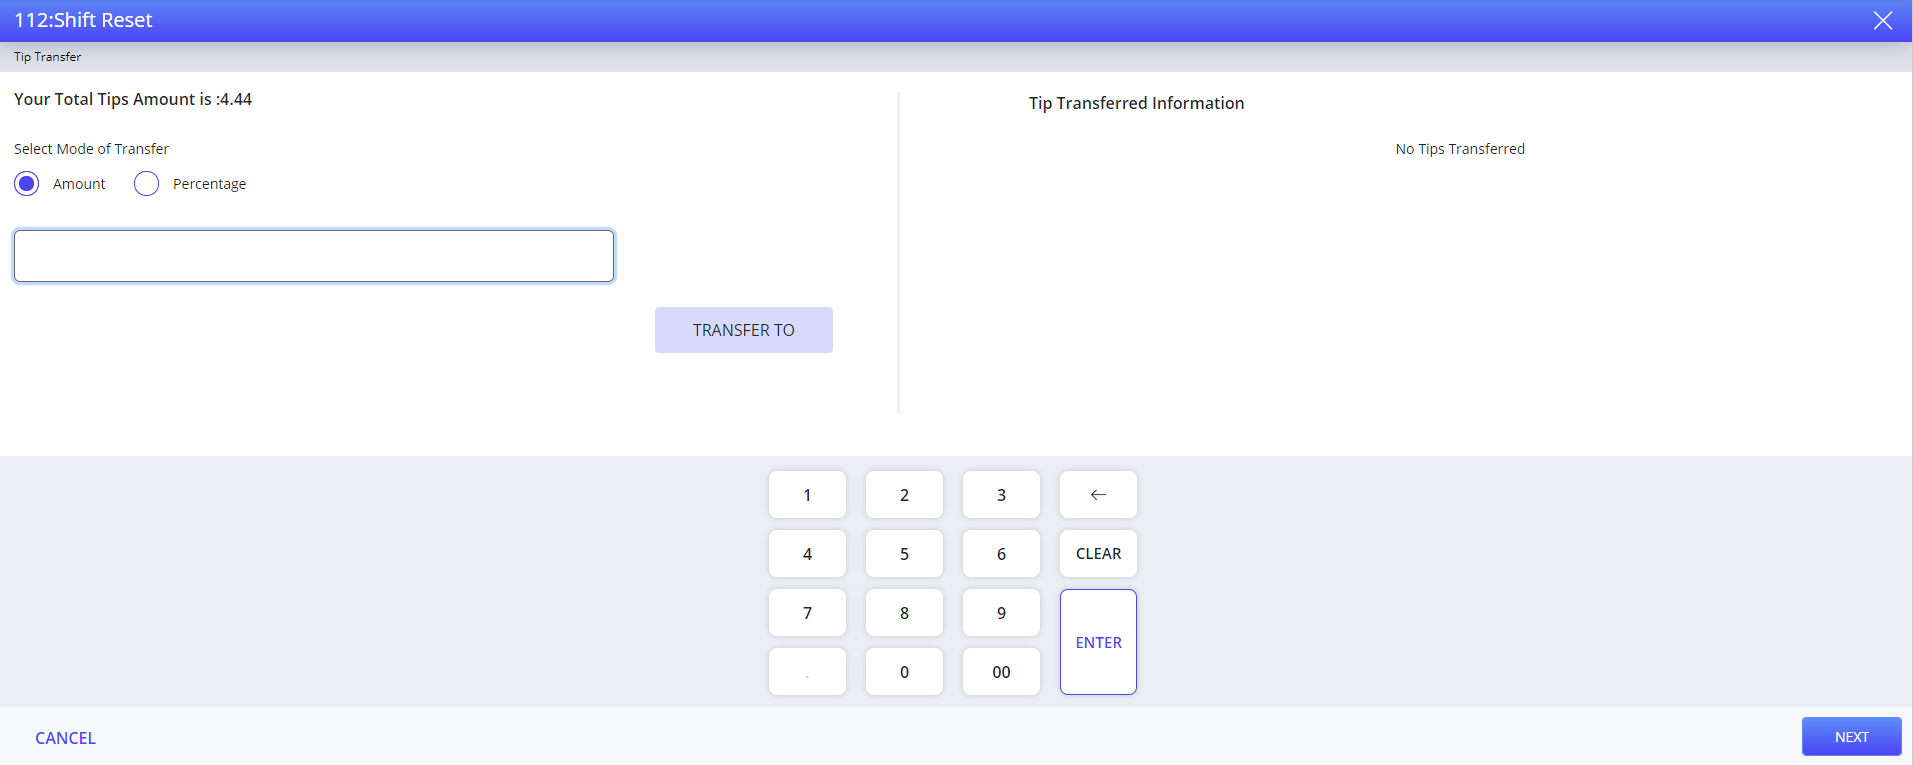
The Tip Transfer wizard appears only if the logged-in employee has any tips, and Terminal Option 210: (Shift Reset: Automatically prompt for tip transfer and tip payout) is enabled.
Refer to the following table and fill in the fields to transfer the tips amount:
|
Field |
Description |
|---|---|
|
Select Mode of Transfer |
|
|
Amount |
Transfers the tip amount in amount. |
|
Percentage |
Transfers the tip amount in percentage. |
|
Tips Amount |
The total tip amount to be transferred to another employee. |
Select Transfer To or Enter. The Tip Transfer prompt appears.
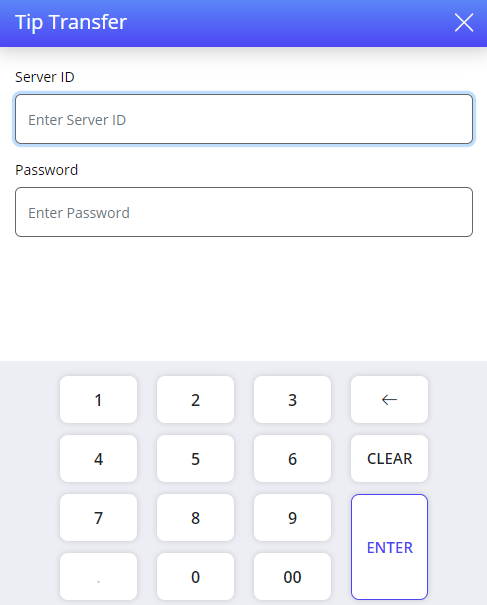
Refer to the following table and fill in the fields to transfer the tip amount:
|
Field |
Description |
|---|---|
|
Server ID |
The unique ID of the server to whom the tips must be transferred. |
|
Password |
The password of the server. It is an optional field; the user must enter password only if it is configured in IGCM for the respective server. |
Select Enter. A confirmation prompt appears.
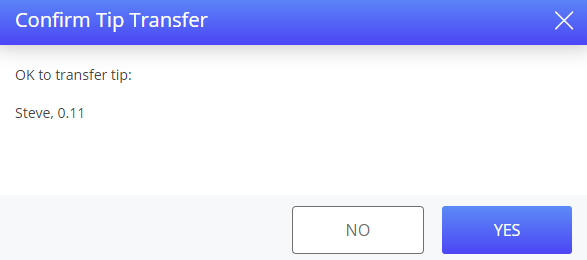
Select Yes to confirm the tip transfer. The tip amount is transferred and the employee to whom the tip is transferred is added under Tip Transferred Information.
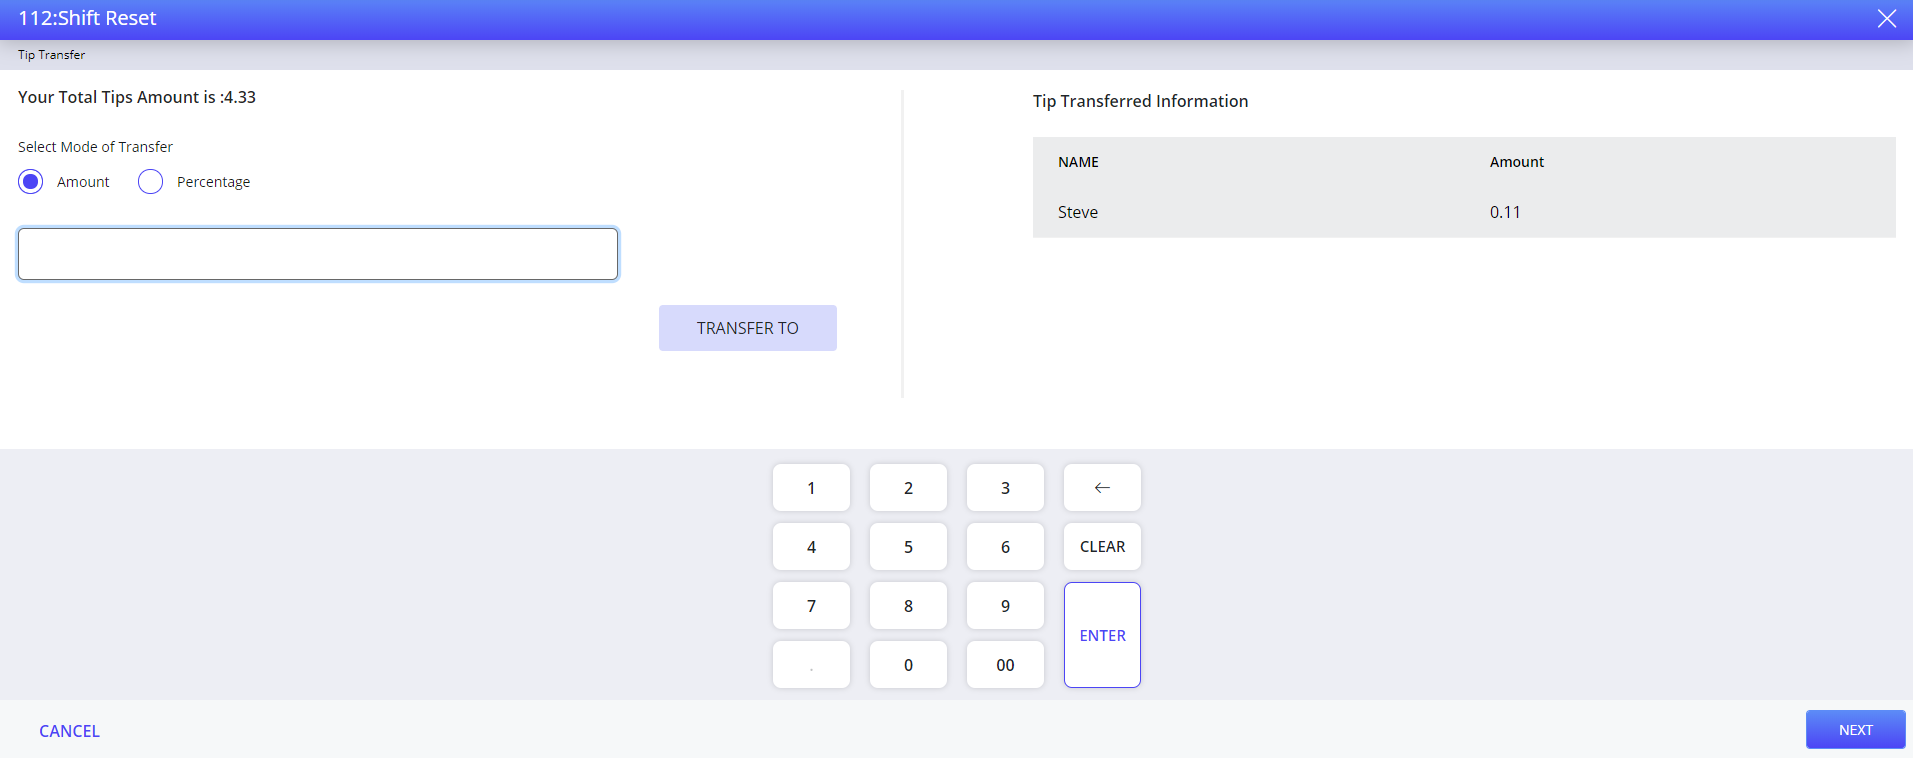
Select Next. The Tip Payout wizard appears.
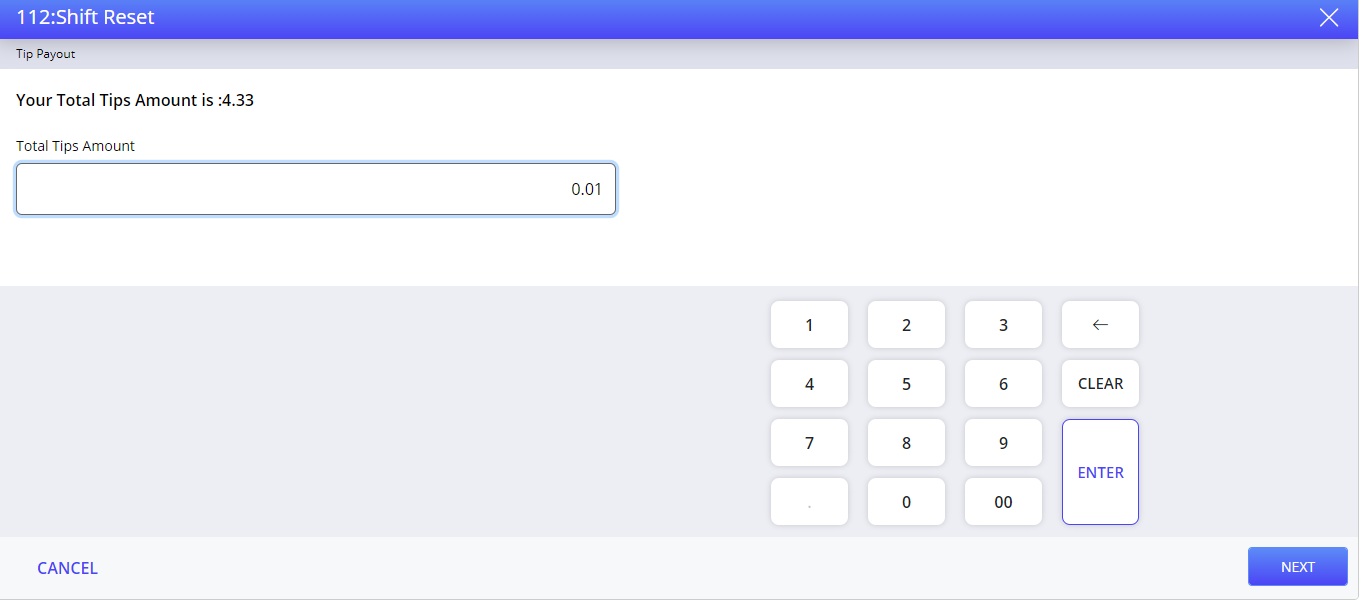
The Tip Payout wizard appears only if the logged-in employee has any tips, and Terminal Option 210 (Shift Reset: Automatically prompt for tip transfer and tip payout) is enabled.
Enter total tip amount to payout.
Select Enter or Next. The tip payout is completed successfully and the Tip Payout: Print Chit? prompt appears.
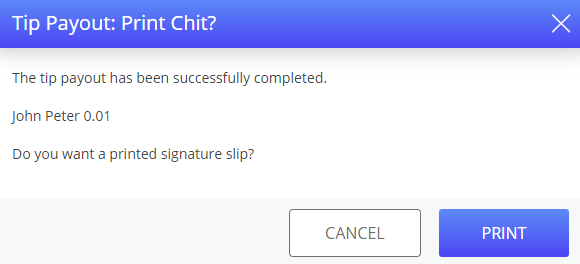
Select Print to print a signature slip. The Cash Drop wizard appears.
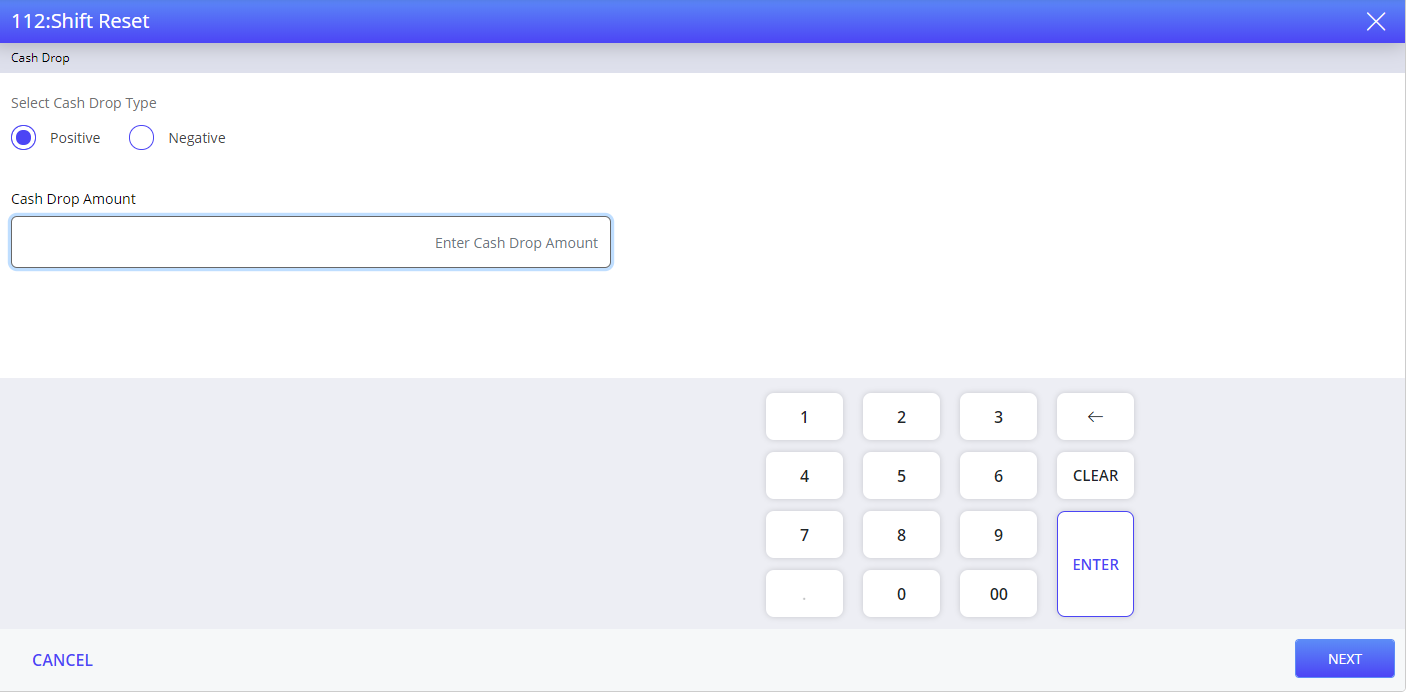
Select the cash drop type: Positive or Negative.
Enter cash drop amount.
Select Enter or Next. A confirmation prompt appears.
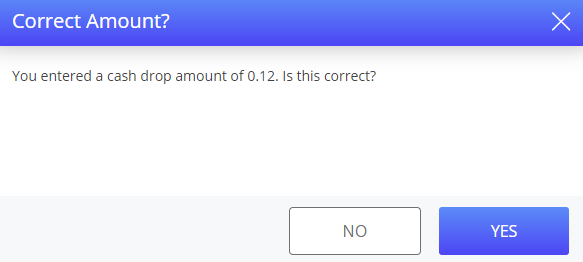
Select Yes to confirm the cash drop amount. The Shift Reset Summary wizard appears.
Select Done.
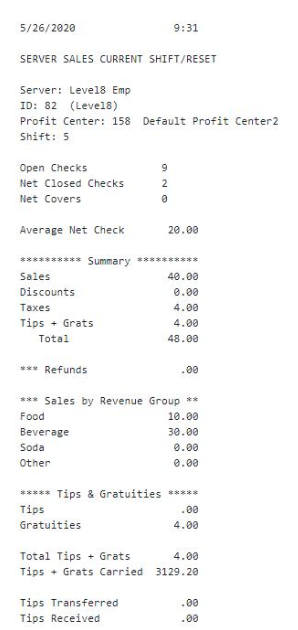
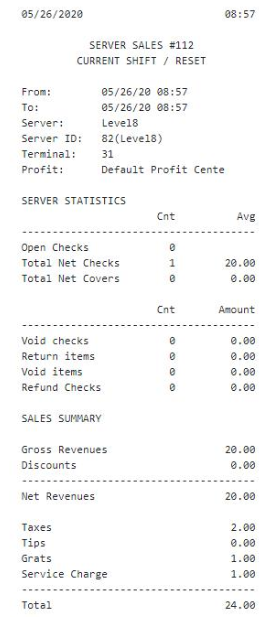
Sample Report
|
When the terminal is Online |
When the terminal is LSS |
|---|---|
|
|
|
Important Points
-
If the user performs Shift Reset and Clock Out, the employee clocks in again the new shift begins. This will affect the shift accounting.
-
The Tip Payout is performed as a part of Shift Reset. The Tip Payout includes tip, gratuity, and service charge amount. The Gratuity/Service Charge can be paid out in the POS terminal only if Allow payout at terminal checkbox is enabled in the Gratuity menu in IGCM.
-
The user can also perform Shift Reset by selecting the Shift Reset button in the User screen.
-
The Declare Cash Tip, Tip Transfer, and Tip Payout need not be performed mandatorily during Shift Reset.
-
If the Carry over tips and gratuities check box is enabled for a job code in the Job Code menu in IGCM, after performing Shift Reset, the unpaid tip amount will be available for tip payout in the next shift.
-
If the Carry over tips and gratuities check box is disabled for a job code in the Job Code menu in IGCM, after performing Shift Reset the unpaid tip amount will not be available for tip payout in the next shift. The Total Tips balance becomes zero and the employee cannot payout the unpaid tip amount.
-
The user can also payout tip, gratuity, and service charge amount using the Tip Payout function button. For more information about Tip Payout, refer the Tip Payout section.
The Carry over tips and gratuities option will not affect the tip payout balance.
Terminal Option Supported
|
Terminal Option |
Description |
|---|---|
|
211 (Shift Reset: Automatically prompt for clock-out) |
If this terminal option is enabled, a clock-out prompt appears automatically during Shift Reset. |
Shift Report - Previous
The Shift Report - Previous button allows the user to generate the previous shift report.
Select the Shift Report - Previous button. The Shift Report - Previous wizard appears.
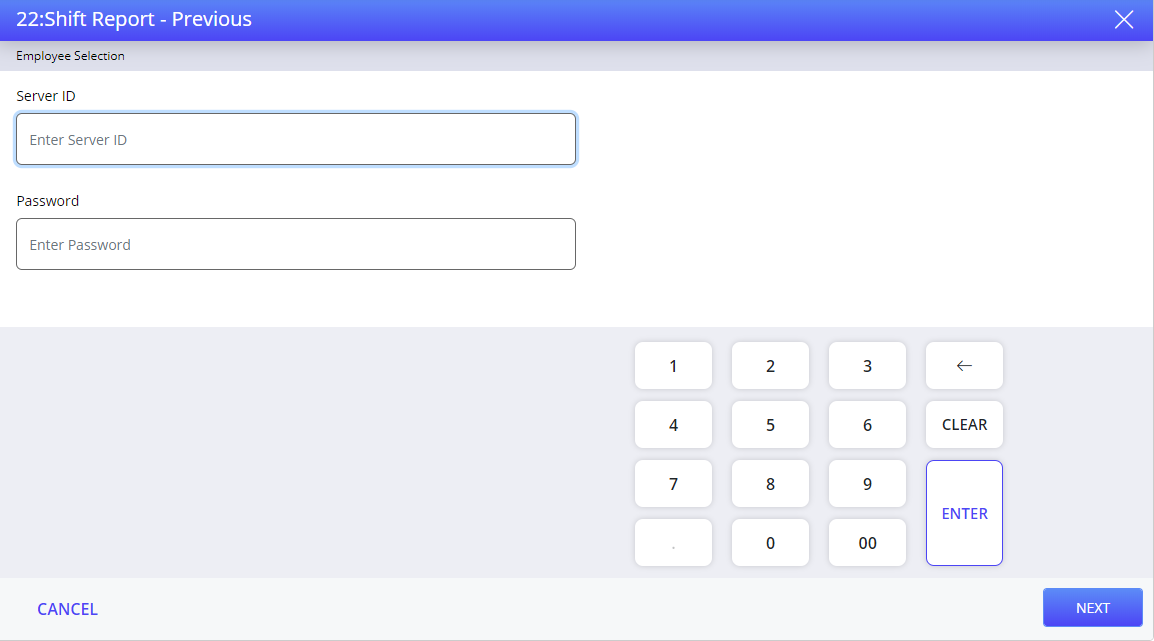
Refer to the following table and fill in the fields to generate shift report:
|
Field |
Description |
|---|---|
|
Server ID |
The unique ID of the server to generate previous shift report. |
|
Password |
The password of the server. It is an optional field; the user must enter password only if it is configured in IGCM for the respective server. |
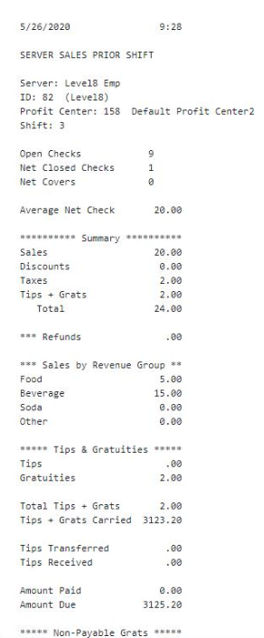
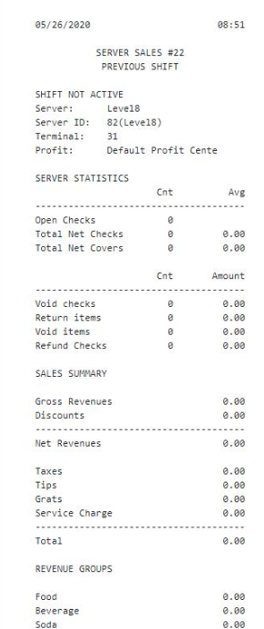
Select Enter or Next. The Shift Report - Previous Summary appears.
Sample Report
|
When the terminal is Online |
When the terminal is LSS |
|---|---|
|
|
|
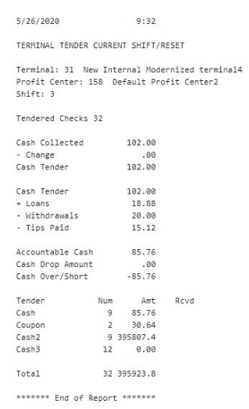
Terminal Shift Reset and Report
The Terminal Shift Reset and Report button allows the user to reset their shift and generate terminal shift report.
Select the Terminal Shift Reset and Report button. A confirmation prompt appears.
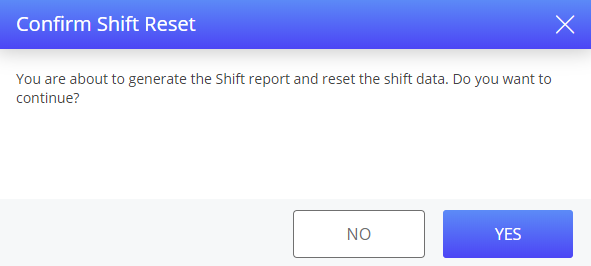
Select Yes. The Open Check Verification wizard appears if the employee has any open checks.
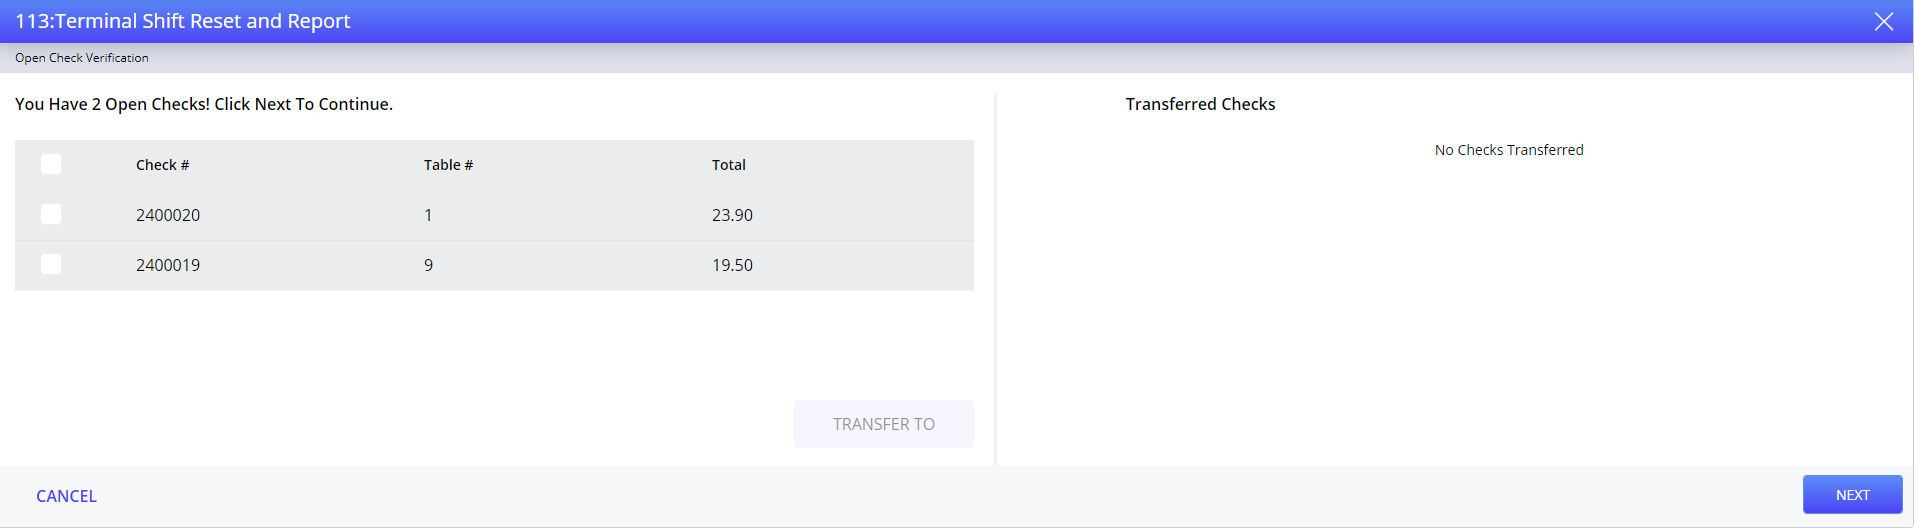
Select the required open checks.
Select Transfer To. The Transfer Server prompt appears.
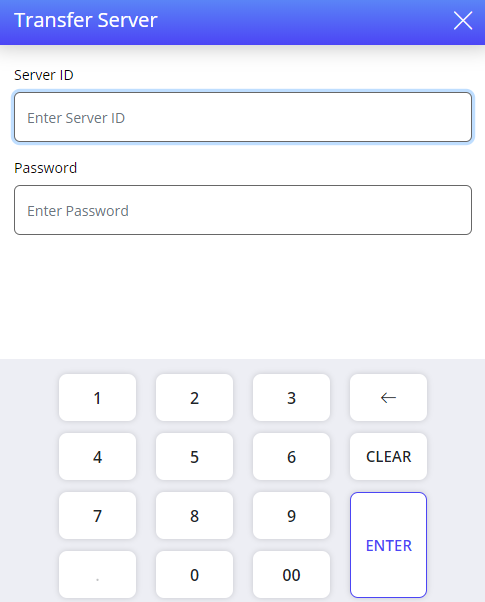
Refer to the following table and fill in the fields to transfer the open checks:
|
Field |
Description |
|---|---|
|
Server ID |
The unique ID of the server to whom the checks must be transferred. |
|
Password |
The password of the server. It is an optional field; the user must enter password only if it is configured in IGCM for the respective server. |
Select Enter. The selected checks are moved under Transferred Checks wizard appears.
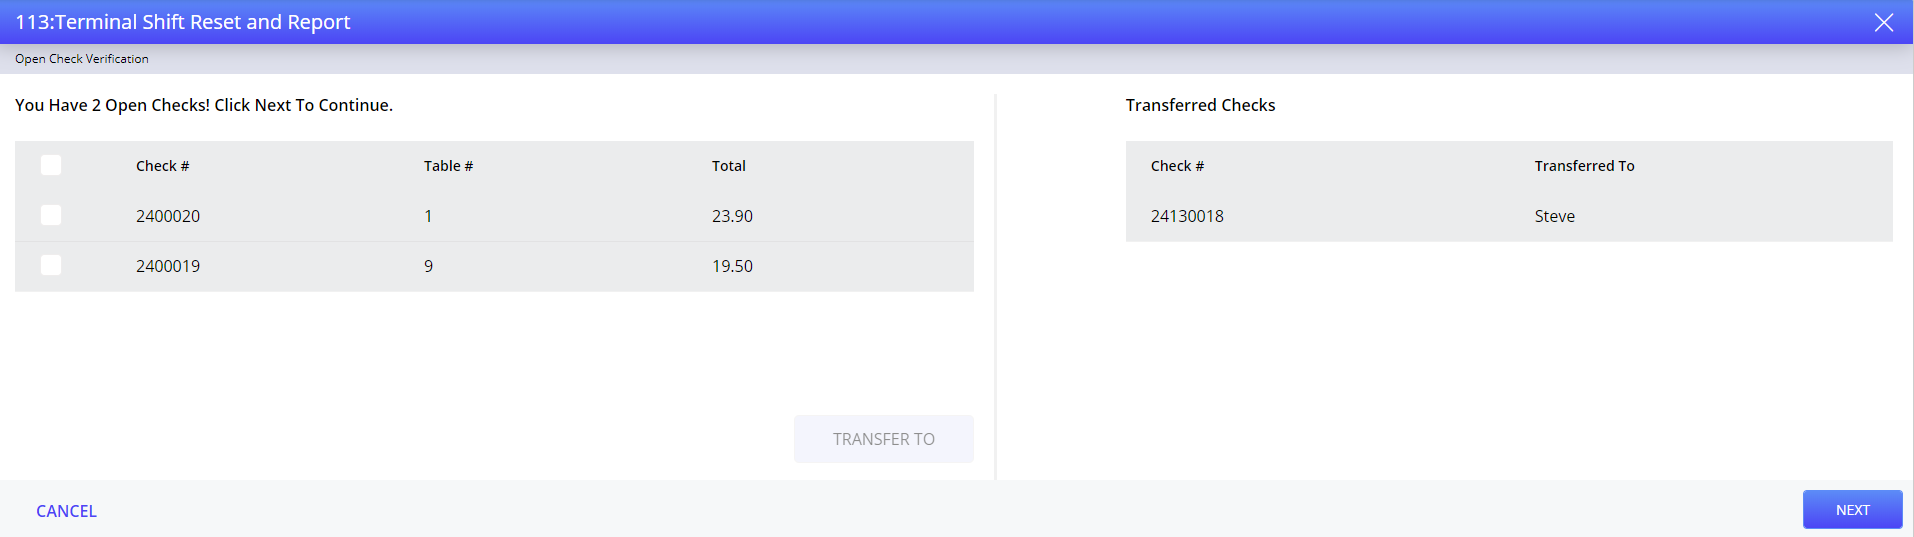
Select Next. The Tip Transfer wizard appears.
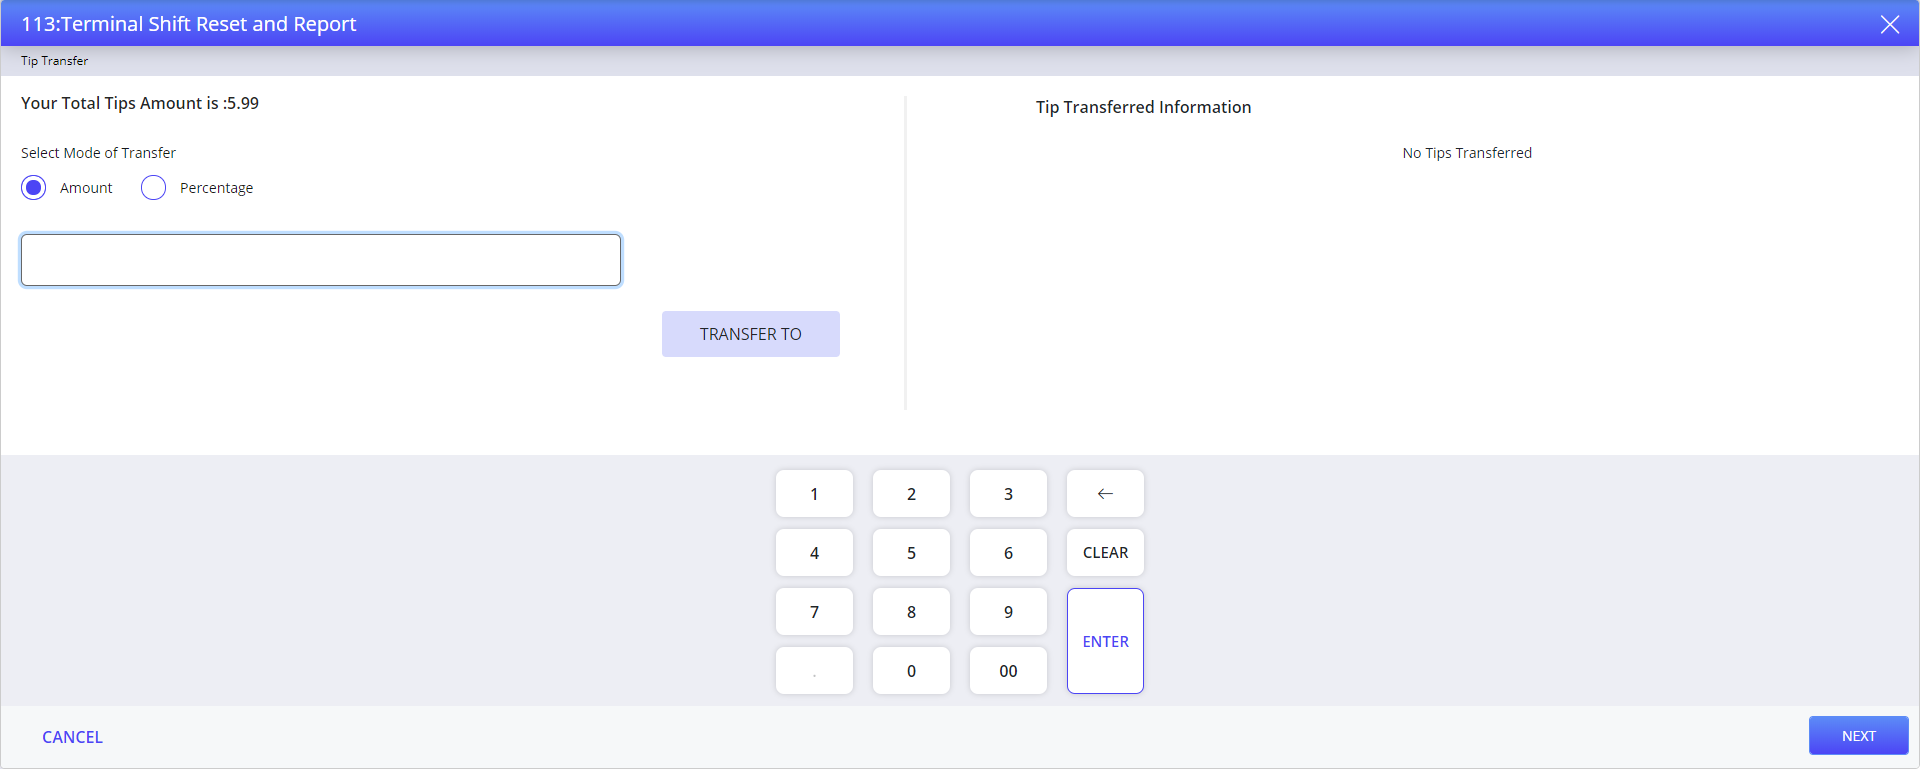
The Tip Transfer wizard appears only if the logged-in employee has any tips, and Terminal Option 210 (Shift Reset: Automatically prompt for tip transfer and tip payout) is enabled.
Refer to the following table and fill in the fields to transfer the tip amount:
|
Select Mode of Transfer |
Description |
|---|---|
|
Amount |
Transfers the tip amount in amount. |
|
Percentage |
Transfers the tip amount in percentage. |
|
Tips Amount |
The total tip amount to be transferred to another employee. |
Select Transfer To or Enter. The Tip Transfer prompt appears.
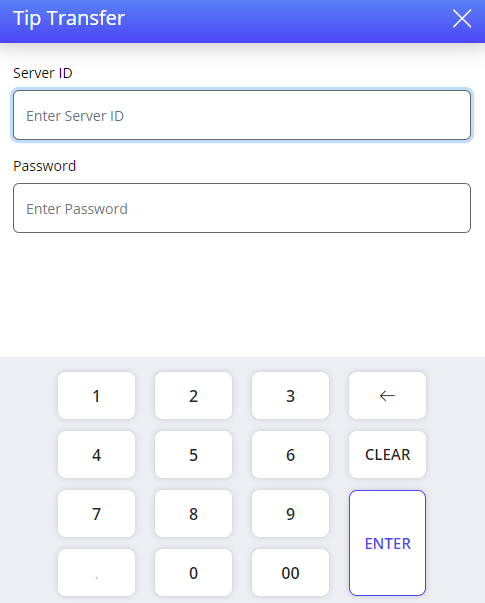
Refer to the following table and fill in the fields to reset their shift and generate terminal shift report:
|
Field |
Description |
|---|---|
|
Server ID |
The unique ID of the server to whom the tips must be transferred. |
|
Password |
The password of the server. It is an optional field; the user must enter password only if it is configured in IGCM for the respective server. |
Select Enter. A confirmation prompt appears.
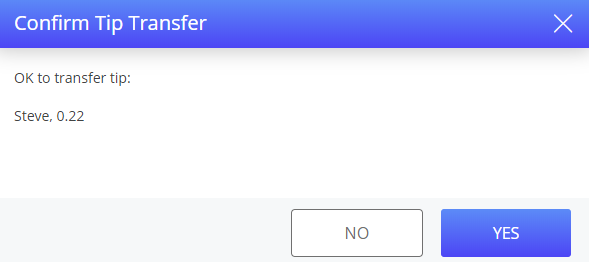
Select Yes to confirm the tip transfer. The tip amount is transferred and the employee to whom the tip is transferred is added under Tip Transferred Information.
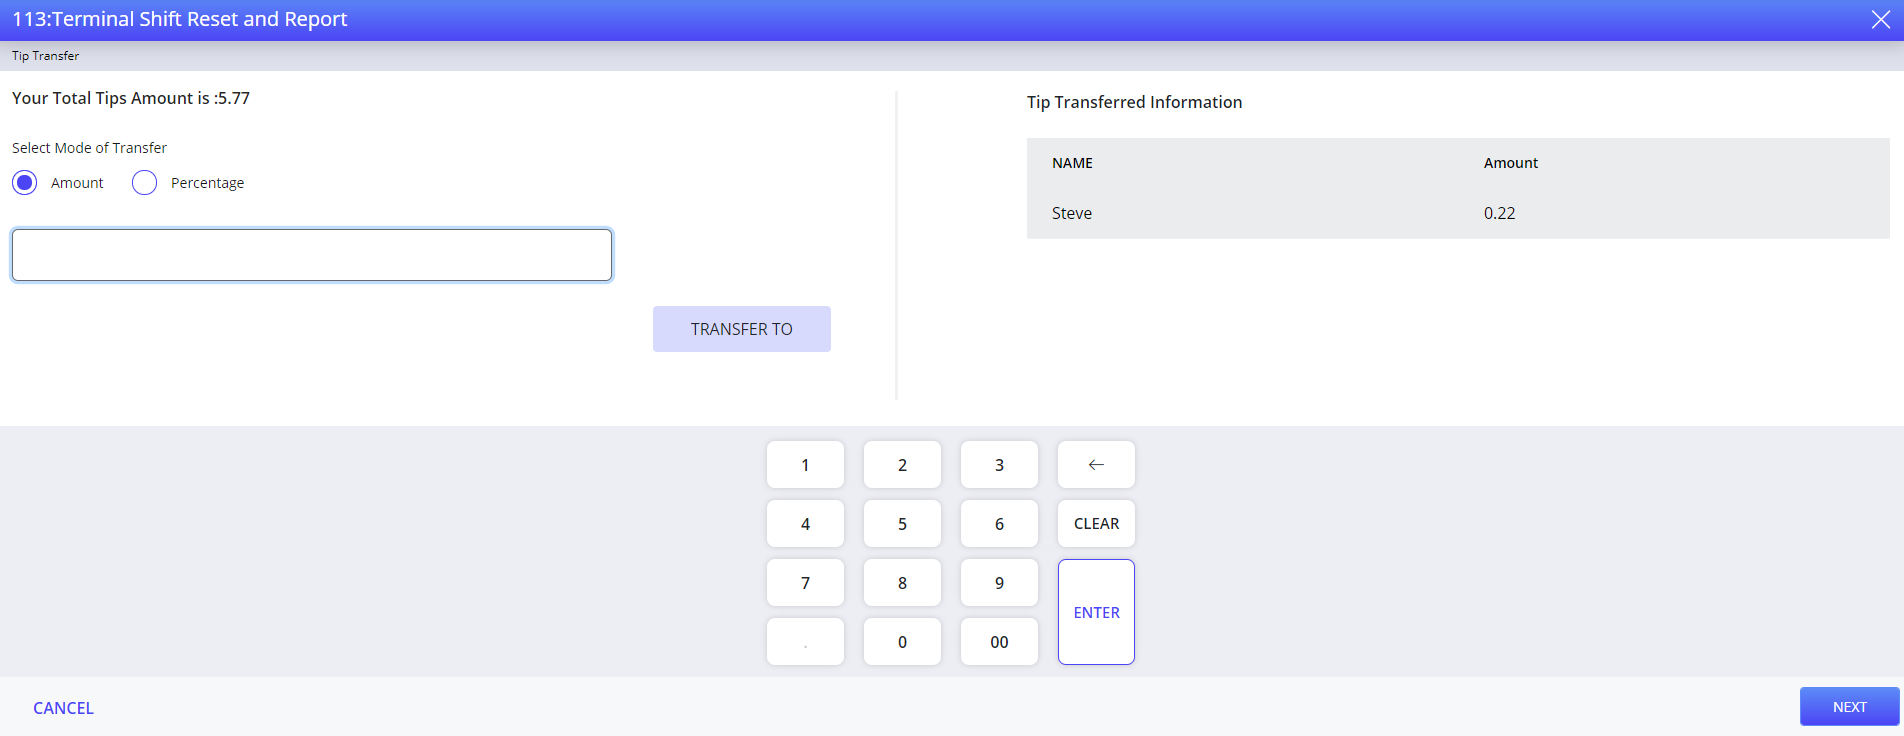
Select Enter or Next. The Tip Payout wizard appears.
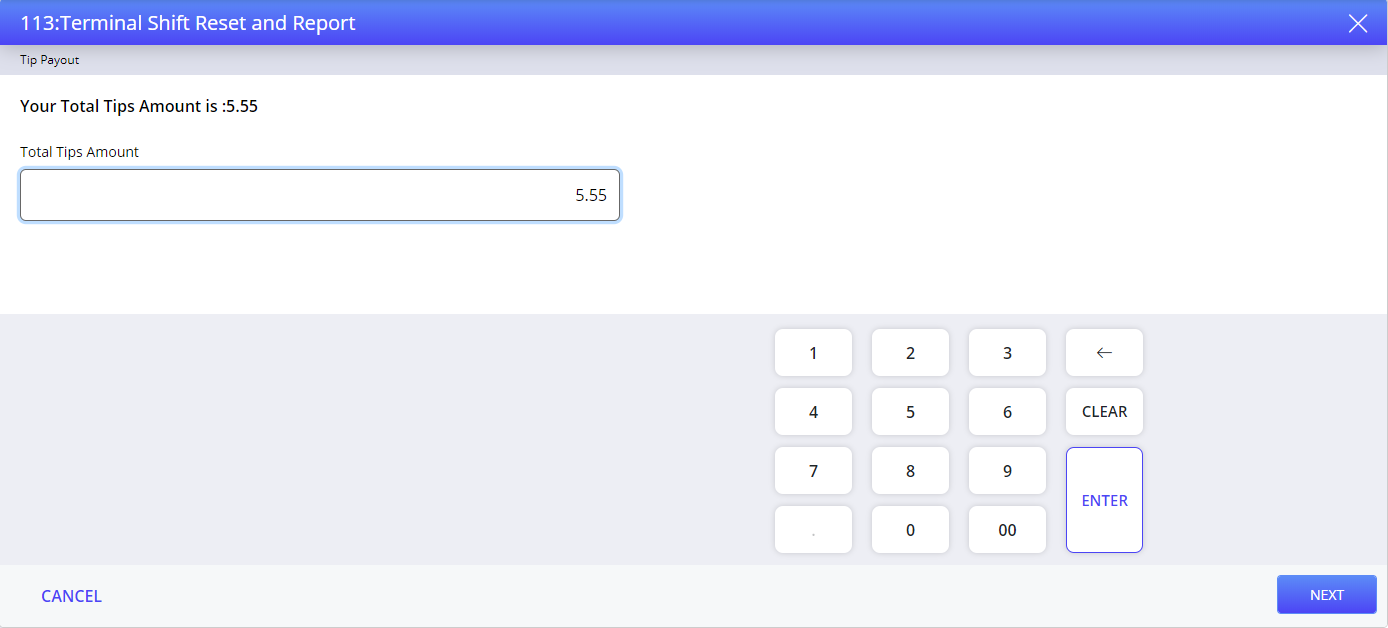
The Tip Payout wizard appears only if the logged-in employee has any tips, and Terminal Option 210 (Shift Reset: Automatically prompt for tip transfer and tip payout) is enabled.
Enter total tips amount.
Select Enter or Next. The Tip Payout: Print Chit? prompt appears.
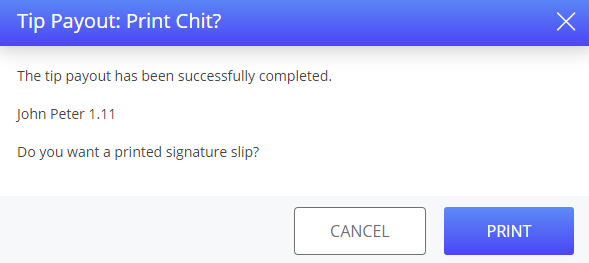
Select Print to print a signature slip. The Cash Drop wizard appears.
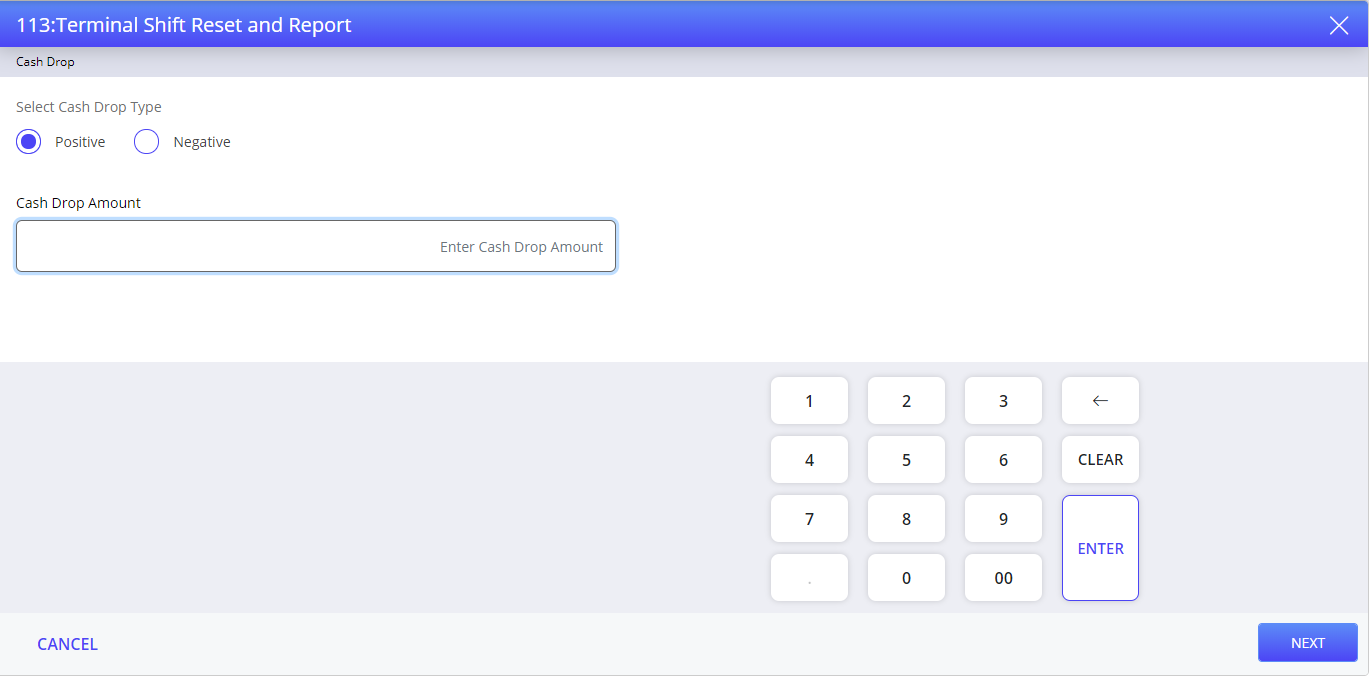
Select the cash drop type: Positive or Negative.
Enter cash drop amount.
Select Enter or Next. A confirmation prompt appears.
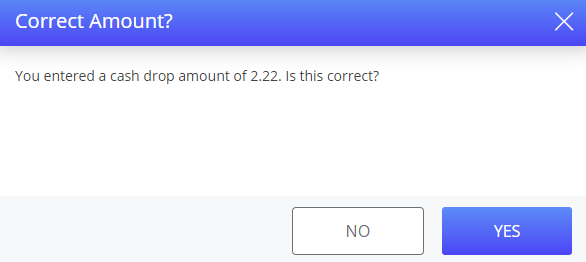
Select Yes to confirm the cash drop amount. The Terminal Shift Reset and Report Summary appears.
Select Done.
Sample Report
|
When the terminal is Online |
When the terminal is LSS |
|---|---|
|
|
|
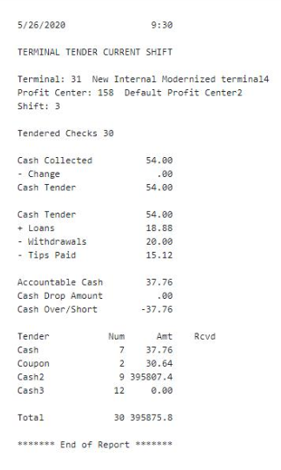
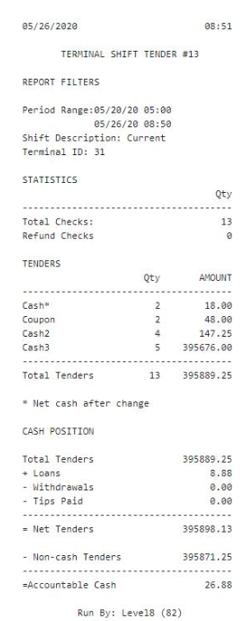
Terminal Shift Report - Current
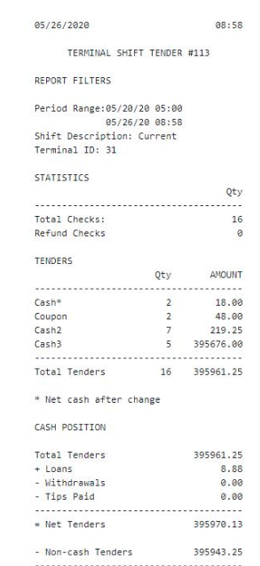
The Terminal Shift Report - Current button allows the user to generate current shift report of the terminal.
Select the Terminal Shift Report - Current button. The Terminal Shift Report - Current Summary appears.
Select Done.
Sample Report
|
When the terminal is Online |
When the terminal is LSS |
|---|---|
|
|
|
Terminal Shift Report - Previous
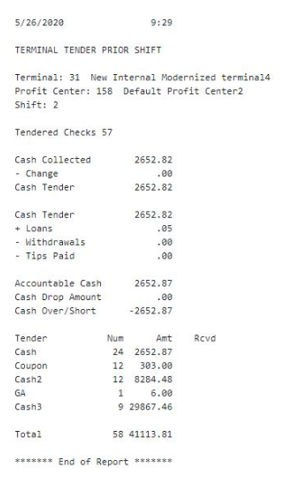
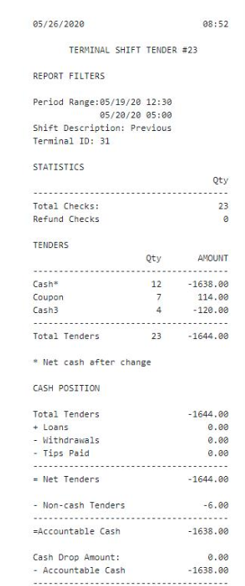
The Terminal Shift Report - Previous button allows the user to generate previous shift report of the terminal.
Select the Terminal Shift Report - Previous button. The Terminal Shift Report - Previous Summary appears.
Select Done.
Sample Report
|
When the terminal is Online |
When the terminal is LSS |
|---|---|
|
|
|
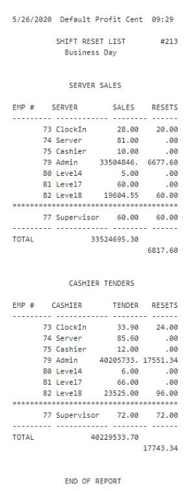
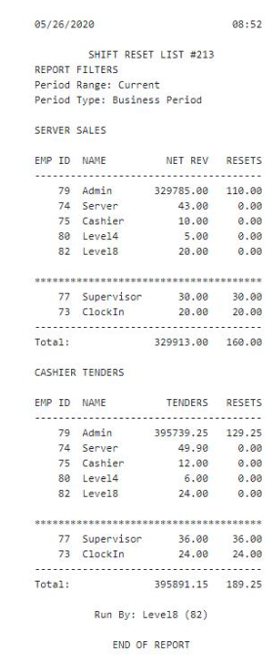
Shift Reset List (current bus. day; all employees)
The Shift Reset List (current bus. day; all employees) button allows the user to generate shift reset list report.
Select the Shift Reset List (current bus. day; all employees) button. The Shift Reset List (Current bus. day; all employees) Summary appears.
Select Done.
Sample Report
|
When the terminal is Online |
When the terminal is LSS |
|---|---|
|
|
|
Employee Tip Transfer Report
The Employee Tip Transfer Report button allows the user to generate the tips transferred to or from an employee. The employee with security level 2 or higher can access the Employee Tip Transfer Report.
Select Employee Tip Transfer Report. The Employee Tip Transfer Report wizard appears.
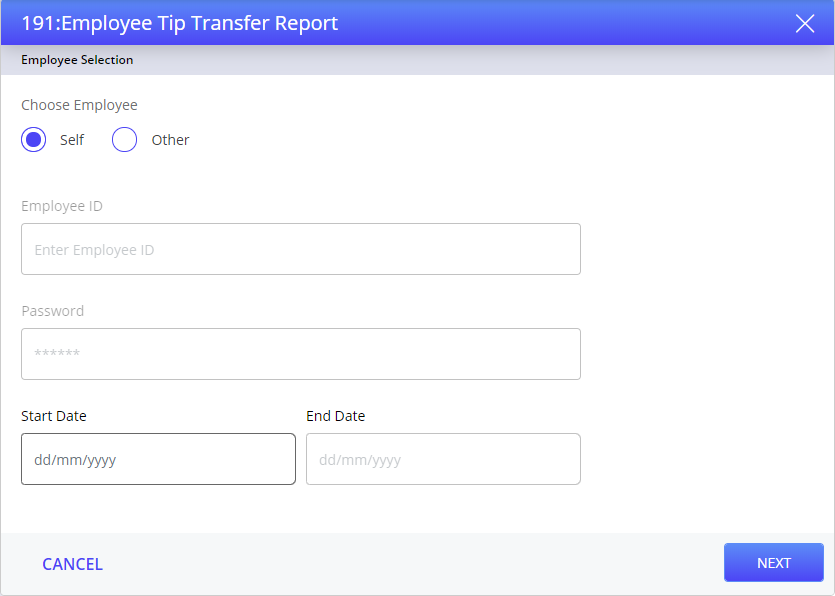
Refer to the following table and fill in the fields to generate tip transfer report of employee:
|
Choose Employee |
Description |
|---|---|
|
Self |
|
|
Enter Employee ID |
This field is disabled since the employee is already logged in. |
|
Enter Password |
This field is disabled since the employee is already logged in. |
|
Start Date |
Select the start date from the calendar. |
|
End Date |
Select the end date from the calendar. |
|
Other |
|
|
Enter Employee ID |
The unique ID of the employee to reset the shift cashier. |
|
Enter Password |
The password of the employee. It is an optional field; the user must enter password only if it is configured in IGCM for the respective employee. |
Select Next. The Employee Tip Transfer Report appears.
Sample Report
When the terminal is online:
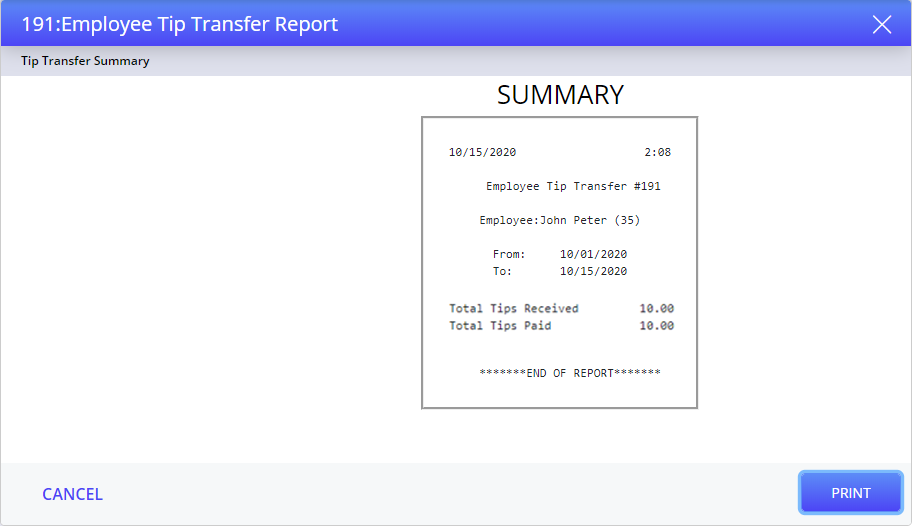
Select Print to print the employee tip transfer report details.
The user cannot generate Employee Tip Transfer Report when the terminal in LSS.
Open Checks Report (all servers)
The Open Checks Report (all servers) button allows the user to generate open checks report for all the servers. If the signed-on employee has a security level of 1 or 2, then the POS Terminal displays open checks reports only for the signed-on employee, else POS Terminal displays open check reports for all the employees.
Select Open Checks Report (all servers). The Open Checks Report (all servers) wizard appears.
Sample Report
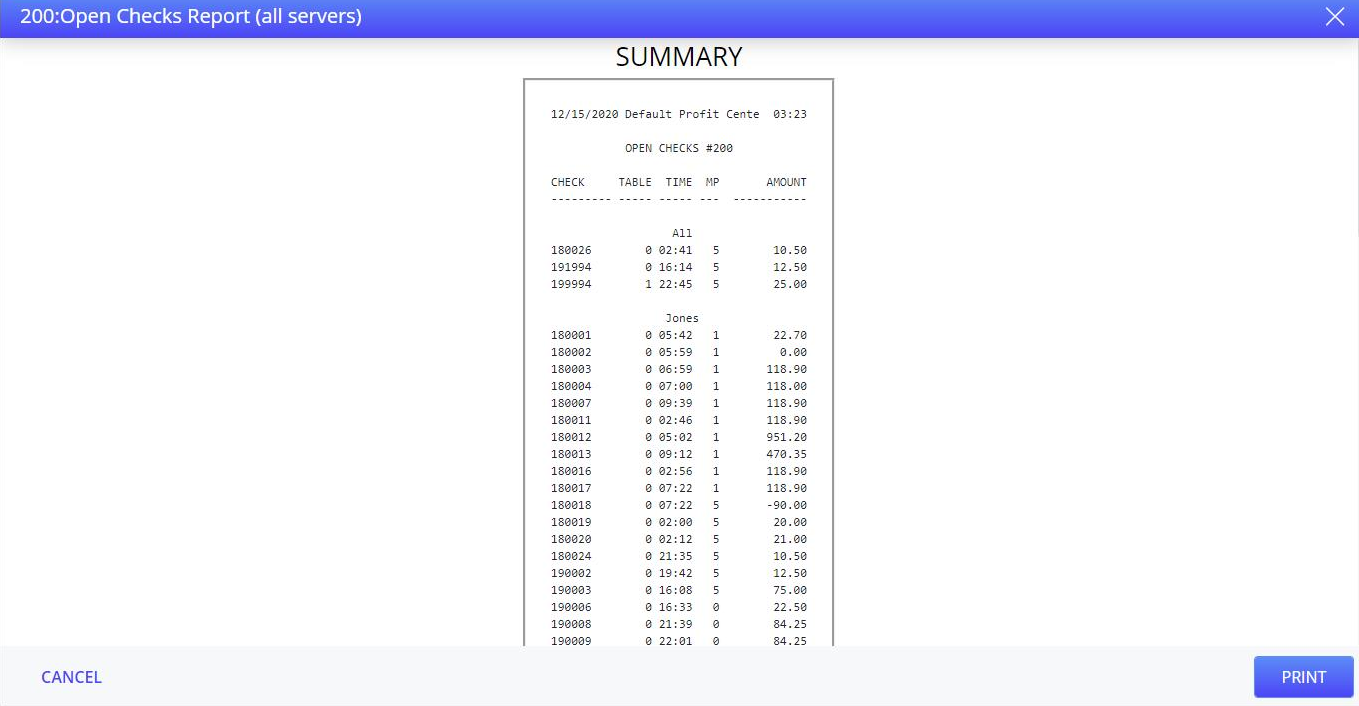
Select Print to print open checks report for all servers.
Open Checks (by specific server)
The Open Checks (by specific server) button allows the user to generate open checks report for the specific user. If the signed-on employee has a security level of 1 or 2 then the POS Terminal displays open checks reports only for the signed-on employee, else POS Terminal displays open check reports for all the employees.
Select Open Checks (by specific server). The Open Checks Report (by specific server) wizard appears.
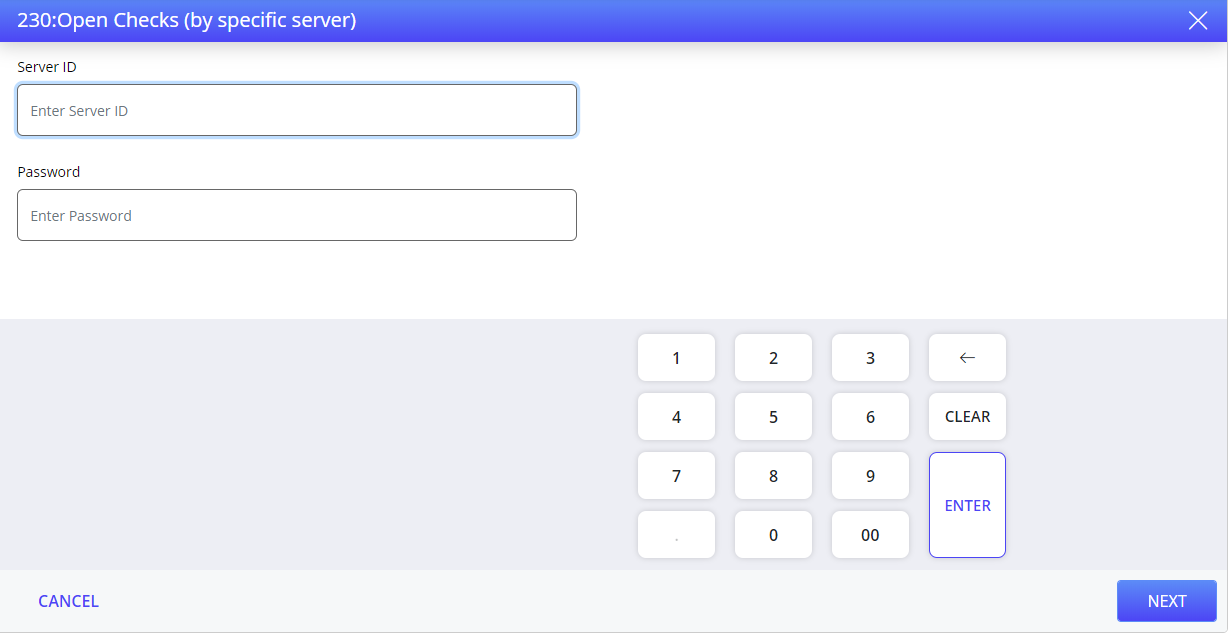
Refer to the following table and fill in the fields to generate open check report for the server:
|
Field |
Description |
|---|---|
|
Server ID |
The unique ID of the server to generate open check report. |
|
Password |
The password of the server. It is an optional field; the user must enter password only if it is configured in IGCM for the respective server. |
Select Enter or Next. The Open Checks (by specific Server) Summary appears.
Sample Report
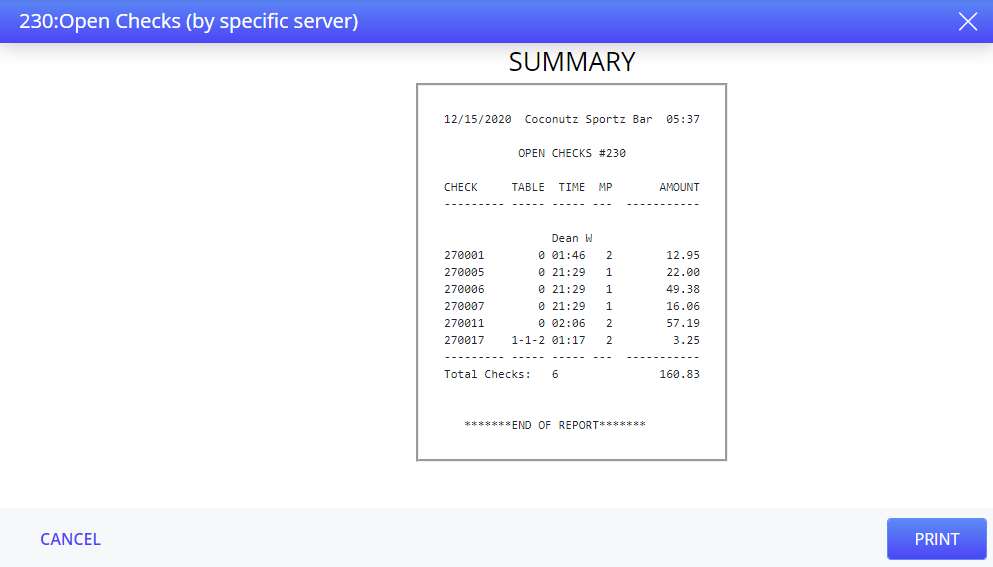
Select Print to print open checks report for the server.
Closed Checks (current bus. day)
The Closed Checks (current bus. day) button allows the user to generate closed checks report for the current business period.
Select Closed Checks (current bus. day). The Closed Checks (current bus. day) wizard appears.
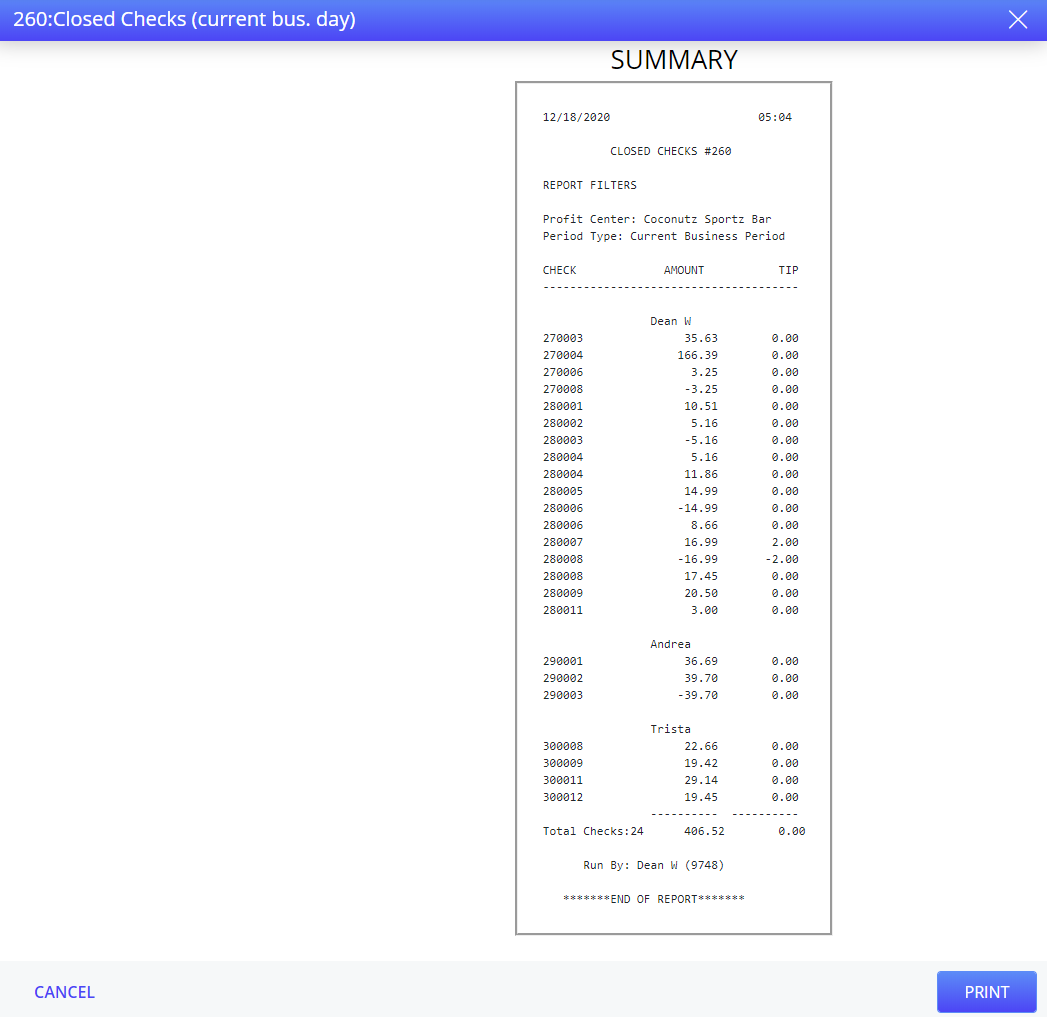
Select Print to print the closed check report for the current business day.
The user cannot generate Closed Checks (current bus. day) when the terminal is in LSS.
Closed Checks (previous bus. day)
The Closed Checks (previous bus. day) button allows the user to generate closed checks report for the previous business period.
Select Closed Checks (previous bus. day). The Closed Checks (previous bus. day) wizard appears.
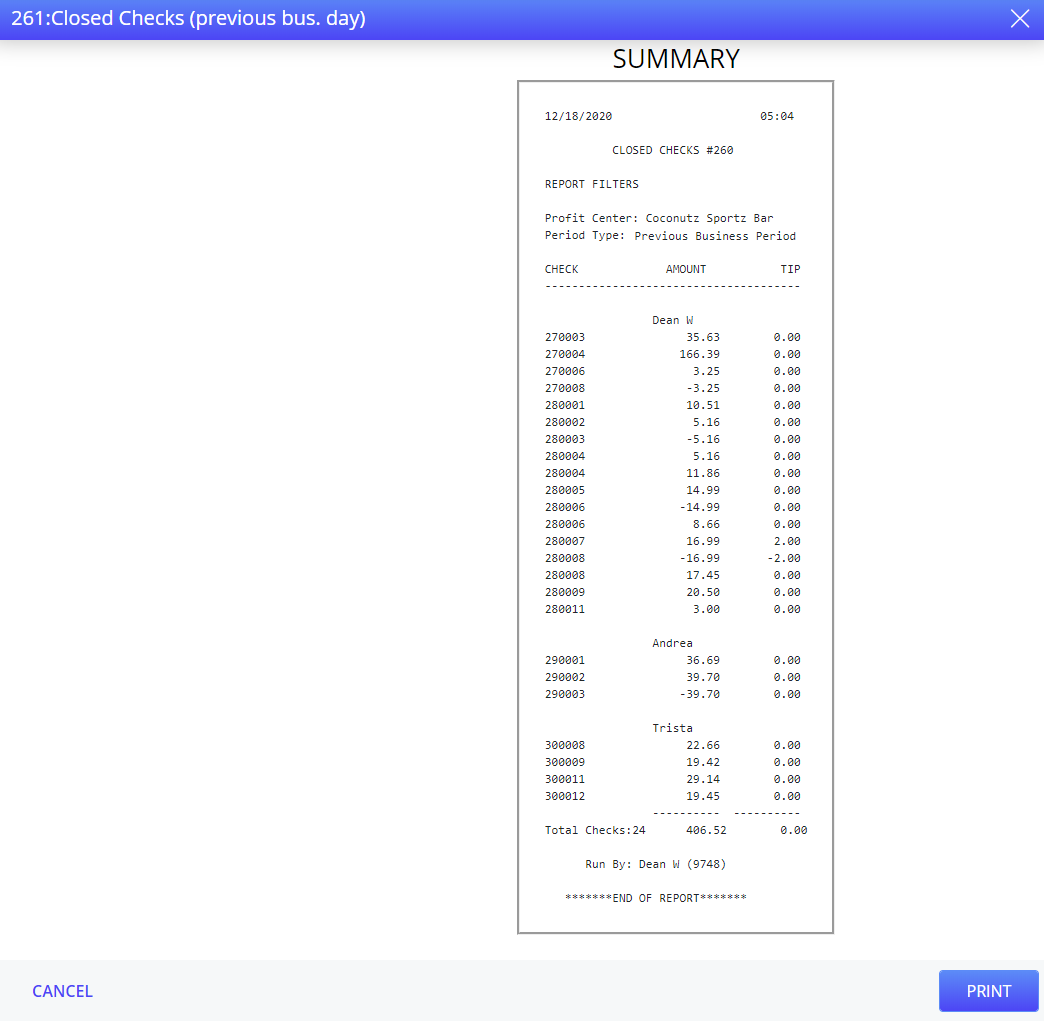
Select Print to print the closed check report for the previous business day.
The user cannot generate Closed Checks (previous bus. day) when the terminal in LSS.
Cashier Closed Checks Tenders (current bus. day)
The Cashier Closed Checks Tenders (current bus. day) button allows the user to generate closed checks tender report of the cashier for the current business period.
Select Cashier Closed Checks Tenders (current bus. day). The Cashier Closed Checks Tenders (current bus. day) wizard appears.
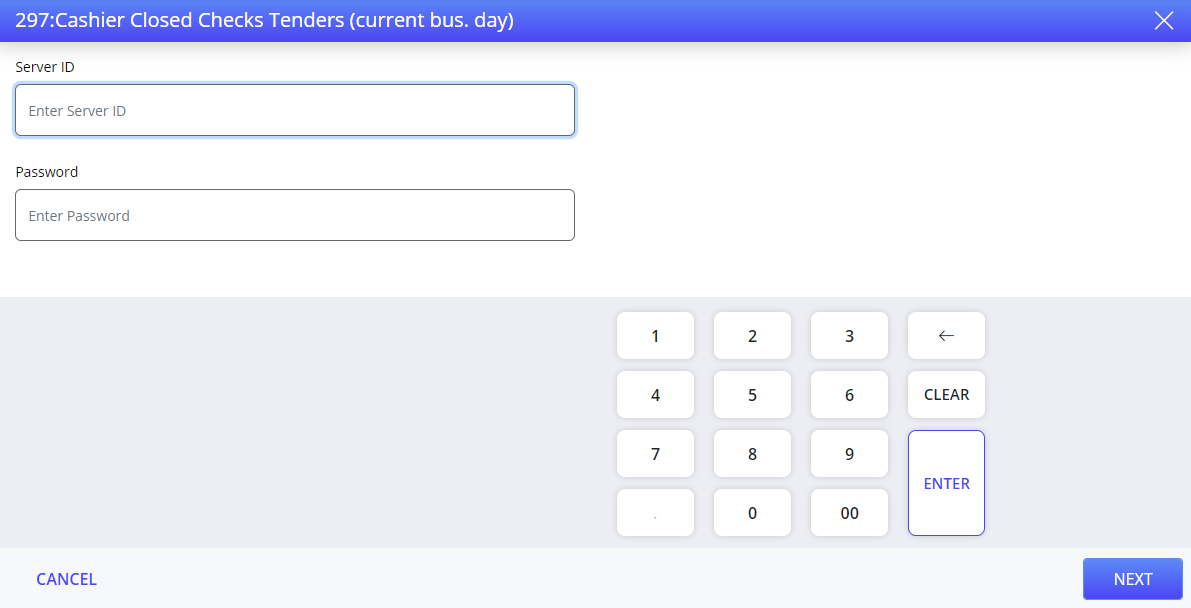
Refer to the following table and fill in the fields to generate cashier closed checks tender report for the current business period:
|
Field |
Description |
|---|---|
|
Server ID |
The unique ID of the server to generate cashier closed checks tender report for the current business period. |
|
Password |
The password of the server. It is an optional field; the user must enter password only if it is configured in IGCM for the respective server. |
Select Enter or Next. The Cashier Closed Checks Tenders (current bus. day) Summary appears.
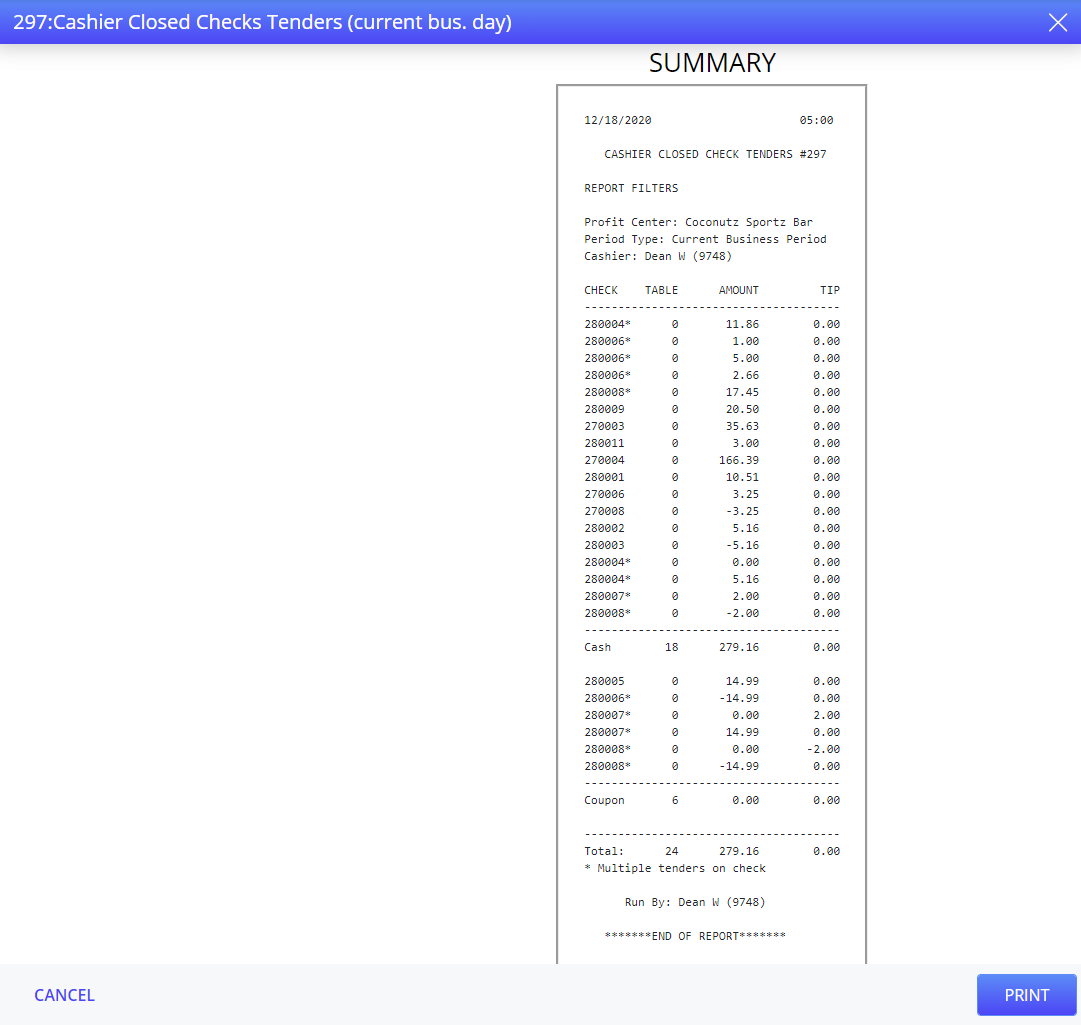
Select Print to print the closed check report for the current business day.
The user cannot generate Closed Checks (current bus. day) when the terminal in LSS.
Cashier Closed Checks Tenders (previous bus. day)
The Cashier Closed Checks Tenders (previous bus. day) button allows the user to generate cashier closed checks tenders report for the previous business period.
Select Closed Checks (previous bus. day). The Cashier Closed Checks Tenders (previous bus. day) Summary appears.
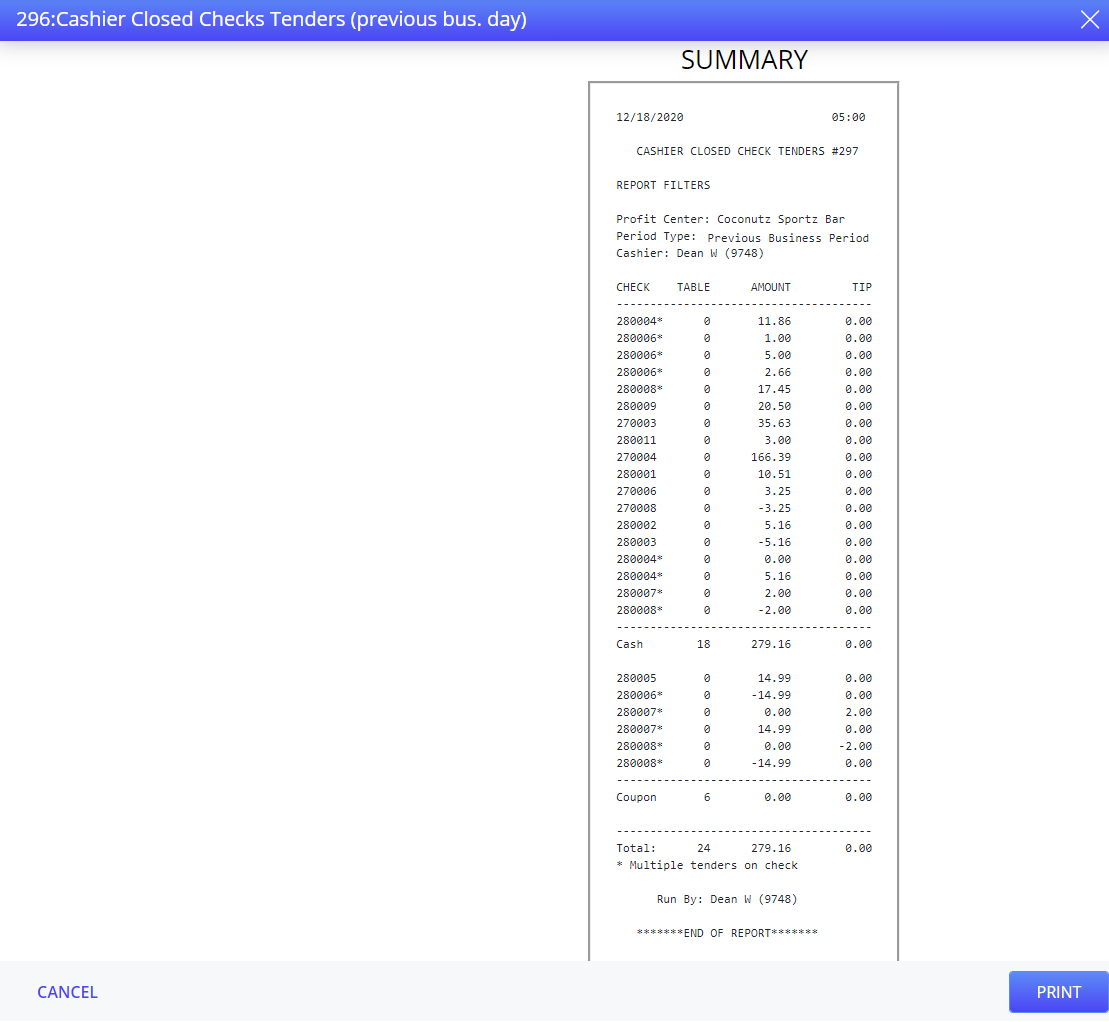
Select Print to print the closed check report for the previous business day.
The user cannot generate Closed Checks (previous bus. day) when the terminal in LSS.
Tender Total (all employees/meal periods; curr bus. day)
The Tender Total (all employees/meal periods; curr bus. day) button allows the user to generate tender total reports of all employees and meal periods for the current business period. The Tender Total report contains the tender amounts for each tender type, loans, withdrawals, changes given, tips paid out, and accountable cash.
Select Tender Total (all employees/meal periods; curr bus. day). The Tender Total (all employees/meal periods; curr bus. day) wizard appears.
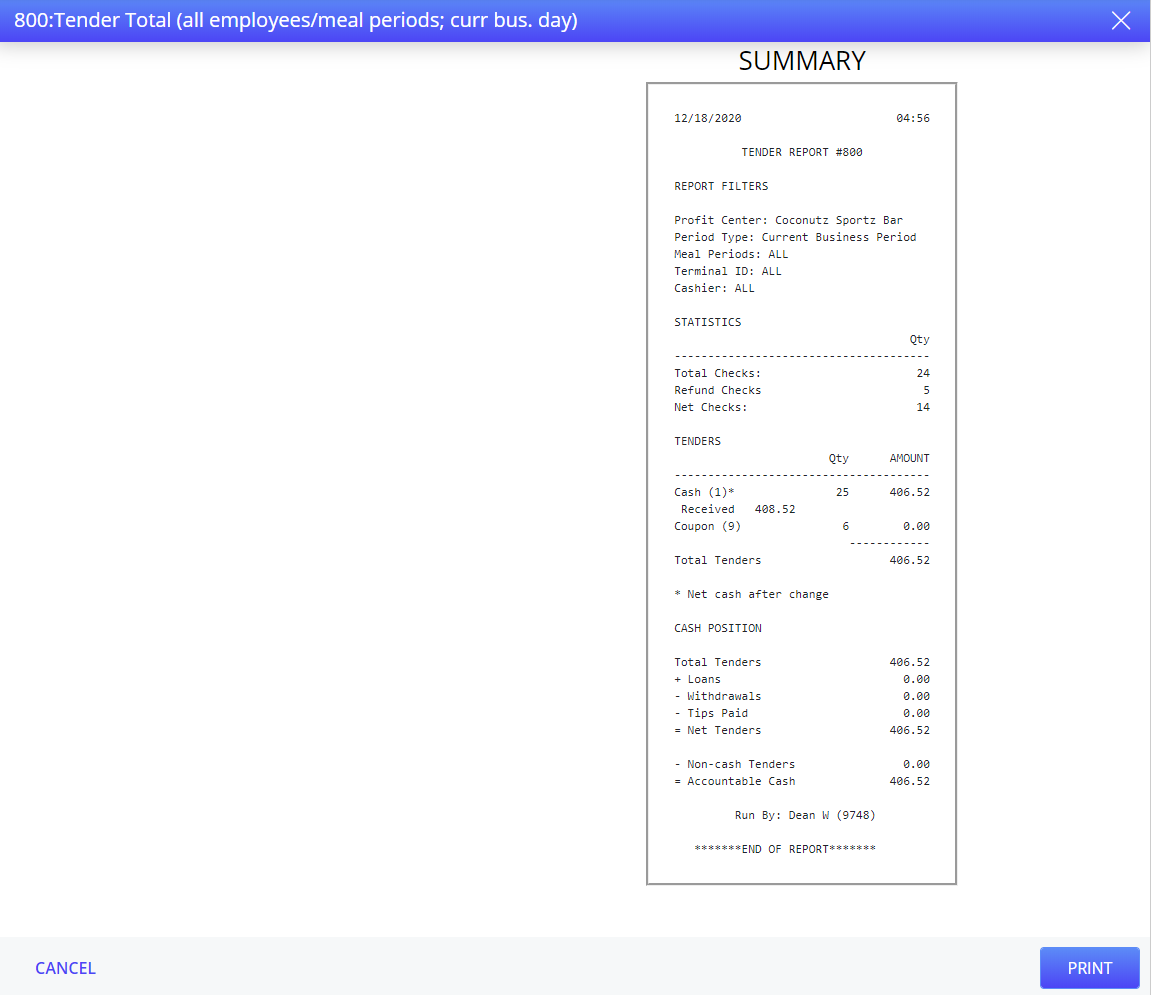
Select Print to print tender total reports of all employees and meal periods for the current business period.
The user cannot generate Tender Total (all employees/meal periods; curr bus. day) when the terminal in LSS.
Tender by Meal Period (current bus. day)
The Tender by Meal Period (current bus. day) button allows the user to generate tender details by meal period for the current business period for all employees. The Tender Total report contains the tender amounts for each tender type, loans, withdrawals, changes given, tips paid out, and accountable cash.
Select Tender by Meal Period (current bus. day). The Tender by Meal Period (current bus. day) wizard appears.
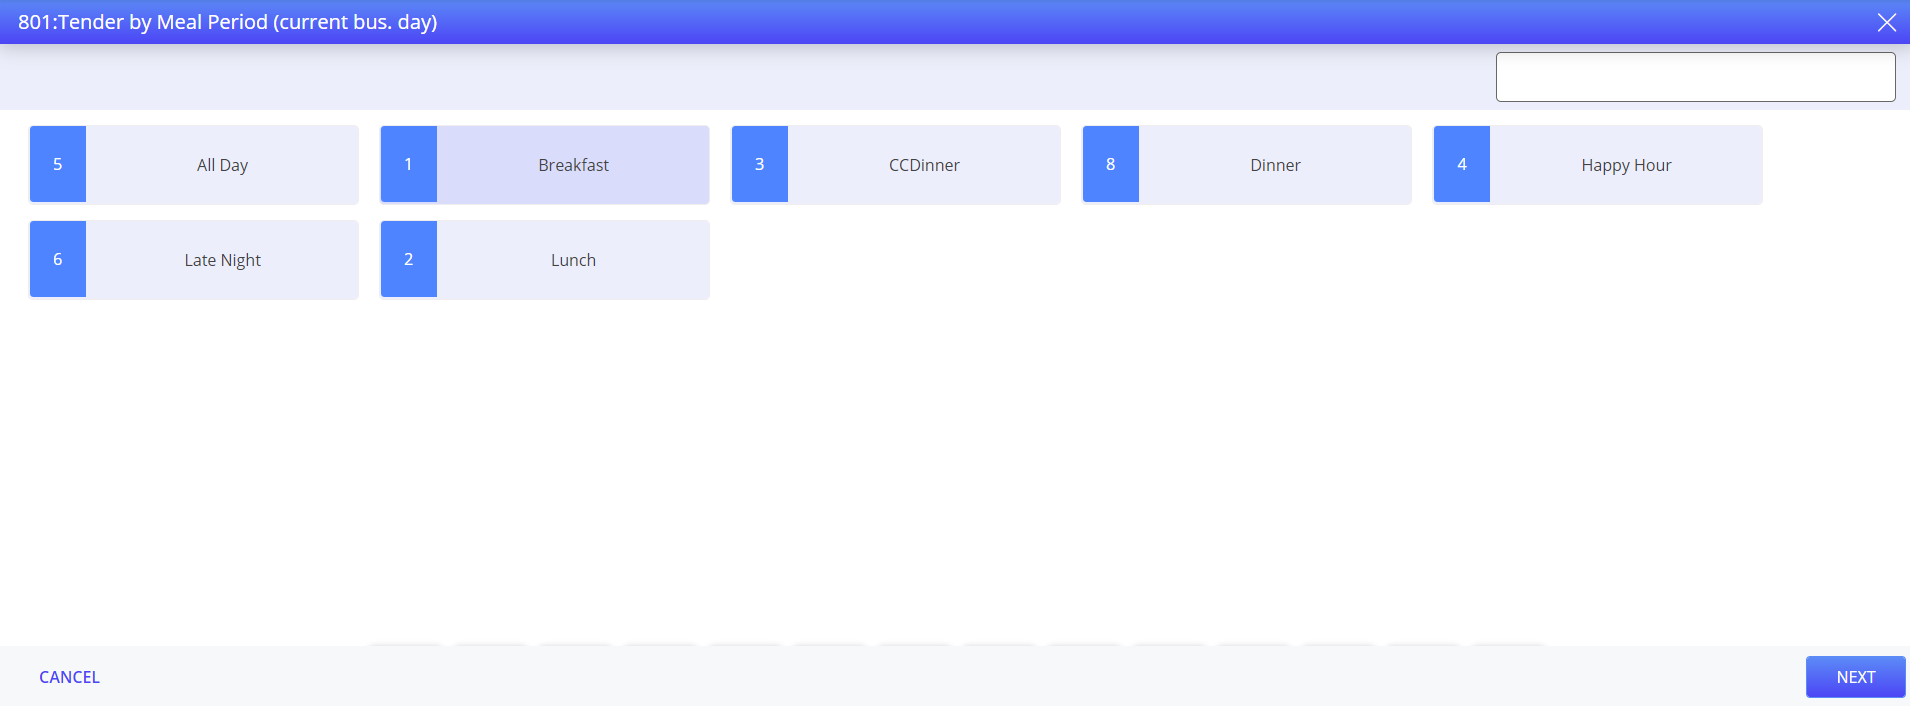
Select the meal period. The Tender by Meal Period (current bus. day) wizard appears.
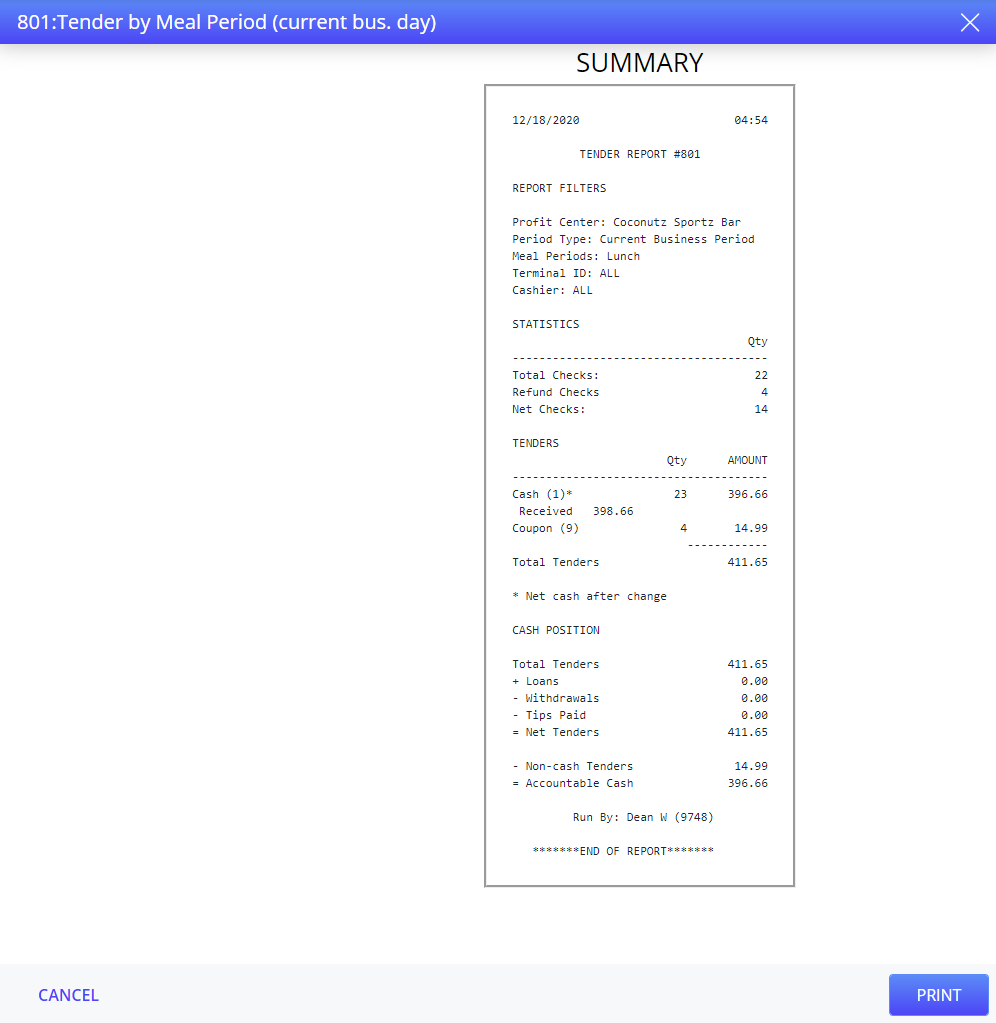
Select Print to print the tender by meal period report.
The user cannot generate Tender by Meal Period (current bus. day) when the terminal in LSS.
Product Mix (all meal period; current bus. day)
The Product Mix (all meal period; current bus. day) button allows the user to generate product mix report of all meal periods for the current business period.
Select Product Mix (all meal period; current bus. day. The Product Mix (all meal periods; current bus. day wizard appears.
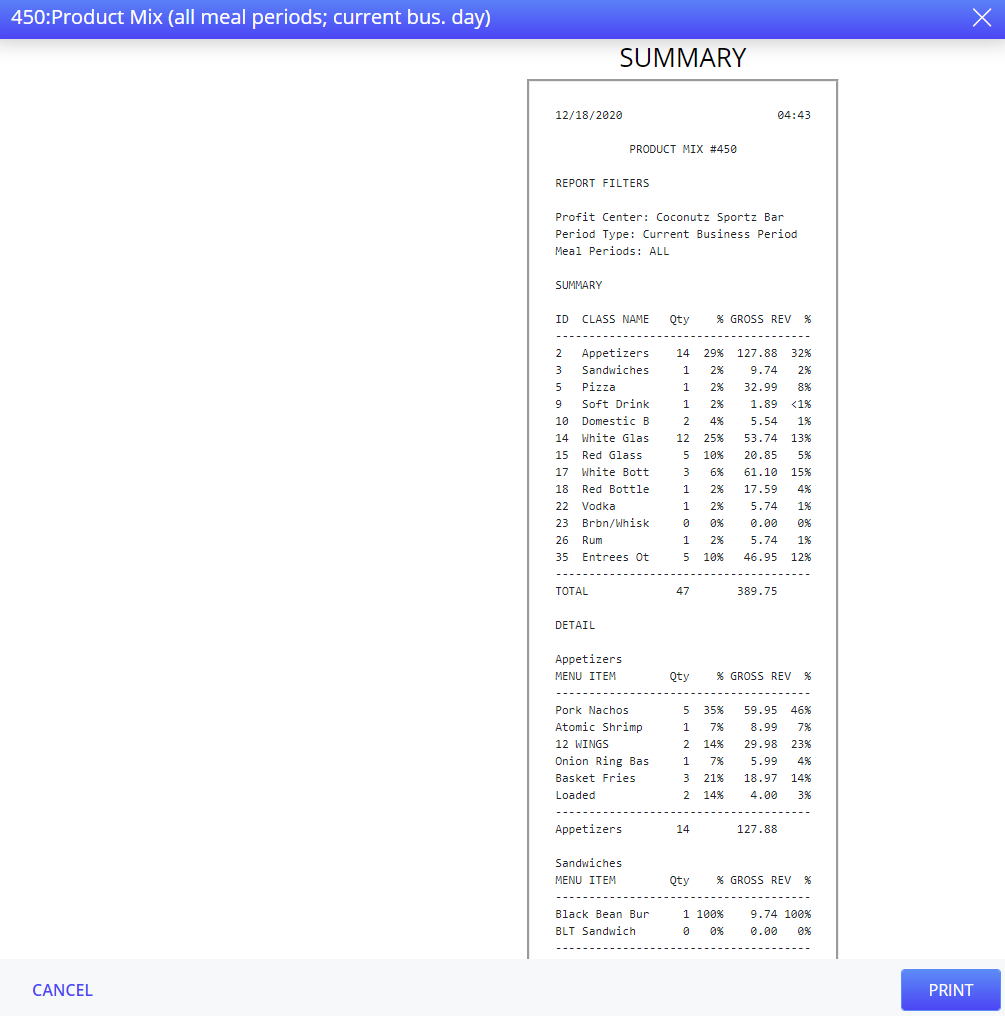
Select Print to print the product mix report for all meal periods for current business day.
The user cannot generate Product Mix (all meal period; current bus. day when the terminal in LSS.
Product Mix (specific meal period; current bus. day)
The Product Mix (specific meal period; current bus. day) button allows the user to generate product mix report of specific meal periods for the current business period.
Select Product Mix (specific meal period; current bus. day). The Product Mix (specific meal period; current bus. day) wizard appears.
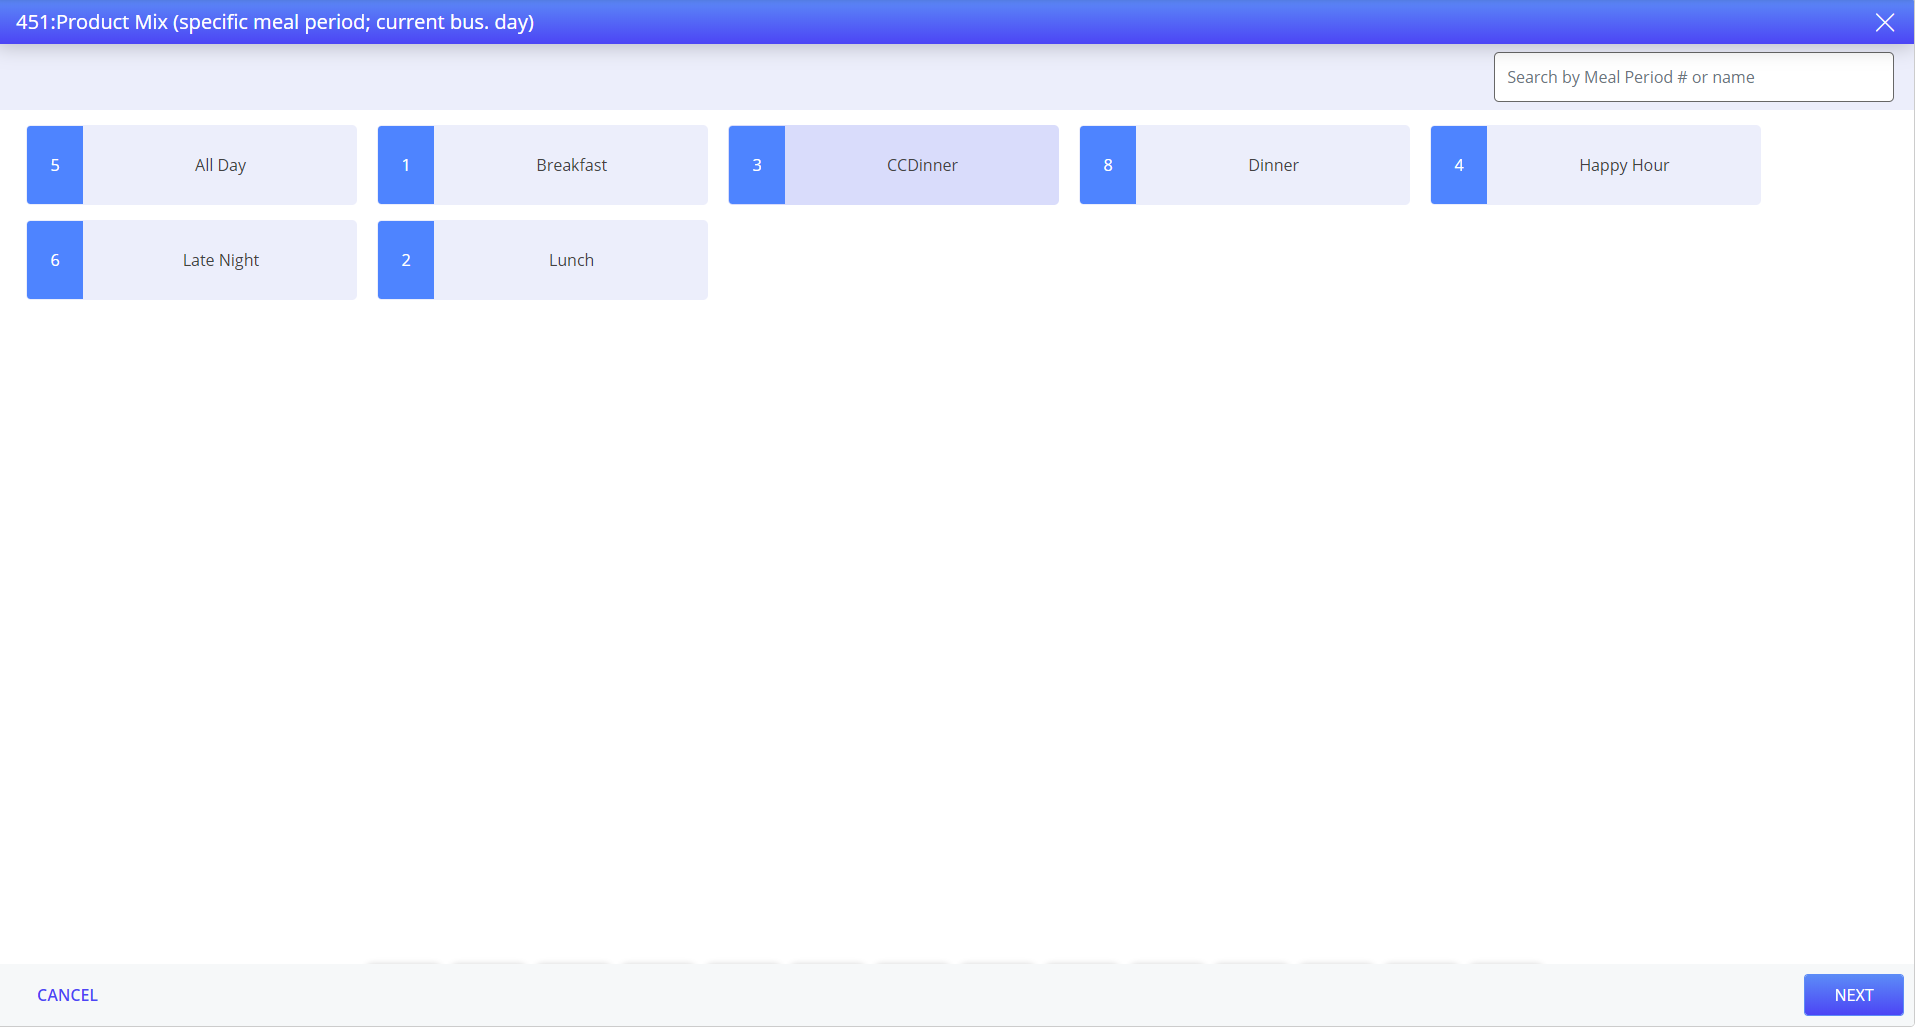
Select the meal period. The Product Mix (specific meal period; current bus. day) wizard appears.
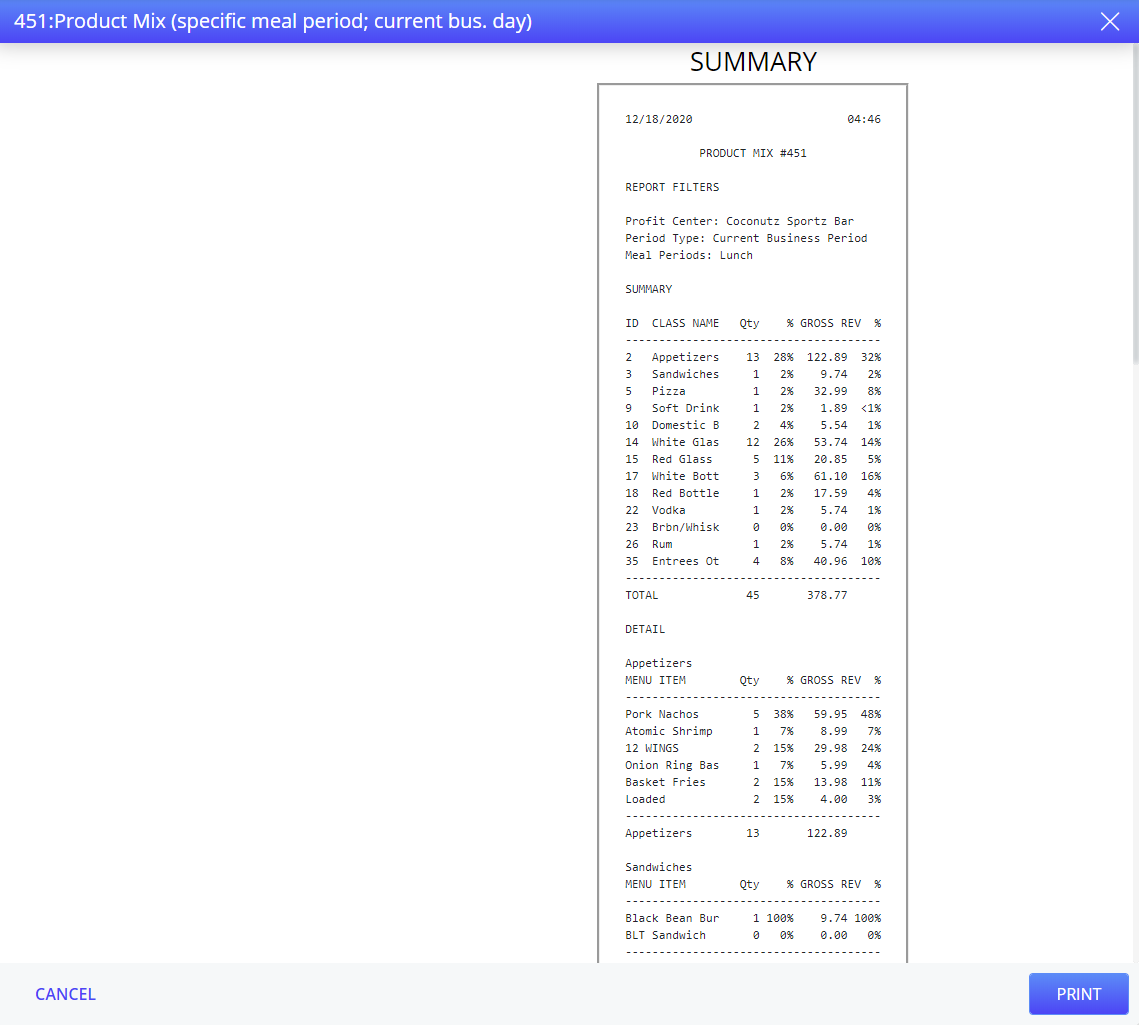
Select Print to print the product mix report for specific meal period for current business day.
The user cannot generate Product Mix (specific meal period; current bus. day) when the terminal in LSS.
Product Mix (all meal period; previous bus. day)
The Product Mix (all meal period; previous bus. day) button allows the user to generate product mix report of all meal periods for the previous business period.
Select Product Mix (all meal period; previous bus. day. The Product Mix (all meal periods; previous bus. day wizard appears.
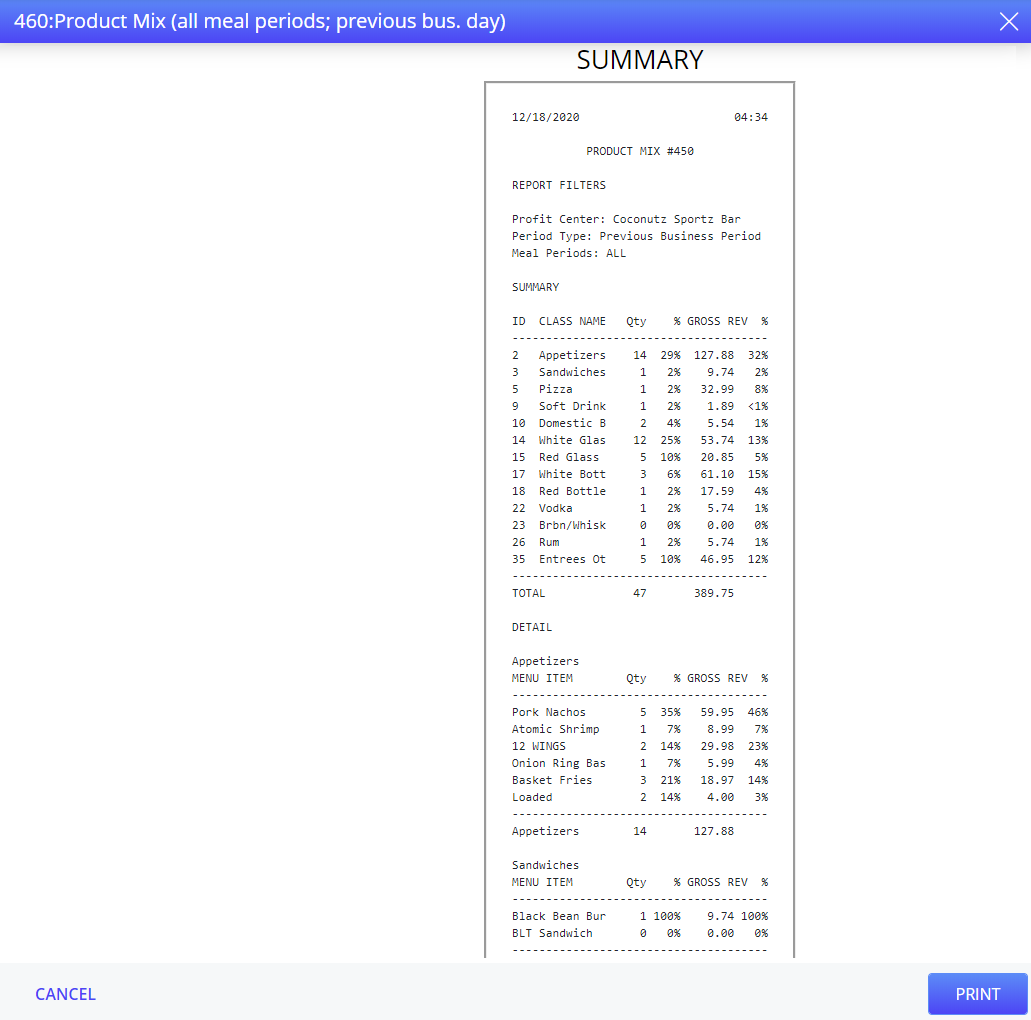
Select Print to print the product mix report for all meal period for previous business day.
The user cannot generate Product Mix (all meal period; previous bus. day when the terminal in LSS.
Product Mix (specific meal period; previous bus. day)
The Product Mix (specific meal period; previous bus. day) button allows the user to generate product mix report of specific meal periods for the previous business period.
Select Product Mix (specific meal period; previous bus. day). The Product Mix (specific meal period; previous bus. day) wizard appears.
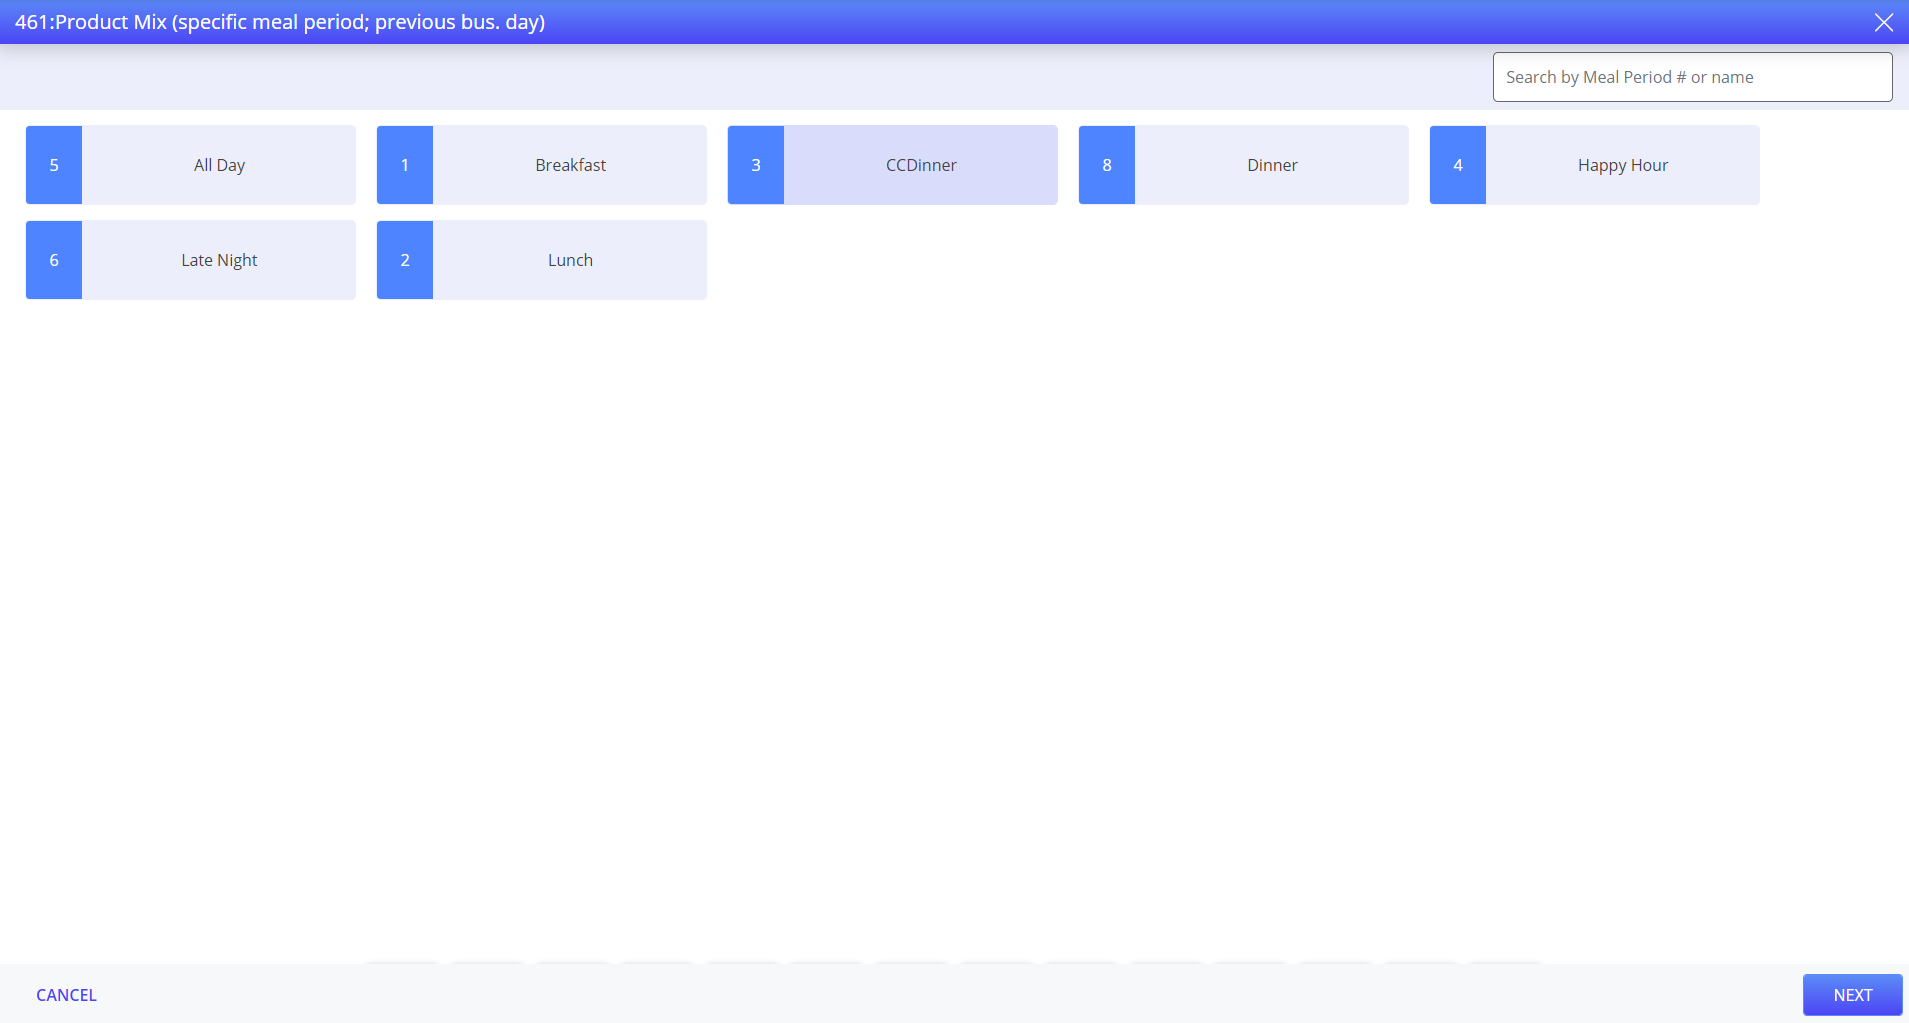
Select the meal period. The Product Mix (specific meal periods; previous bus. day) wizard appears.
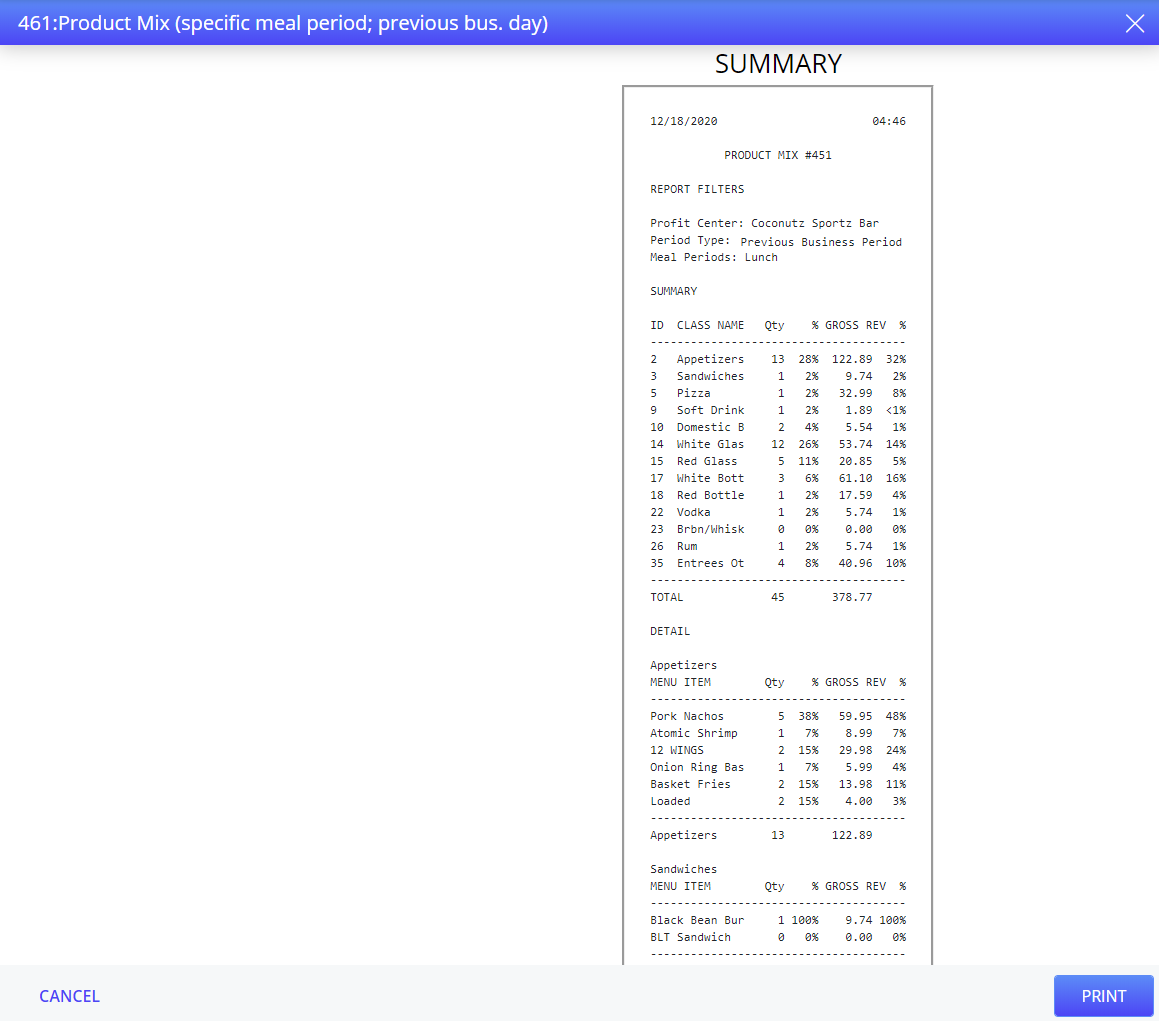
Select Print to print the product mix report for specific meal period for previous business day.
The user cannot generate Product Mix (specific meal periods; previous bus. day) when the terminal in LSS.
Revenue Total (all ck types/meal periods; curr bus. day)
The Revenue Total (all ck types/meal periods; curr bus. day) button allows the user to generate revenue total report for all check types and meal periods for the current business period.
Select Revenue Total (all ck types/meal periods; curr bus. day). The Revenue Total (all ck types/meal periods; curr bus. day) wizard appears.
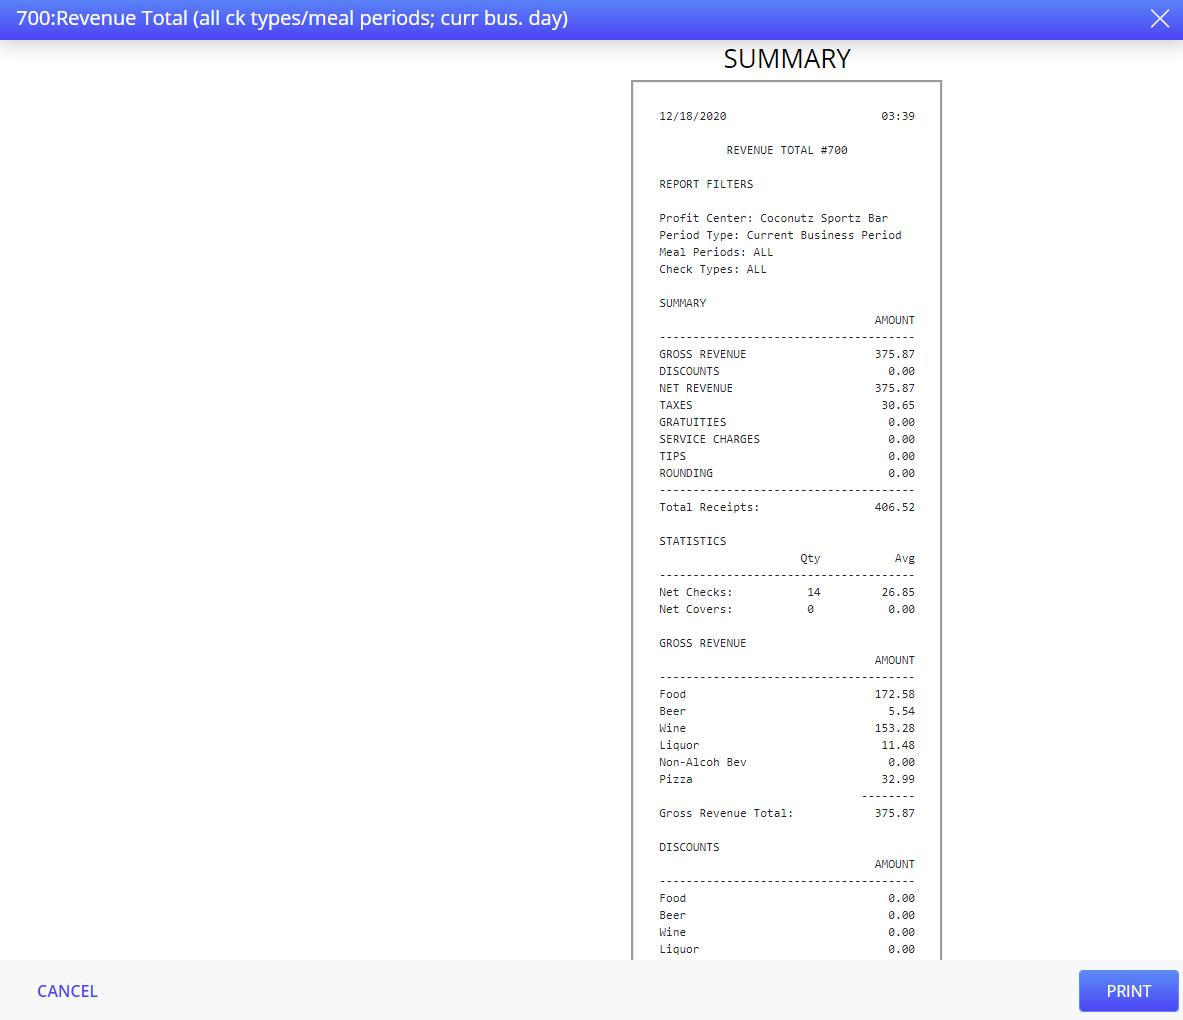
Select Print to print the revenue total report for all check types or meal periods for current business day.
The user cannot generate Revenue Total (all ck types/meal periods; curr bus. day) when the terminal in LSS.
Revenue (specific meal period; current bus. day)
The Revenue (specific meal period; current bus. day) button allows the user to generate revenue report for the specific meal period for the current business period.
Select Revenue (specific meal period; current bus. day). The Revenue (specific meal period; current bus. day) wizard appears.
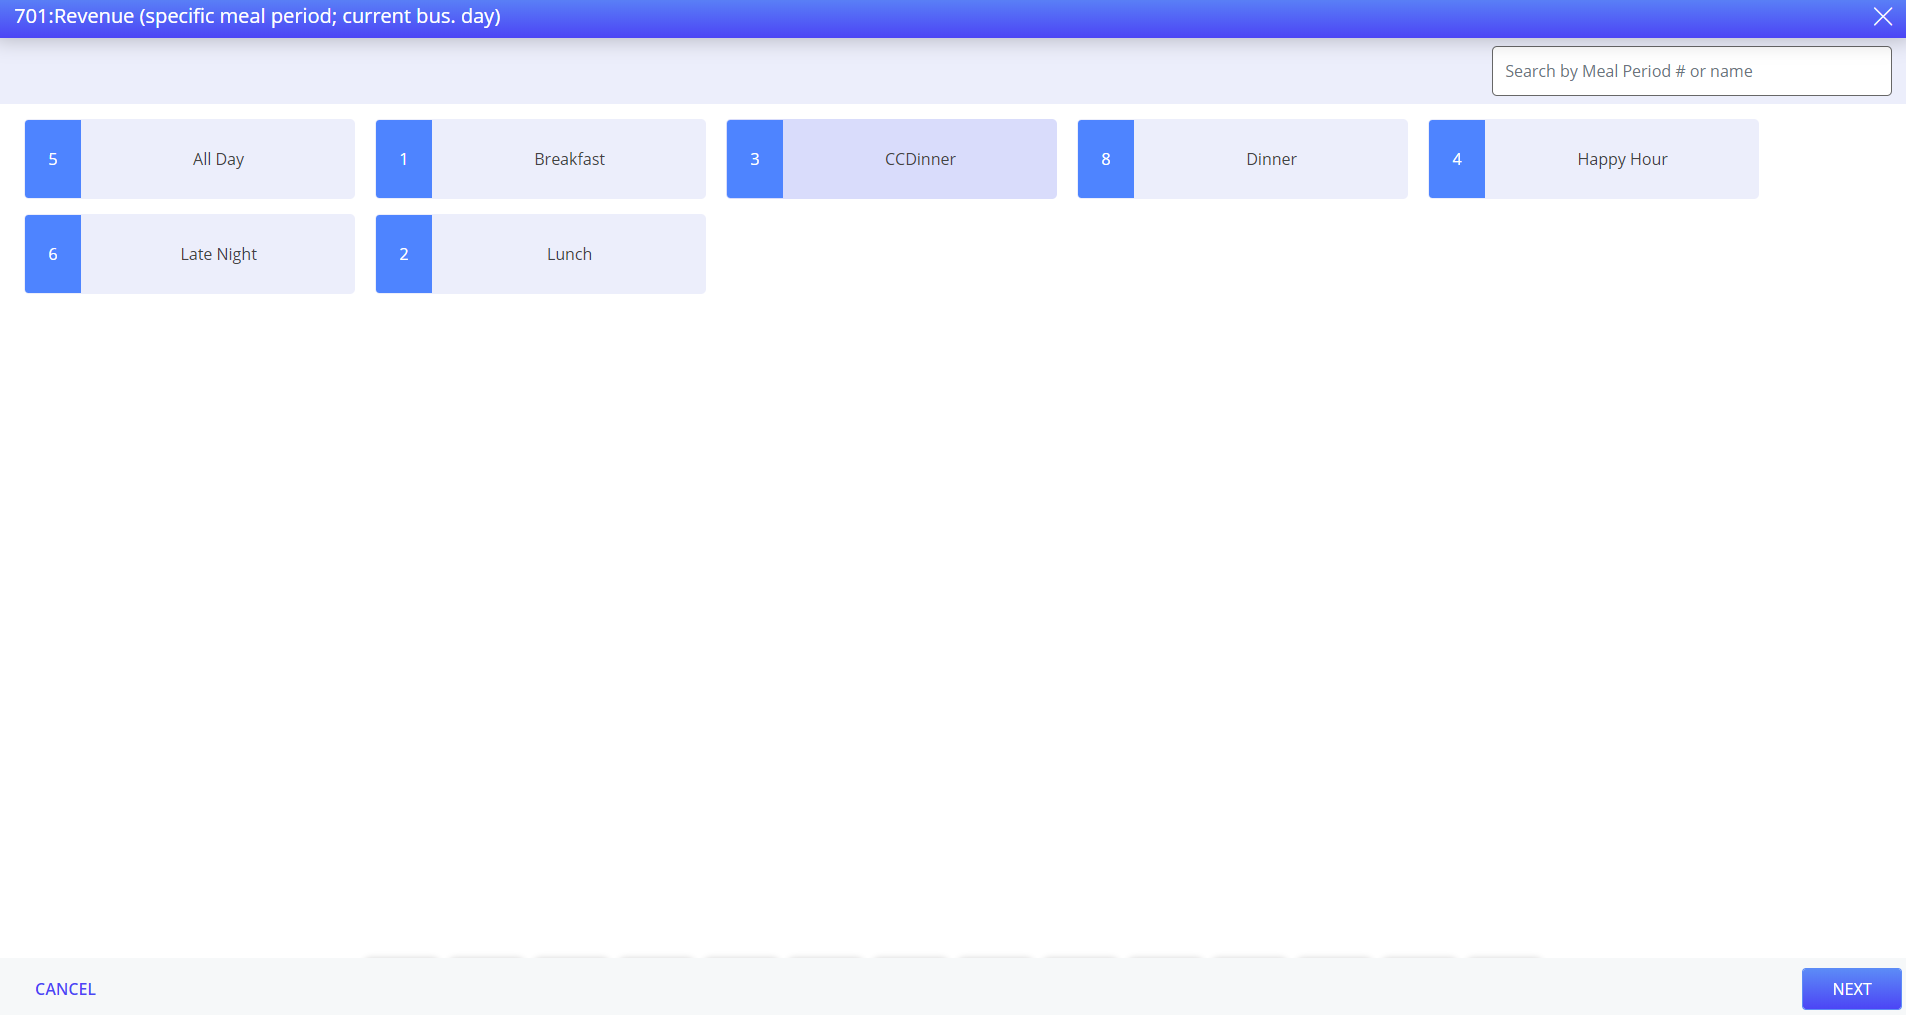
Select the meal period. The Revenue (specific meal period; current bus. day) wizard appears.
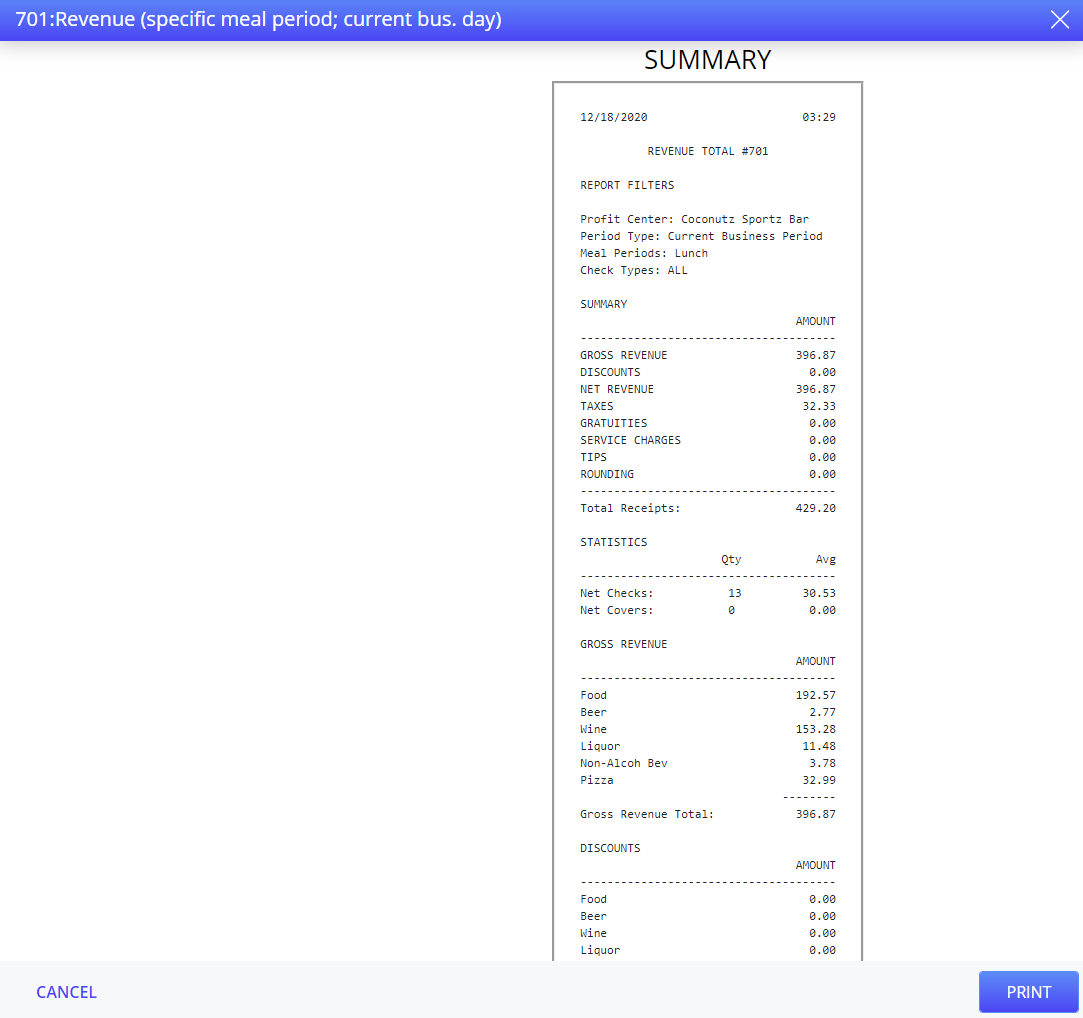
Select Print to print the revenue report of specific meal period for the current business day.
The user cannot generate Revenue (specific meal period; current bus. day) when the terminal in LSS.
Revenue (specific check type; current bus. day)
The Revenue (specific check type; current bus. day) button allows the user to generate revenue total report of specific check type for the current business period.
Select Revenue (specific check type; current bus. day). The Revenue (specific check type; current bus. day) wizard appears.
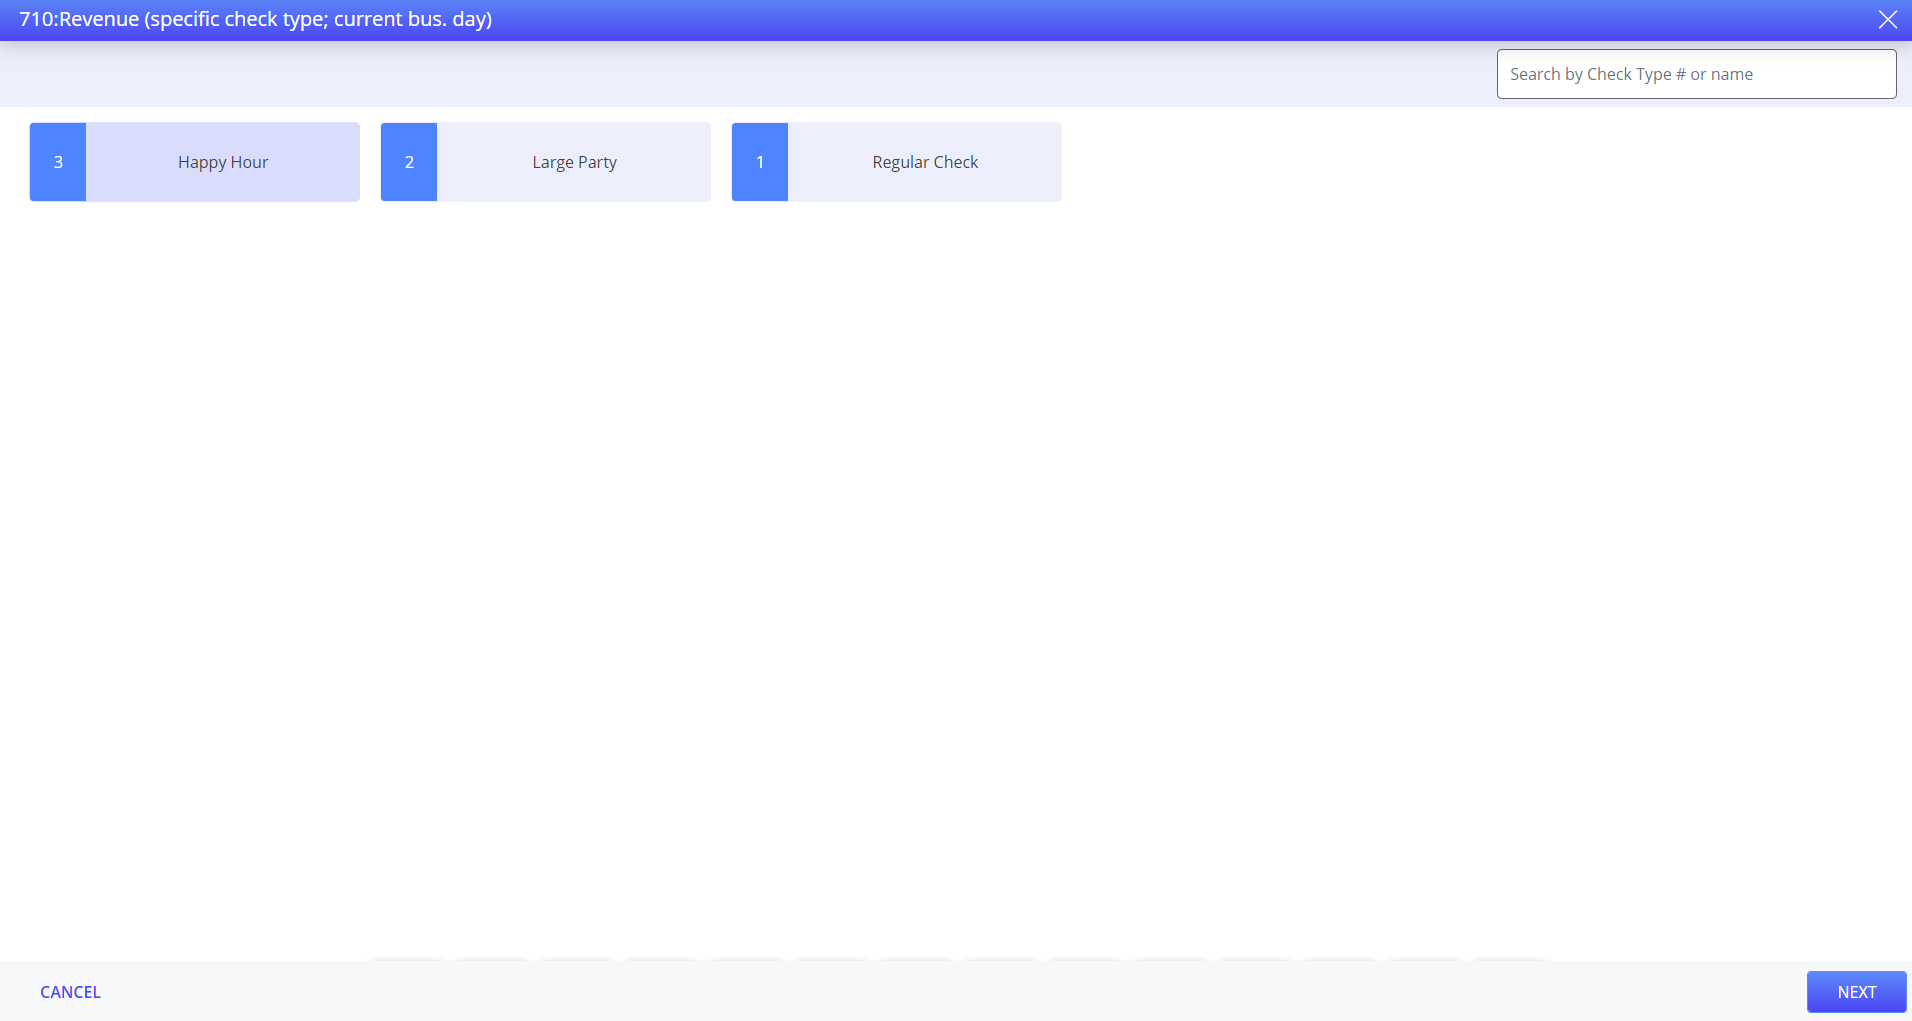
Select the check type. The Revenue (specific check type; current bus. day) wizard appears.
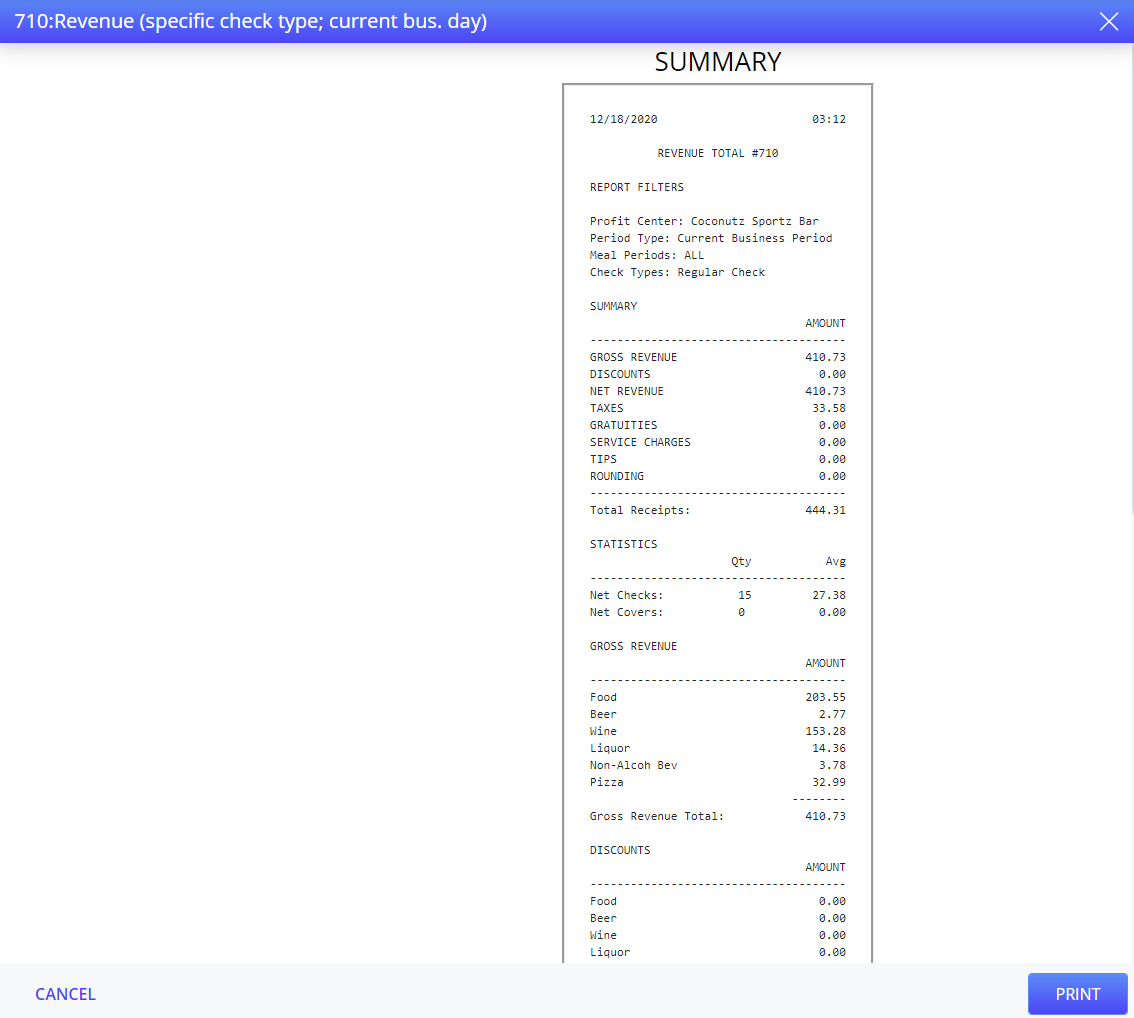
Select Print to print the revenue report of specific check type for current business day.
The user cannot generate Revenue (specific check type; current bus. day) when the terminal in LSS.
Revenue Total (all ck types/meal periods; prev bus. day)
The Revenue (all ck types/meal periods; prev bus. day) button allows the user to generate revenue total report for all check types and meal periods for the previous business period.
Select Revenue (all ck types/meal periods; prev bus. day). The Revenue Total (all ck types/meal periods; prev bus. day) wizard appears.
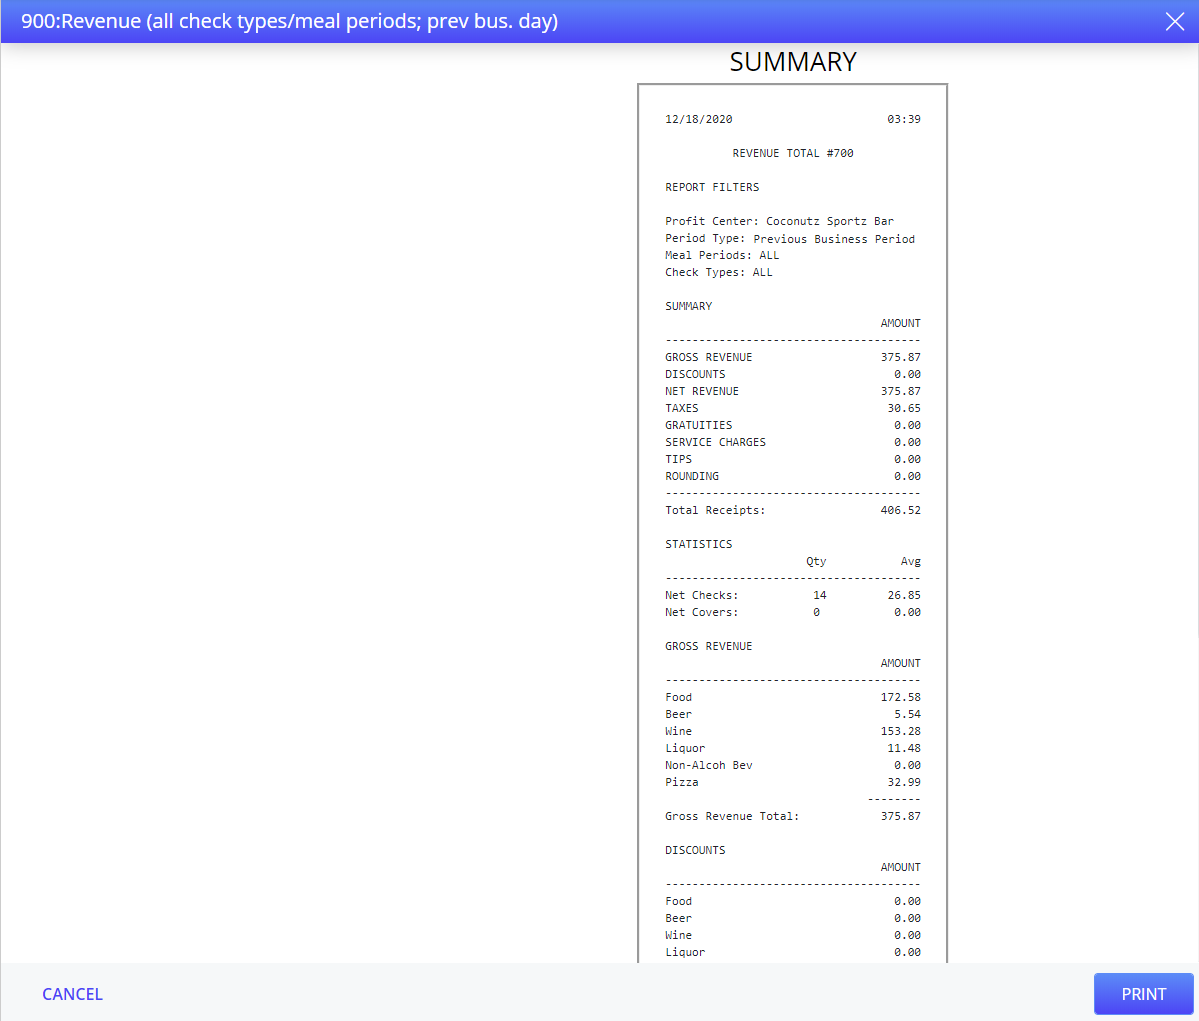
Select Print to print the revenue report of all the check types and meal periods for previous business day.
The user cannot generate Revenue (all ck types/meal periods; prev bus. day) when the terminal in LSS.
Revenue (specific meal period; previous bus. day)
The Revenue (specific meal period; previous bus. day) button allows the user to generate revenue report for the specific meal period for the previous business period.
Select Revenue (specific meal period; previous bus. day). The Revenue (specific meal period; previous bus. day) wizard appears.
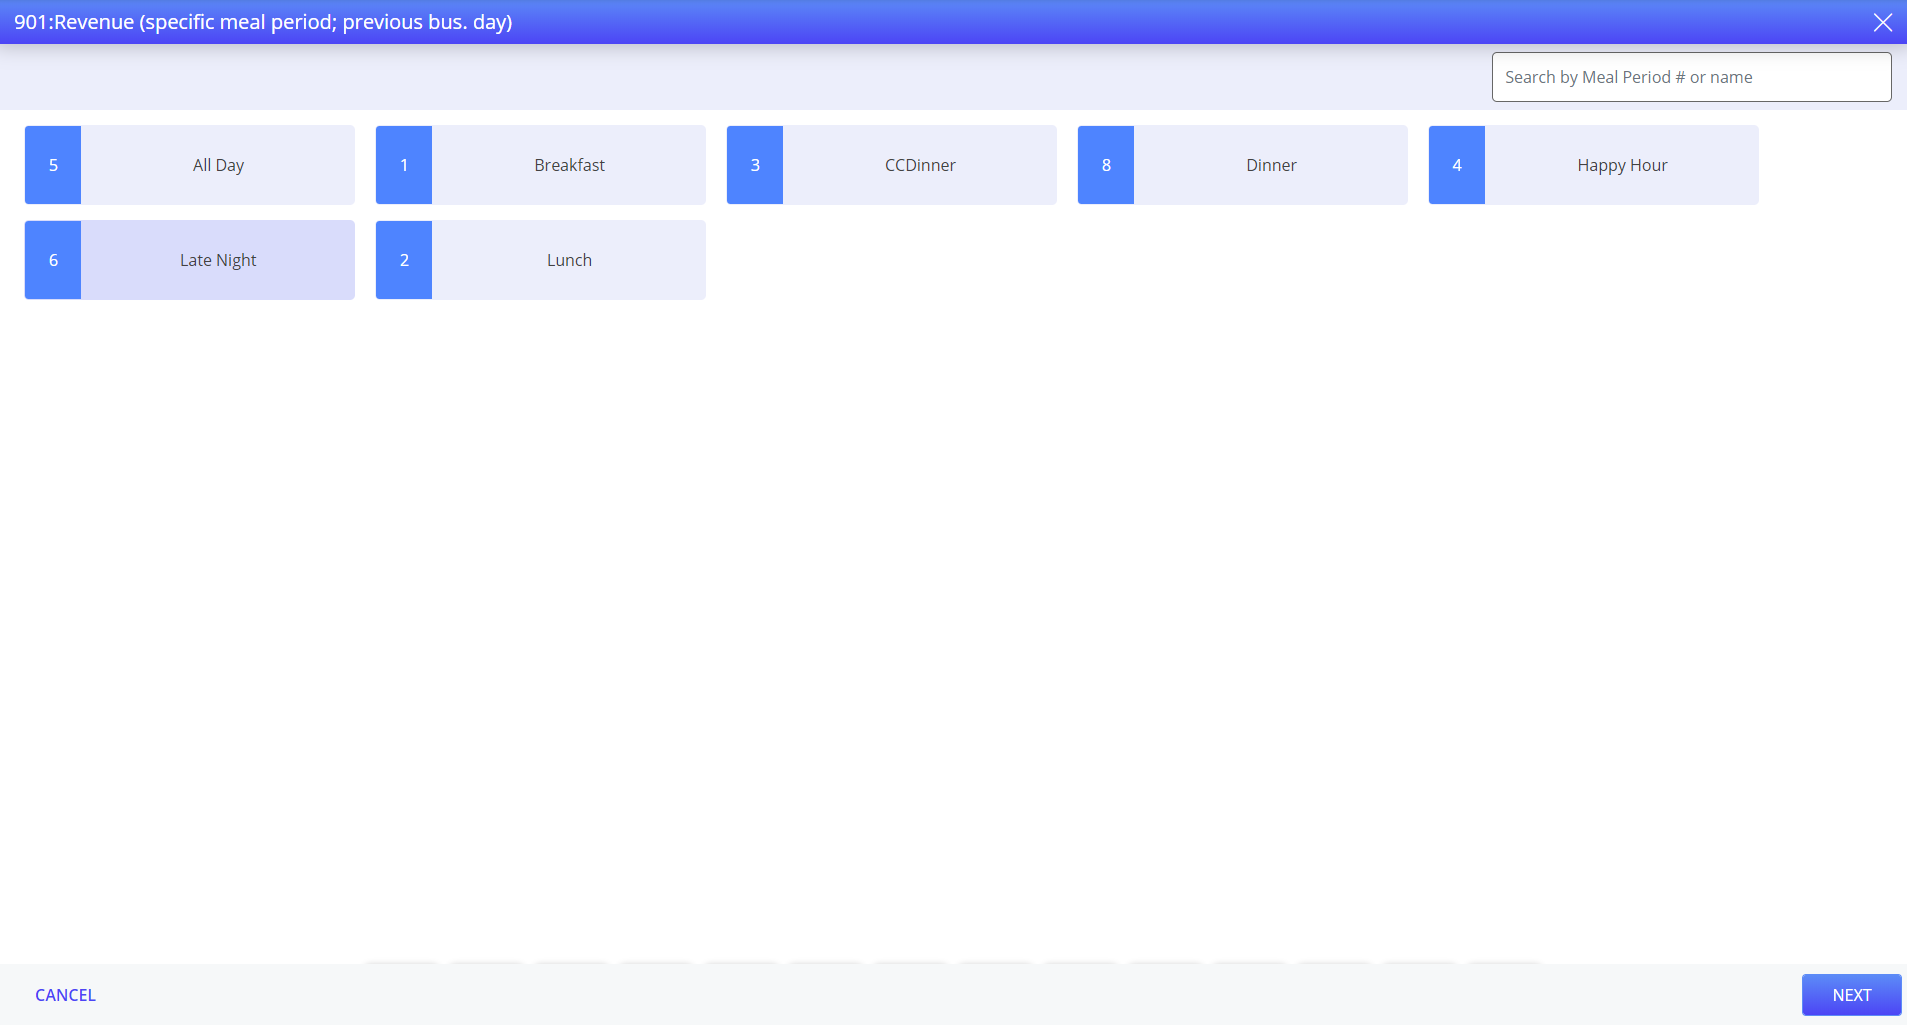
Select the meal period. The Revenue (specific meal period; previous bus. day) wizard appears.
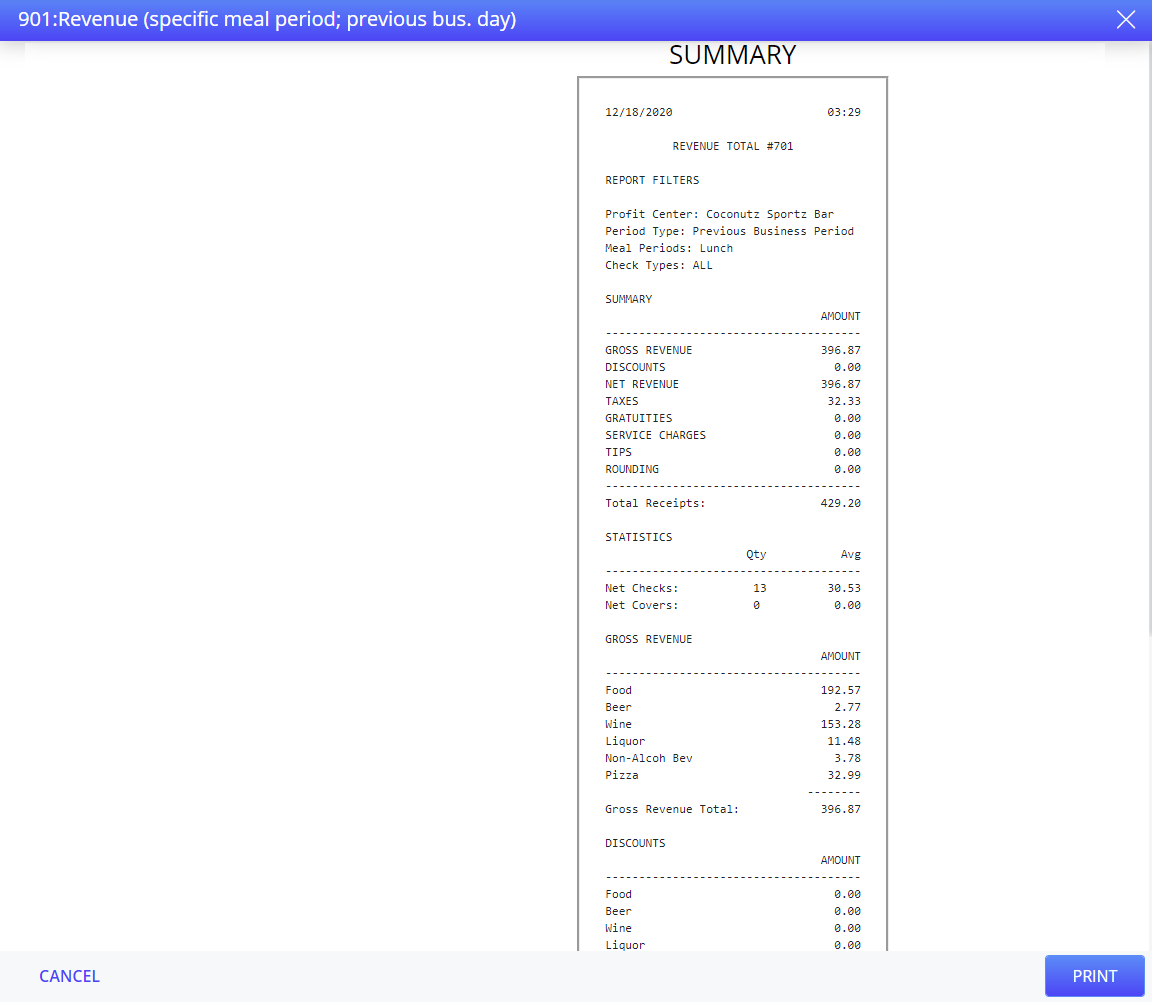
Select Print to print the revenue report of the specific meal period for the previous business day.
The user cannot generate Revenue (specific meal period; previous bus. day) when the terminal in LSS.
Revenue (specific check type; previous bus. day)
The Revenue (specific check type; previous bus. day) button allows the user to generate revenue report of specific check type for the previous business period.
Select Revenue (specific check type; previous bus. day). The Revenue (specific check type; previous bus. day) wizard appears.
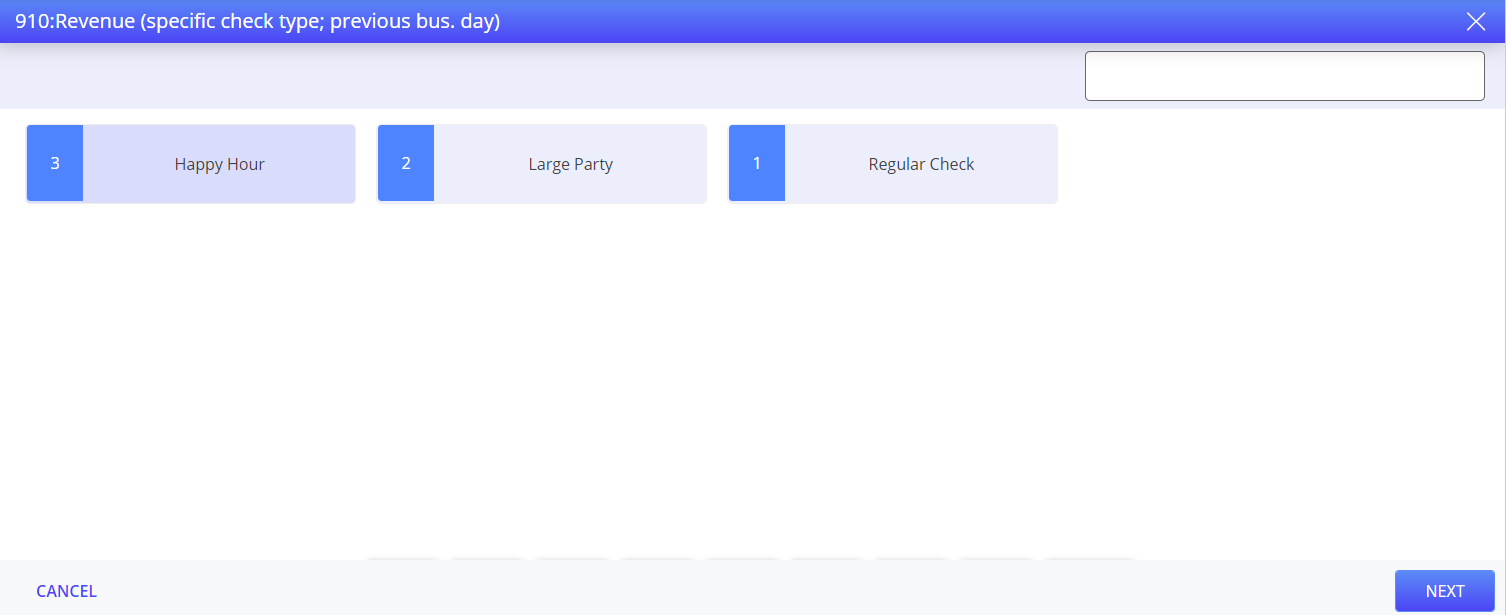
Select the check type. The Revenue (specific check type; previous bus. day) appears.
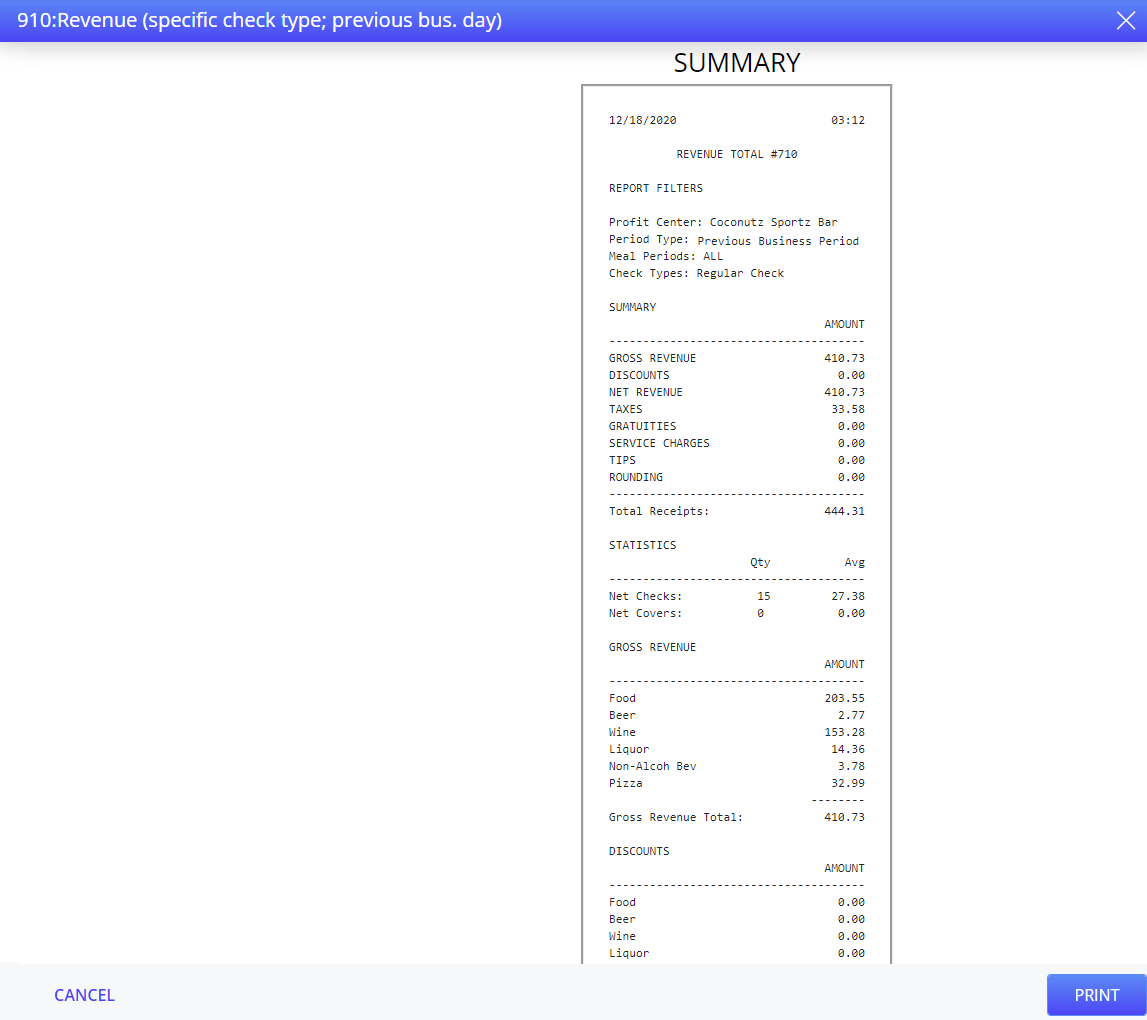
The user cannot generate Revenue (specific check type; previous bus. day) when the terminal in LSS.
Clock-in List Report (all employees/current profit center)
The Clock-in List Report (all employees/current profit center) report lists the employees clocked-in at the current profit center.
Navigate to the Reports screen.
Select Clock-in List Report (all employees/current profit center). The report is generated.
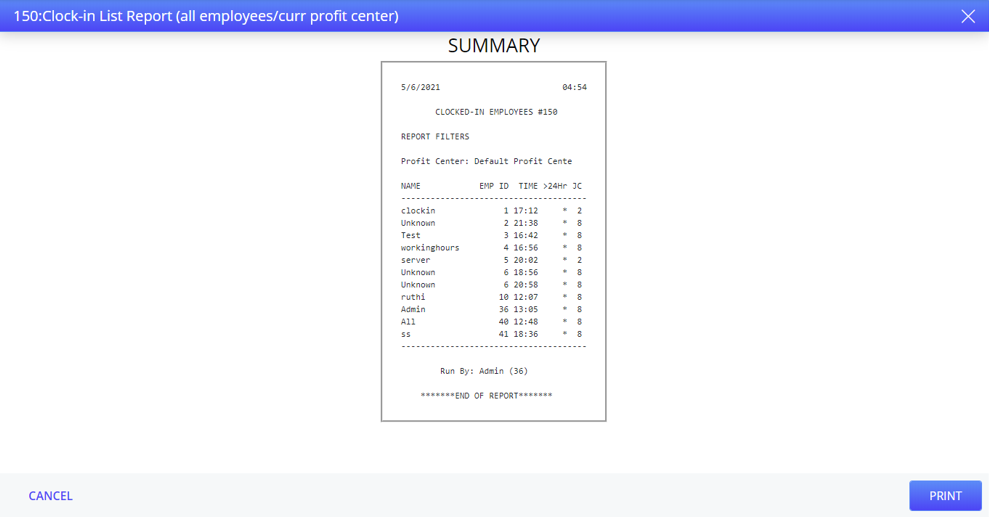
Select Print to print the report.
Global Clocked-in Emps (all employees/profit centers)
The Global Clock-in Emps (all employees/profit centers) report lists the employees clocked-in at all outlets.
Navigate to the Reports screen.
Select Global Clock-in Emps (all employees/profit centers). The report is generated.
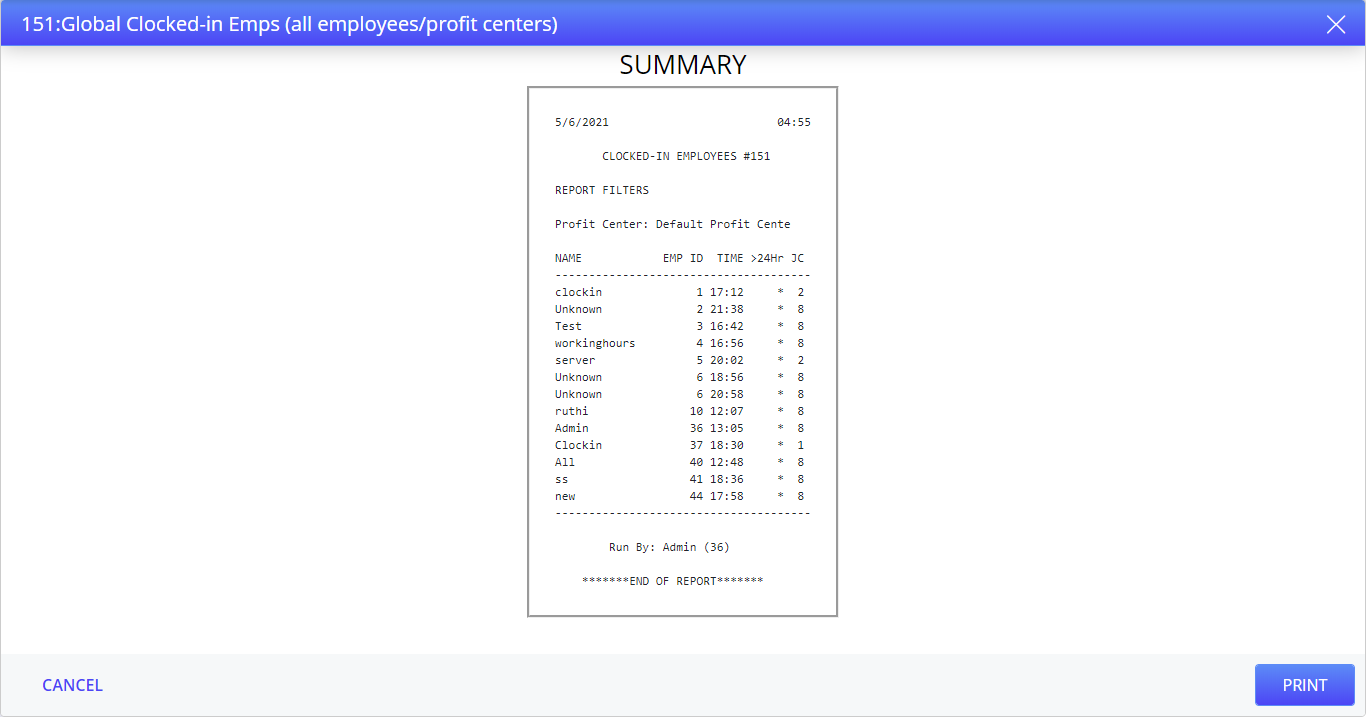
Select Print to print the report.
Generic Auth Accounts
The Generic Auth Accounts report lists GA account charges to date for all GA types.
Navigate to the Reports screen.
Select Generic Auth Accounts. The report is generated.
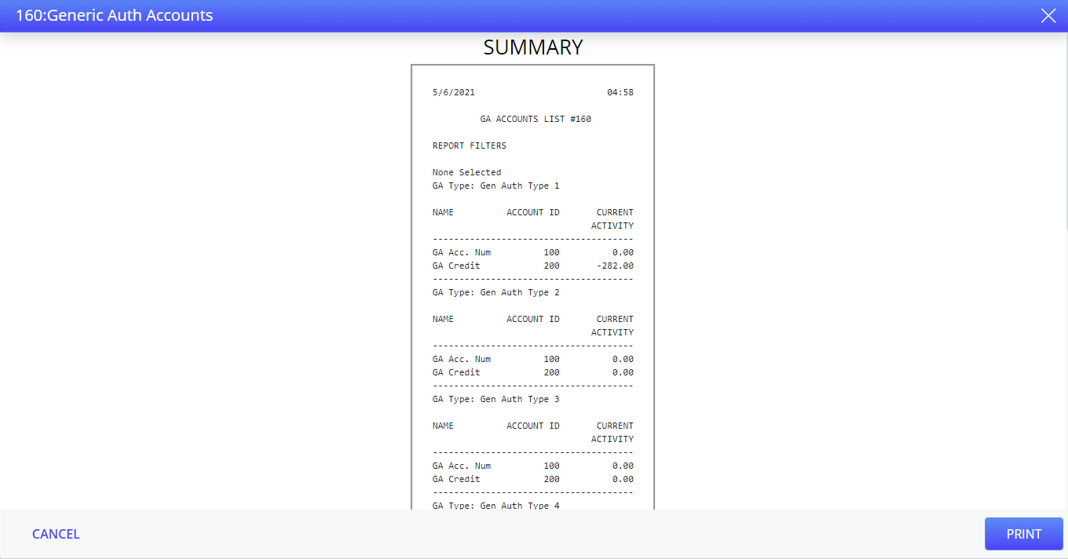
Select Print to print the report.
All Server Sales/Cashier Tenders (current bus. day)
The All Server Sales/Cashier Tenders report lists the server sales and cashier tender information for the current business period.
Navigate to the Reports screen.
Select All Server Sales/Cashier Tenders (current bus. day). The report is generated.
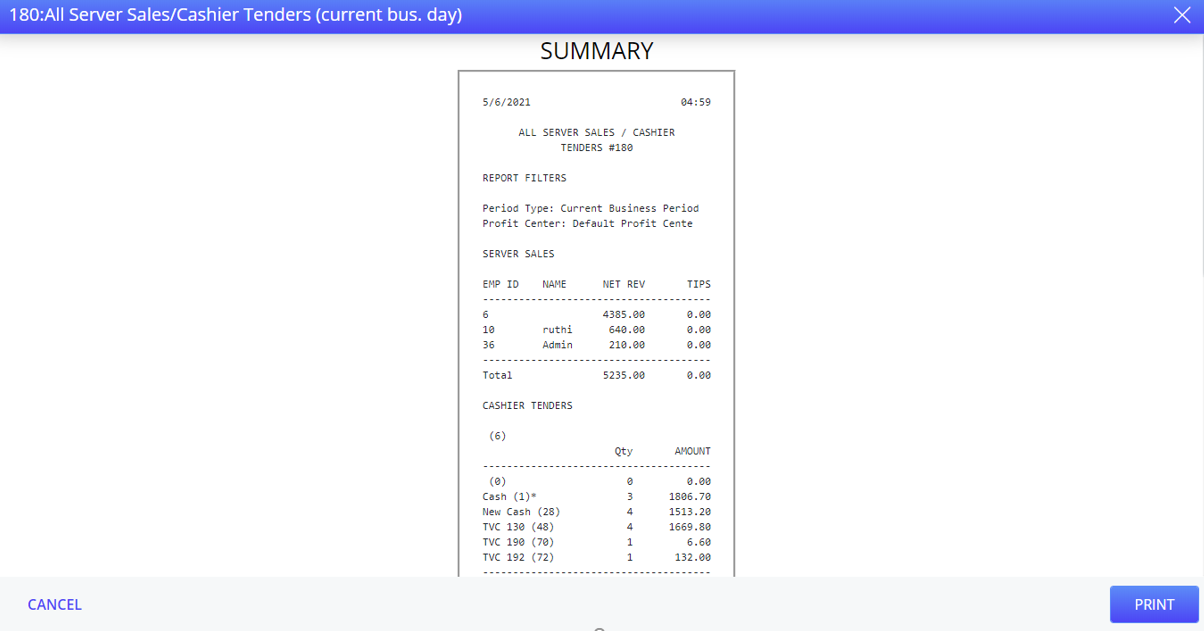
Select Print to print the report.
All Server Sales/Cashier Tenders (previous bus. day)
The All Server Sales/Cashier Tenders (previous bus. day) report lists the server sales and cashier tender information for the previous business period.
Navigate to the Reports screen.
Select All Server Sales/Cashier Tenders (previous bus. day). The report is generated.
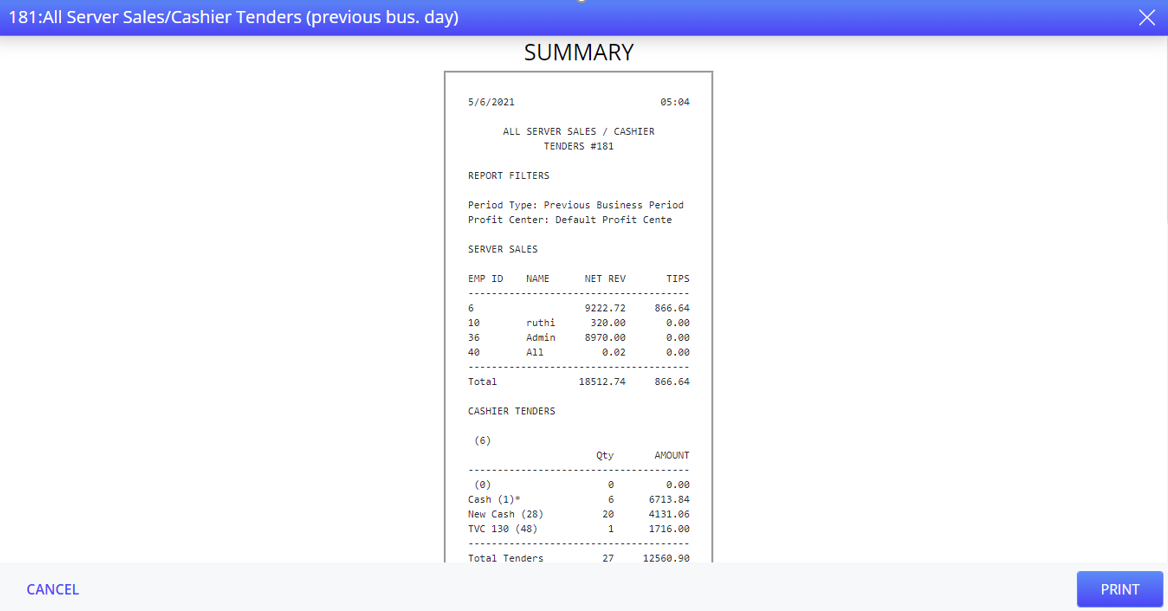
Select Print to print the report.
Historical Employee Tips Report
The Historical Employee Tips Report provides a way for tipped employees to reconcile their financial records with the records in the POS system. Current tip data is based on the date of the last Shift Reset. The report can be run for a range that includes the date of the most recent shift reset. The system assumes that the specified date range is the most recent valid range.
Navigate to the Reports screen.
Select Historical Employee Tips Report. The Historical Employee Tips Report wizard appears.
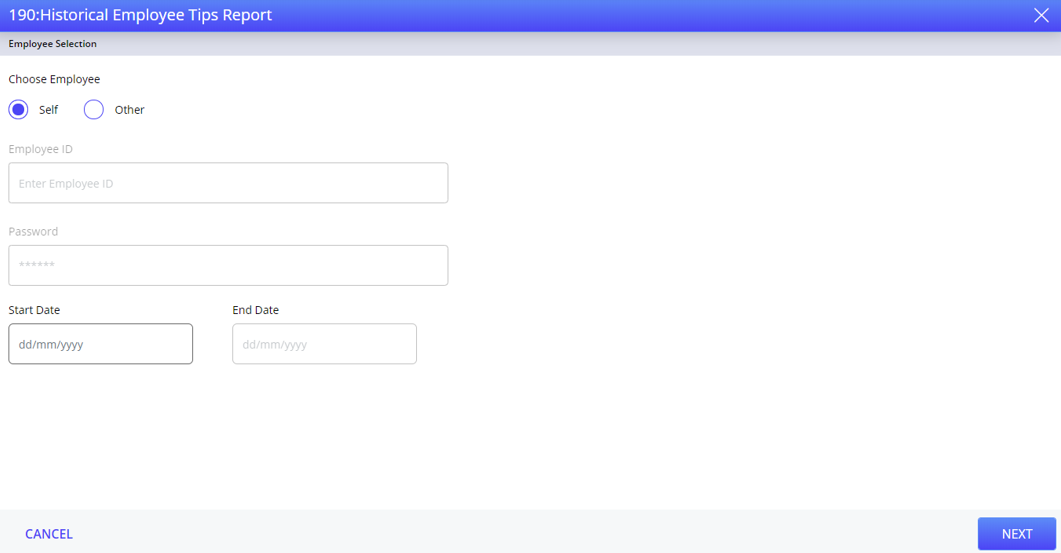
Select Self to generate the report for self or Other in case of generating the report for another employee. Self is selected by default.
Enter the employee ID and password, in case of generating the report for another employee. These fields get enabled only when Other is selected under the Choose Employee section.
Enter the start date and end date in the respective fields.
Select Next. The report is generated.
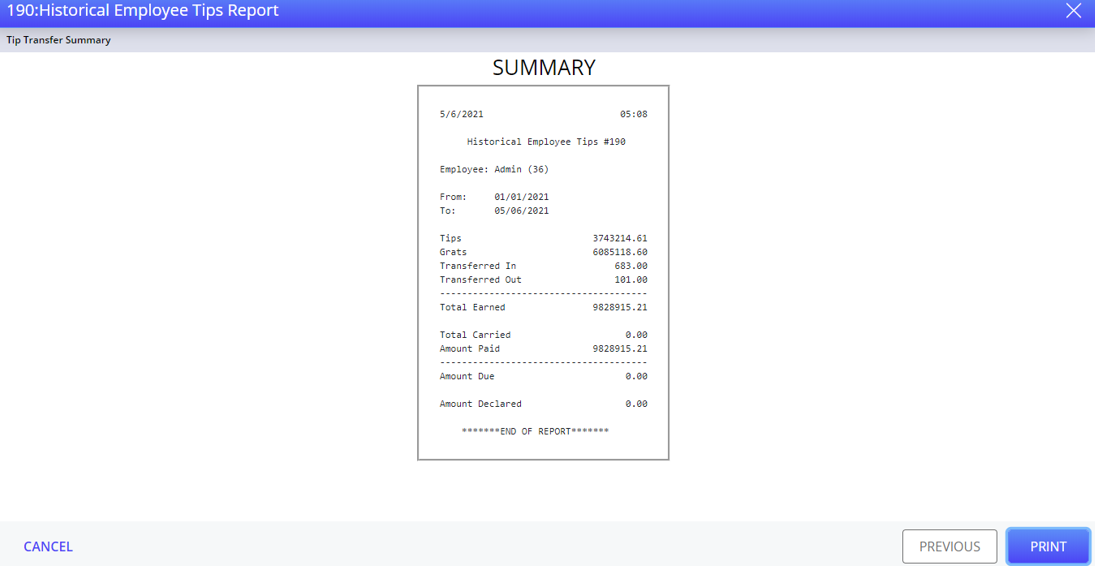
Select Print to print the report.
Closed Checks by Server - Previous
The Closed Checks by Server - Previous report lists the checks closed by a server during the previous business day.
Employees with security levels 1 and 2 can generate the report for themselves.
Navigate to the Reports screen.
Select Closed Checks by Server - Previous. The Closed Checks by Server - Previous wizard appears.
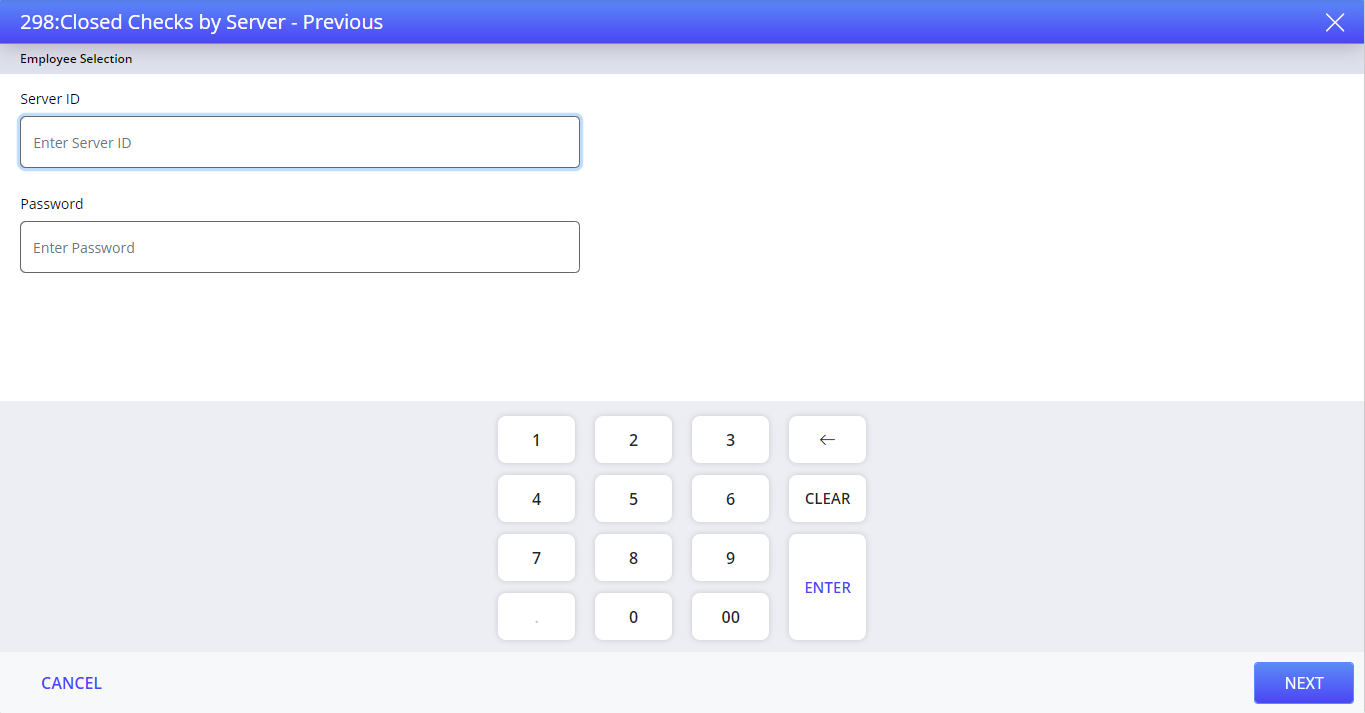
Enter the credentials and select Next. The report is generated.
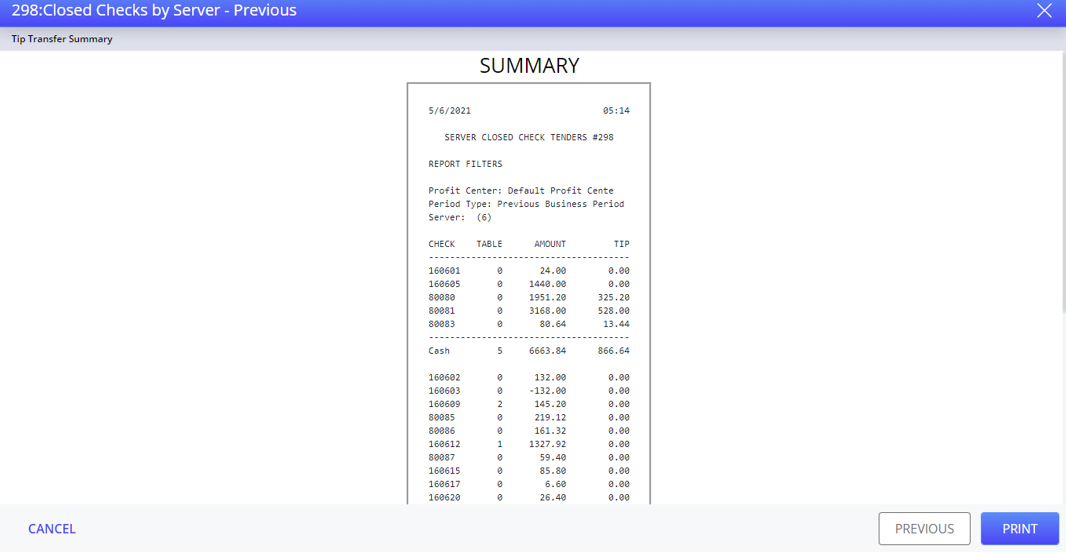
Select Print to print the report.
Closed Checks by Server - Current
The Closed Checks by Server - Current report lists the checks closed by a server during the current business day.
Navigate to the Reports screen.
Select Closed Checks by Server - Current. The Closed Checks by Server - Current wizard appears.
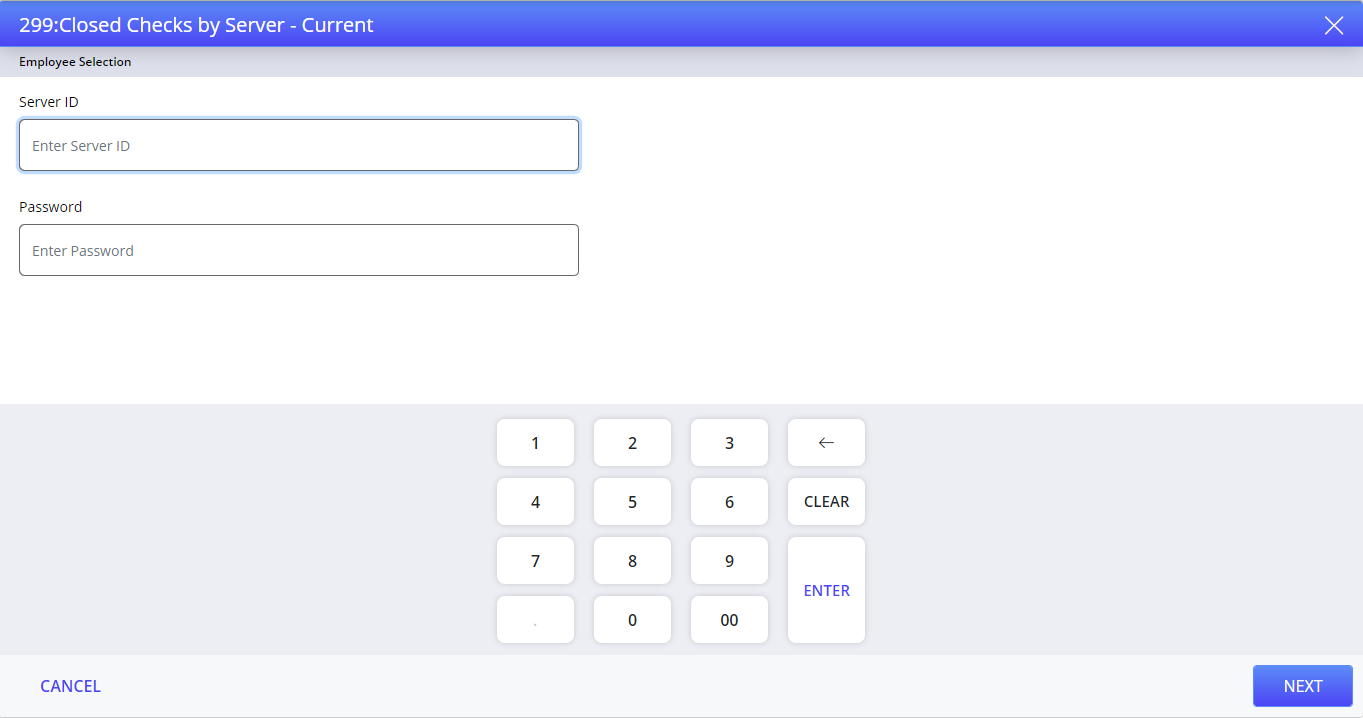
Enter the credentials and select Next. The report is generated.
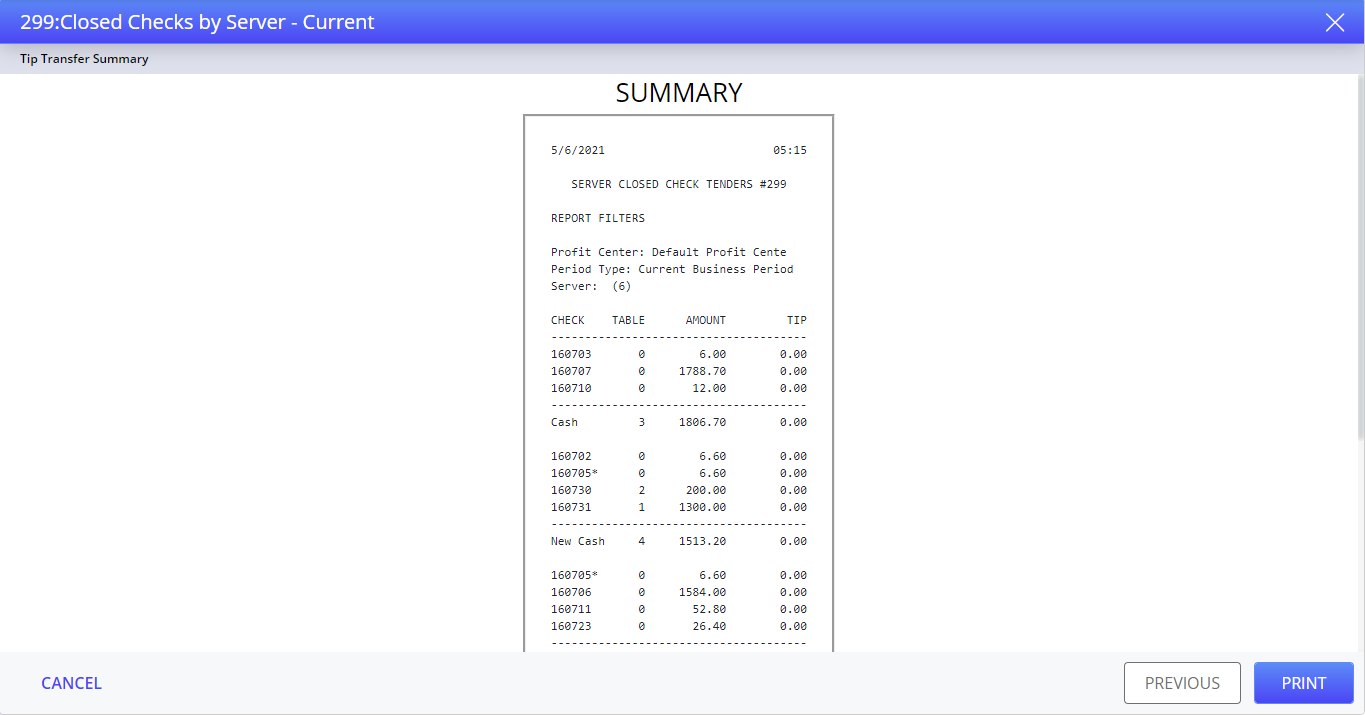
Select Print to print the report.
Hourly Sales (check close time; current cal. day)
The Hourly Sales (check close time; current cal. day) report lists the checks closed during the current calendar day.
Navigate to the Reports screen.
Select Hourly Sales (check close time; current cal. day). The report is generated.
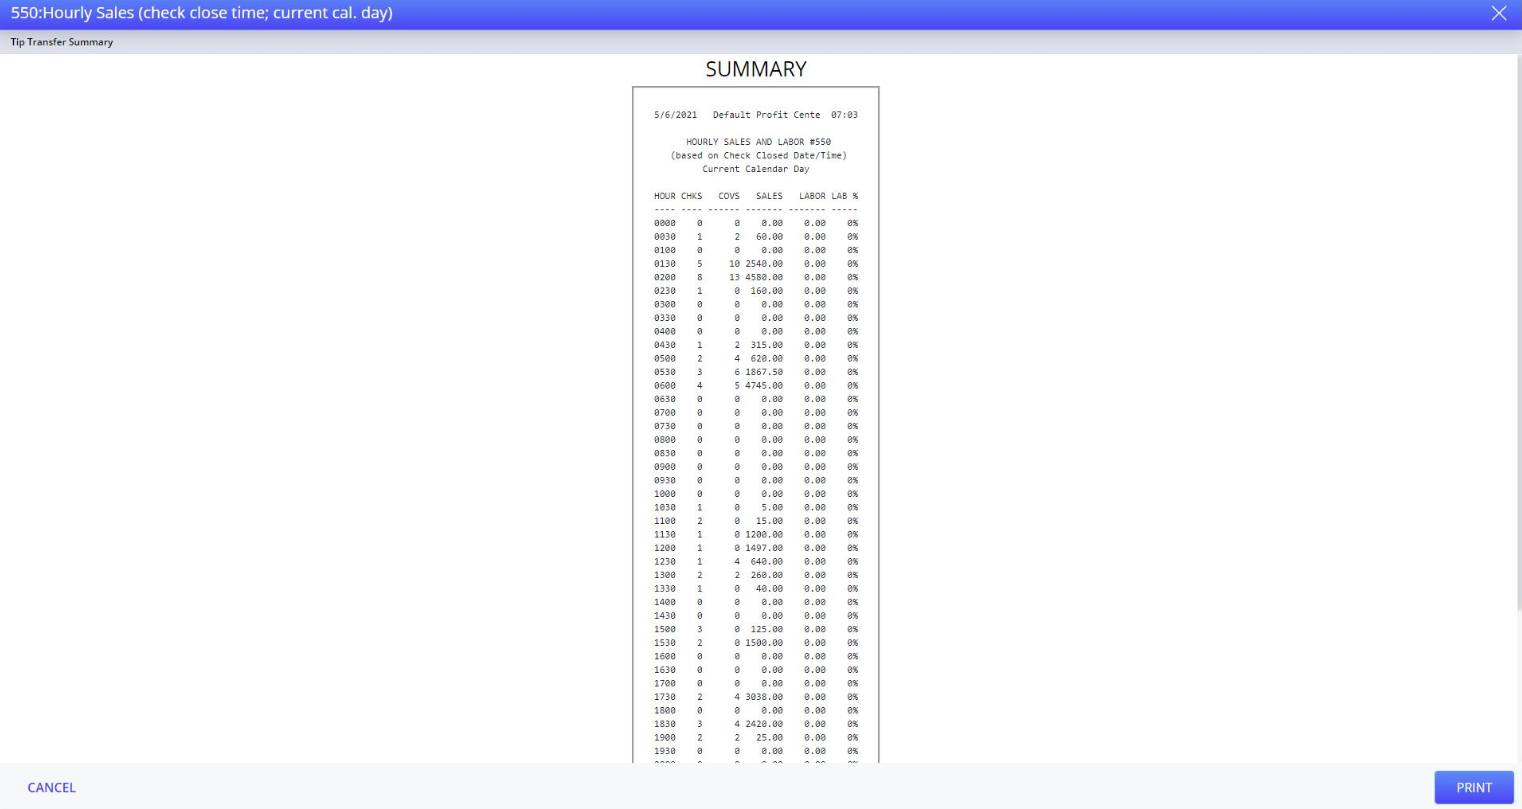
Select Print to print the report.
Hourly Sales and Labor (check open time; current cal. day)
The Hourly Sales and Labor (check open time; curr cal. day) report lists the checks opened during the current calendar day.
Navigate to the Reports screen.
Select the Hourly Sales (check close time; current cal. day). The report is generated.
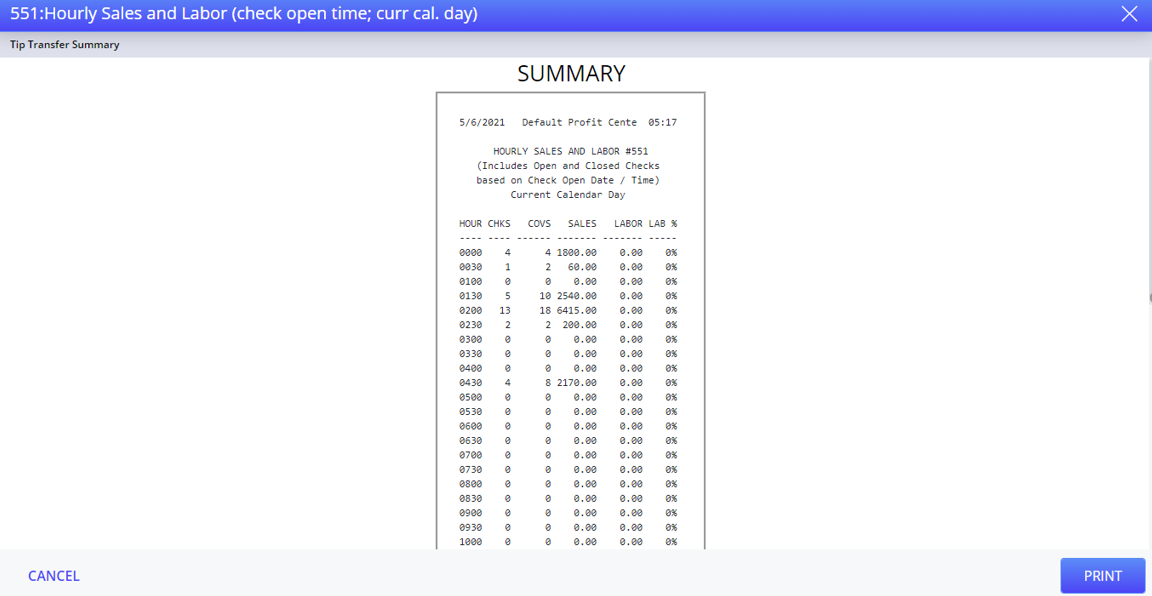
Select Print to print the report.
Hourly Sales and Labor (check close time; prev cal. day)
The Hourly Sales and Labor (check close time; prev cal. day) report lists the checks closed during the previous calendar day.
Navigate to the Reports screen.
Select Hourly Sales and Labor (check close time; prev cal. day). The report is generated.
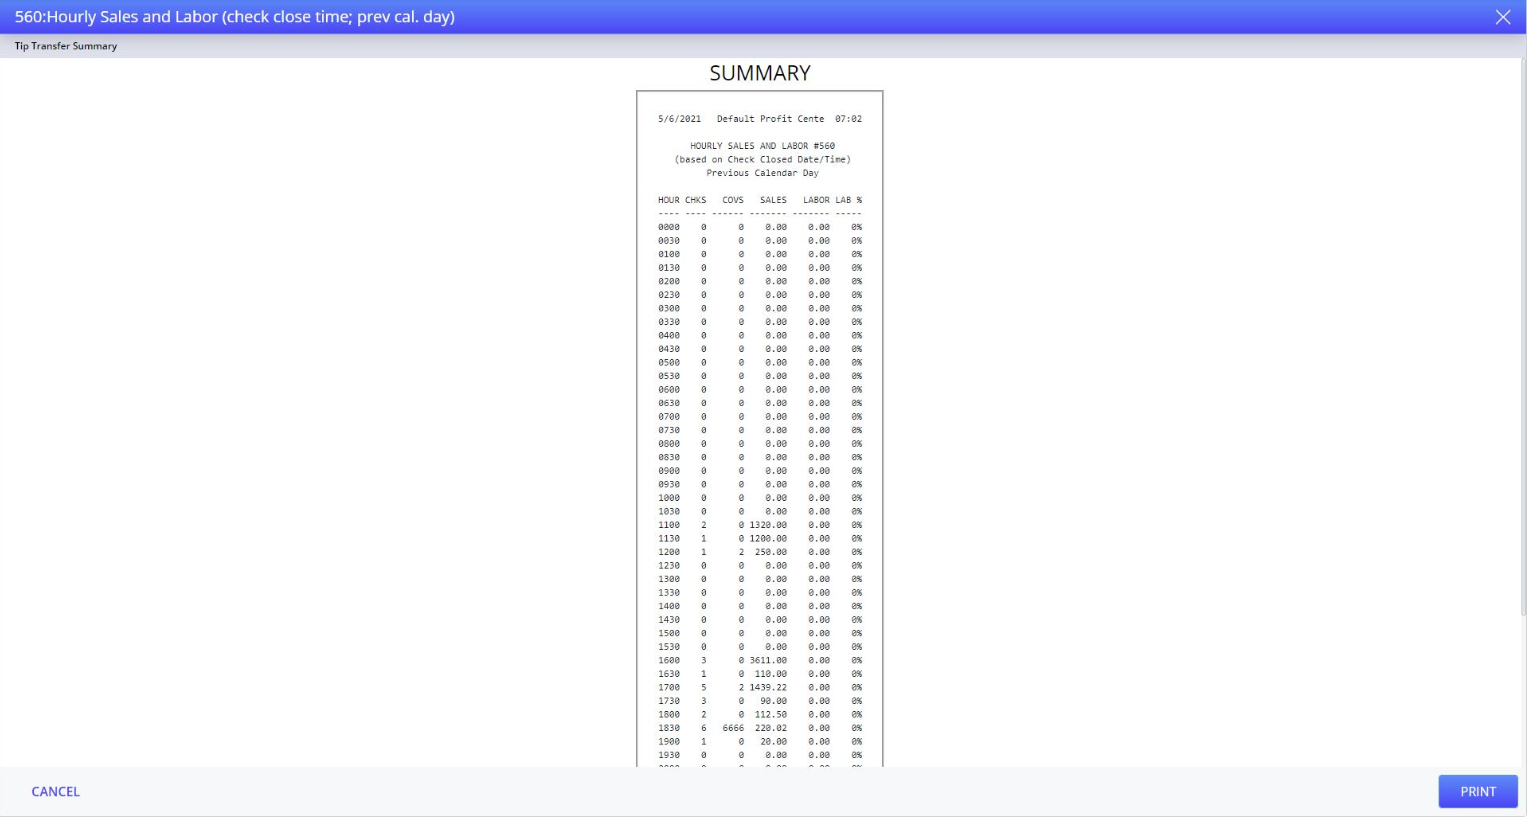
Select Print to print the report.
Hourly Sales and Labor (check open time; prev cal. day)
The Hourly Sales and Labor (check open time; prev cal. day) report lists the checks opened during the previous calendar day.
Navigate to the Reports screen.
Select Hourly Sales and Labor (check open time; prev cal. day). The report is generated.
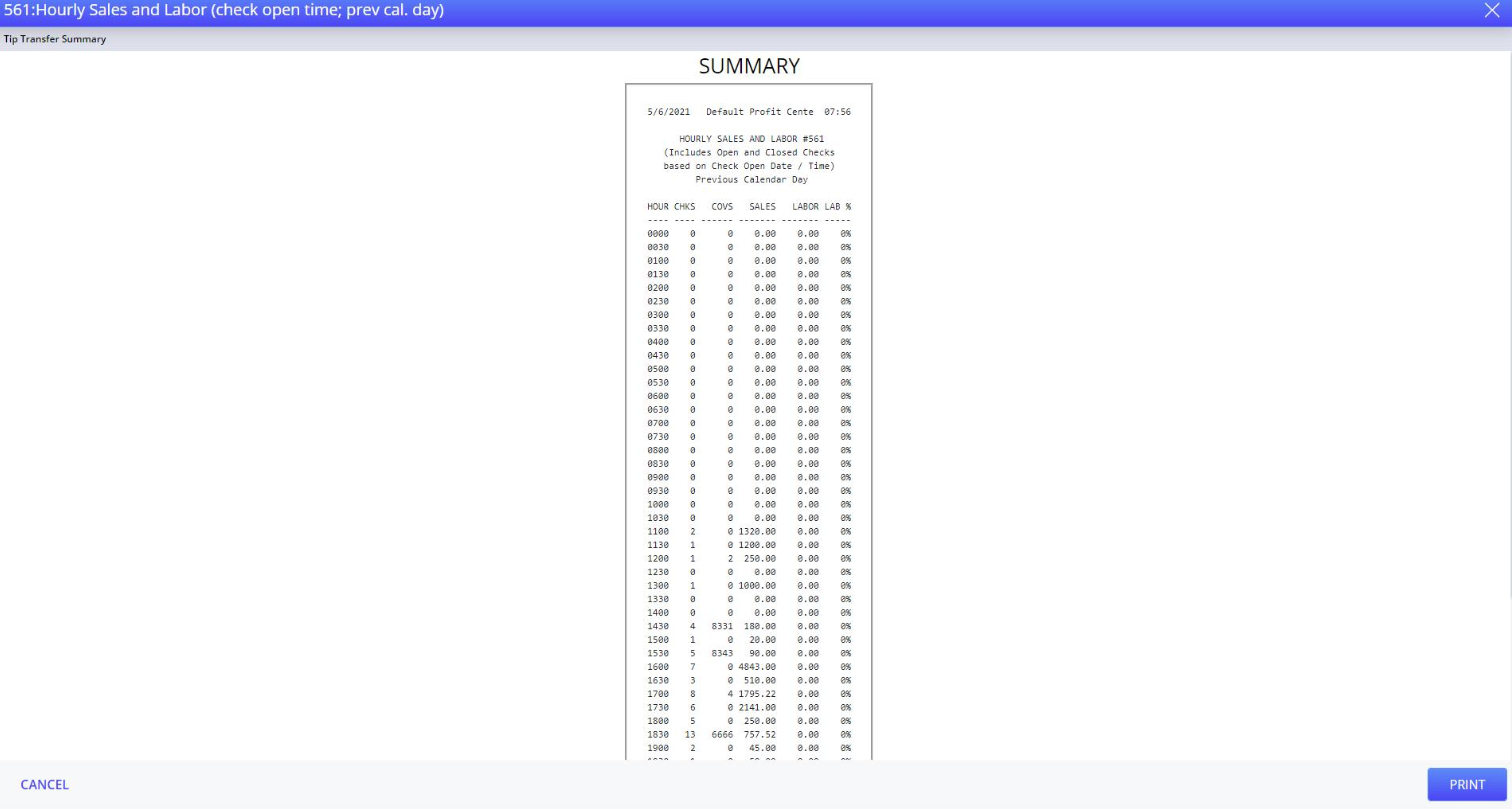
Select Print to print the report.
Productivity Flash Report (current calendar day)
The Productivity Flash Report (current calendar day) report provides the management with a summary of customer volume, gross revenue, discounts, net revenue, and labor costs. It gives an up-to-the-minute information for the current business period.
lists the for the current calendar day starting from the first productivity period.
Navigate to the Reports screen.
Select the Productivity Flash Report (current calendar day). The report is generated.
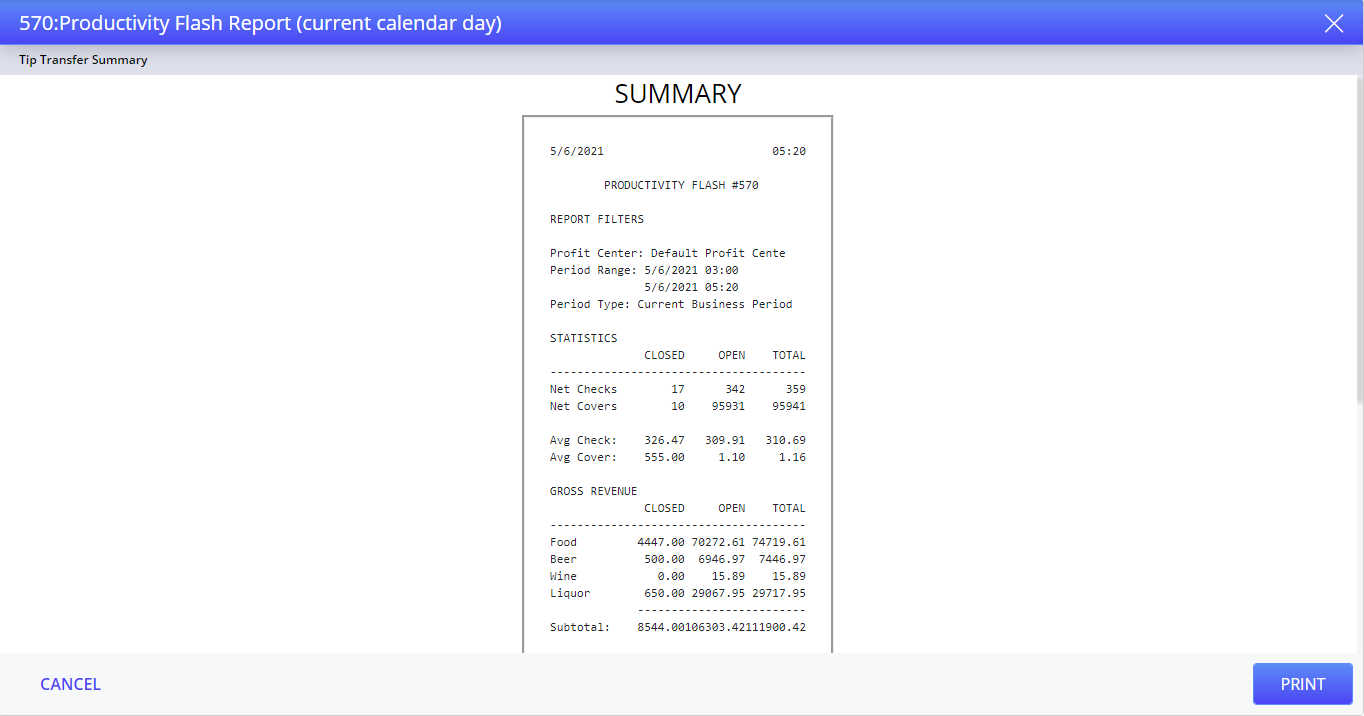
Select Print to print the report.
Productivity Flash Report (current Productivity Period)
The Productivity Flash Report (current Productivity Period) gives an up-to-the-minute information for the current productivity period.
Navigate to Reports screen.
Select Productivity Flash Report (current Productivity Period). The report is generated.
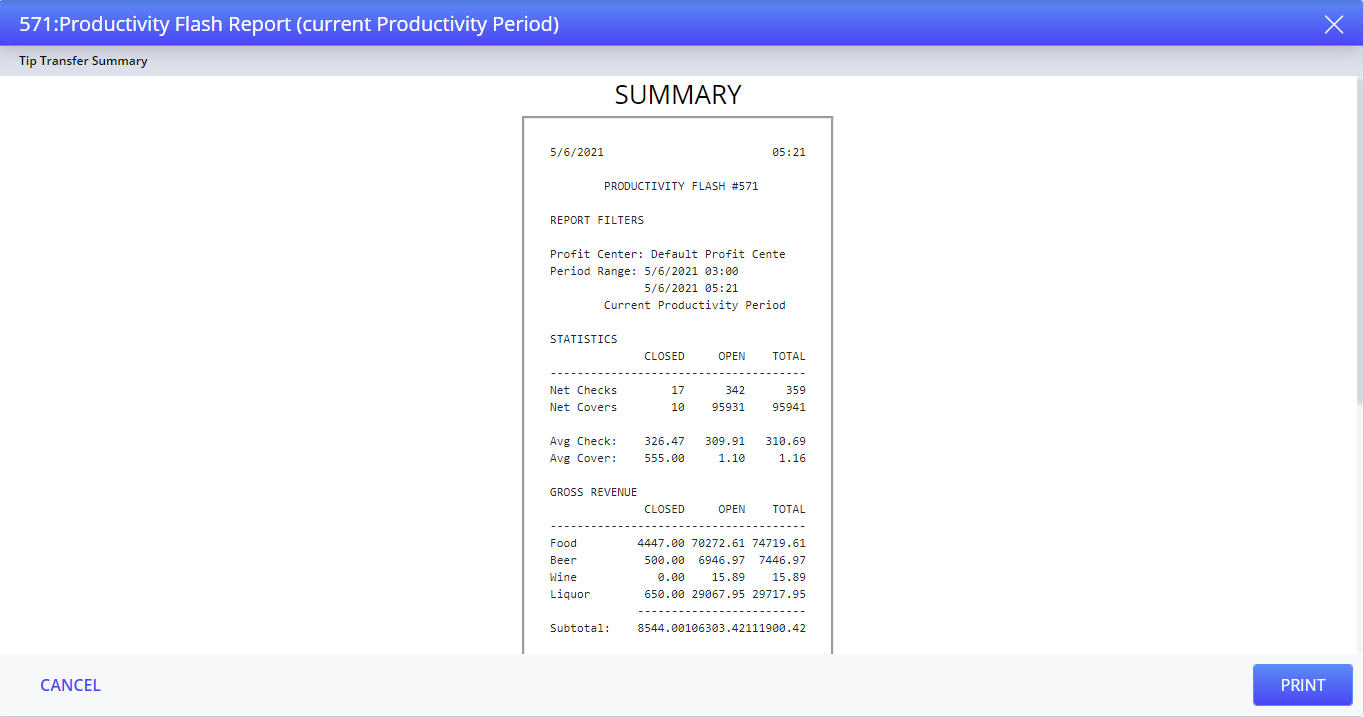
Select Print to print the report.
Daily Cashier (all meal periods; current business day)
The Daily Cashier (all meal periods; current business day) report lists the cashier tender information for all meal periods in the current business day.
Navigate to Reports screen.
Select Daily Cashier (all meal periods; current business day). The Daily Cashier (all meal periods; current business day) wizard appears.
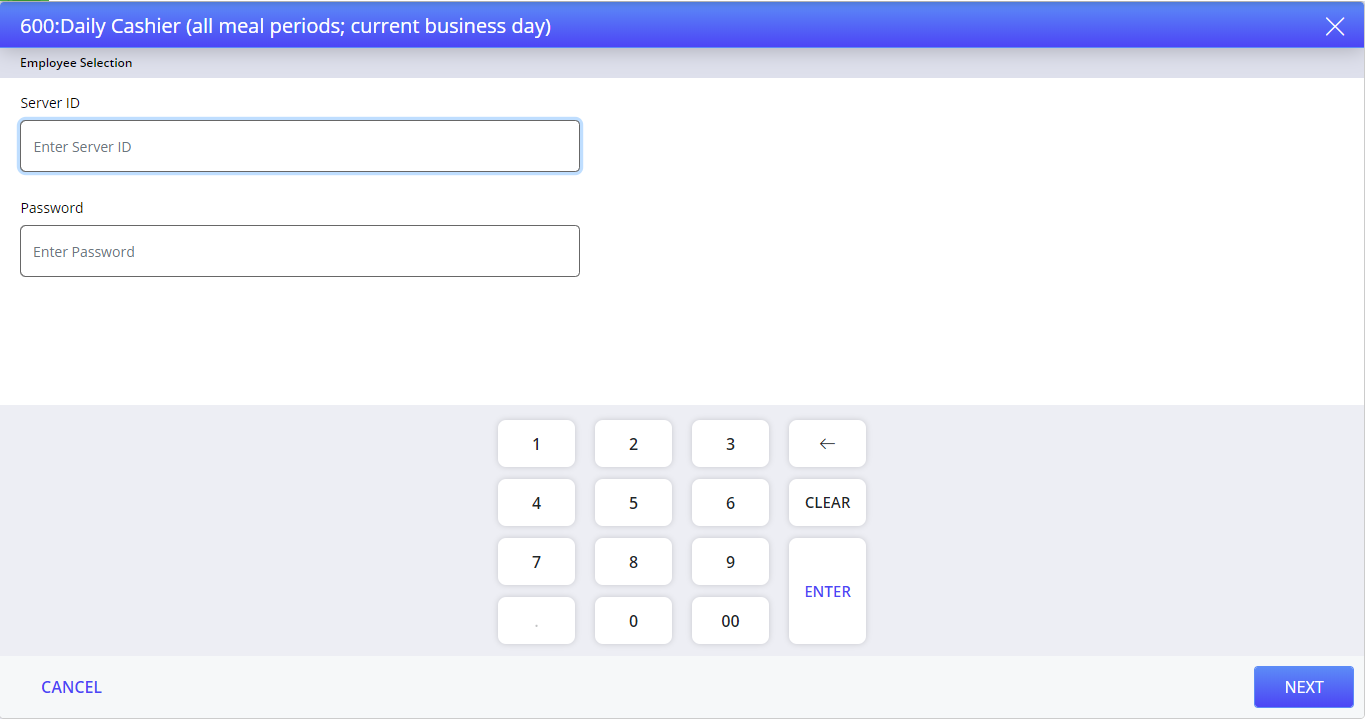
Enter the credentials and select Next. The report is generated.
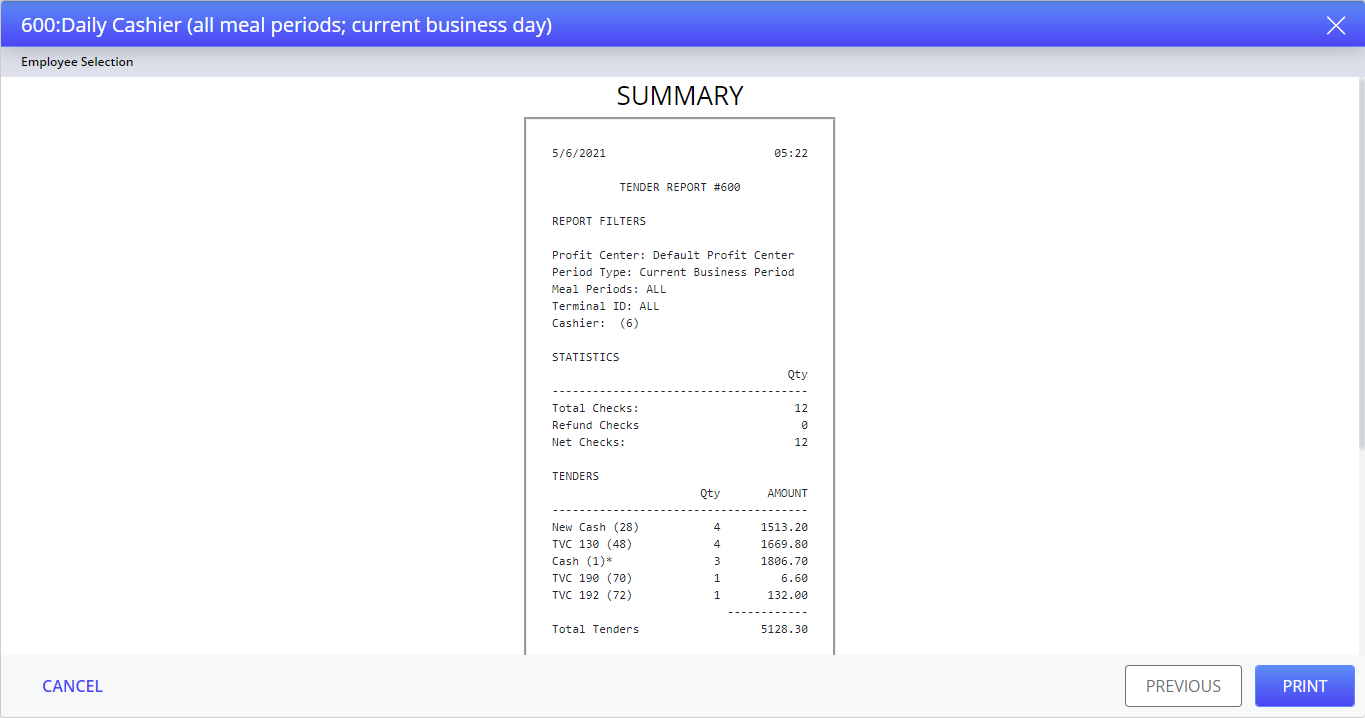
Select Print to print the report.
Daily Cashier by Meal Period (current business day)
The Daily Cashier (all meal periods; current business day) report lists the cashier tender information for a specific meal period in the current business day.
Navigate to Reports screen.
Select the Daily Cashier by Meal Period (current business day). The Daily Cashier by Meal Period (current business day) wizard appears.
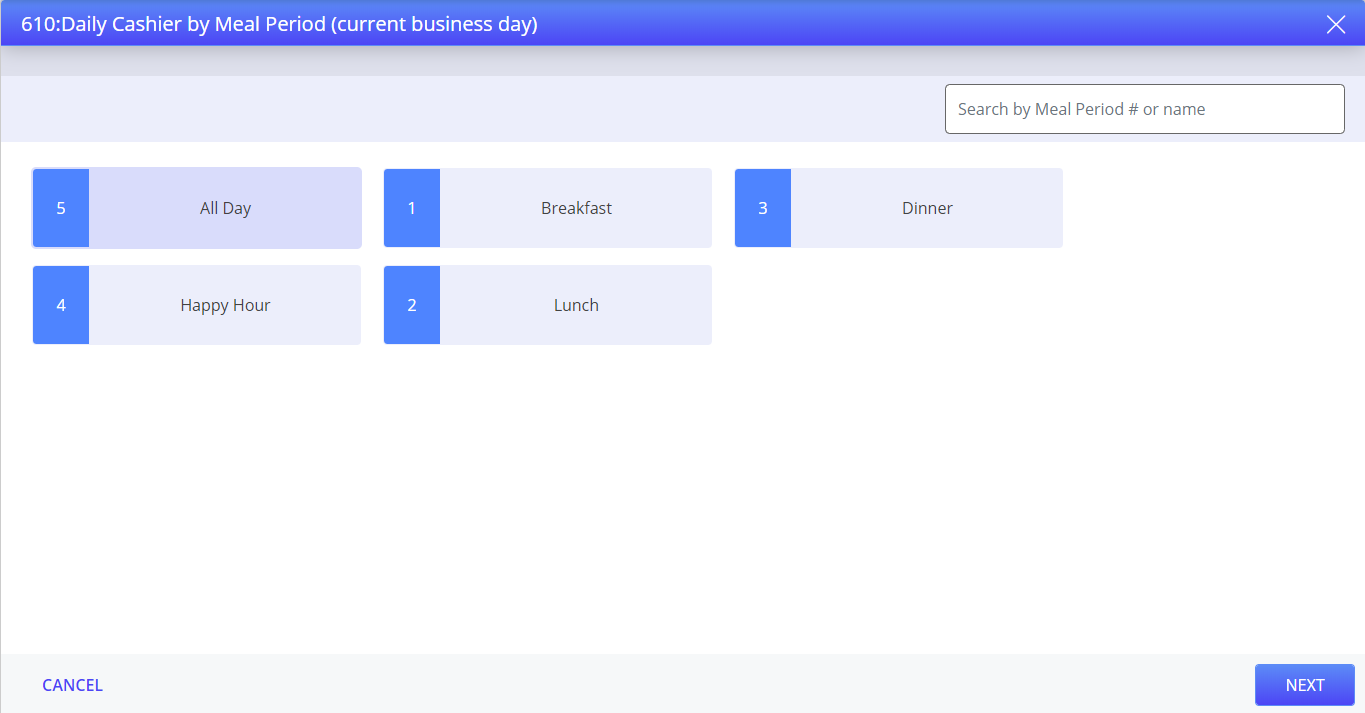
Select the appropriate meal period and select Next. The Server ID and Password fields appear.
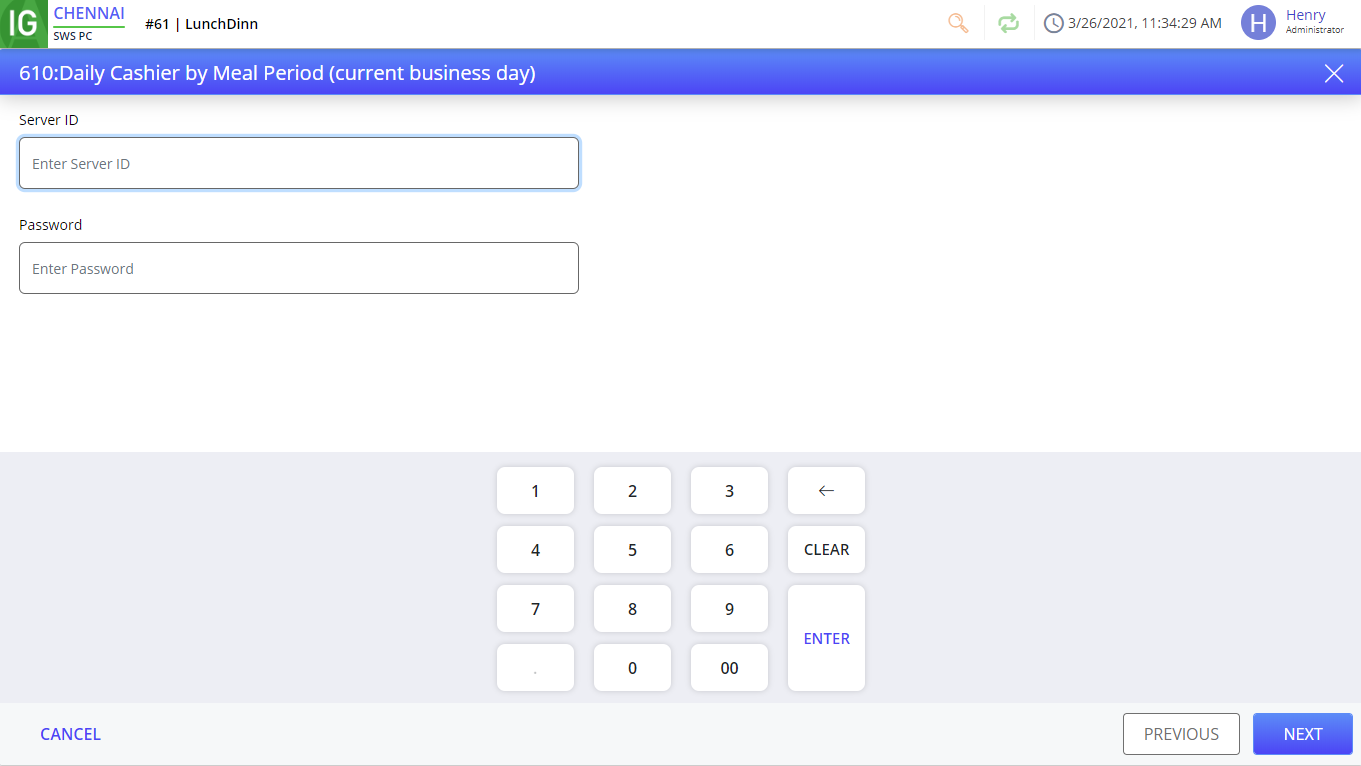
Enter the credentials and select Next. The report appears.
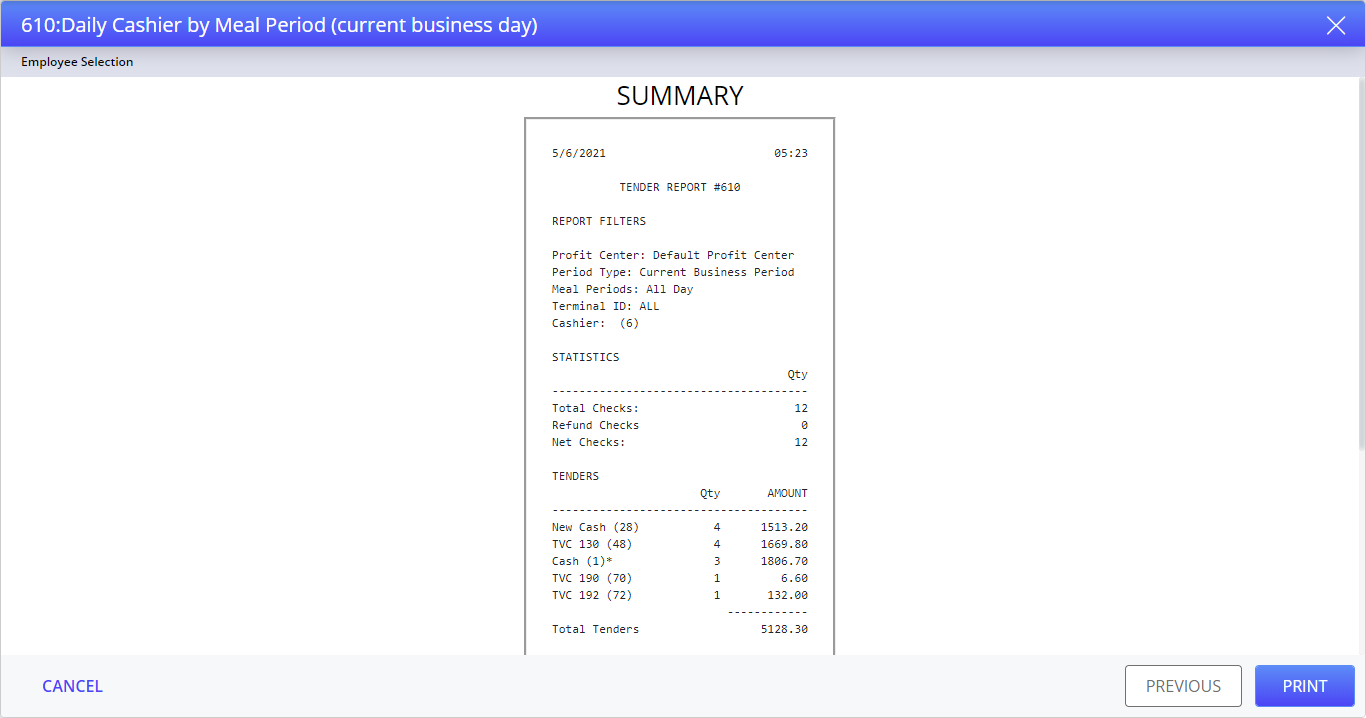
Select Print to print the report.
Revenue (specific check type/meal period; curr bus. day)
The Revenue (specific check type/meal period; curr bus. day) lists the total revenue for the selected check type and meal period in the current business day.
Navigate to Reports screen.
Select Revenue (specific check type/meal period; curr bus. day). The Revenue (specific check type/meal period; curr bus. day) wizard appears.
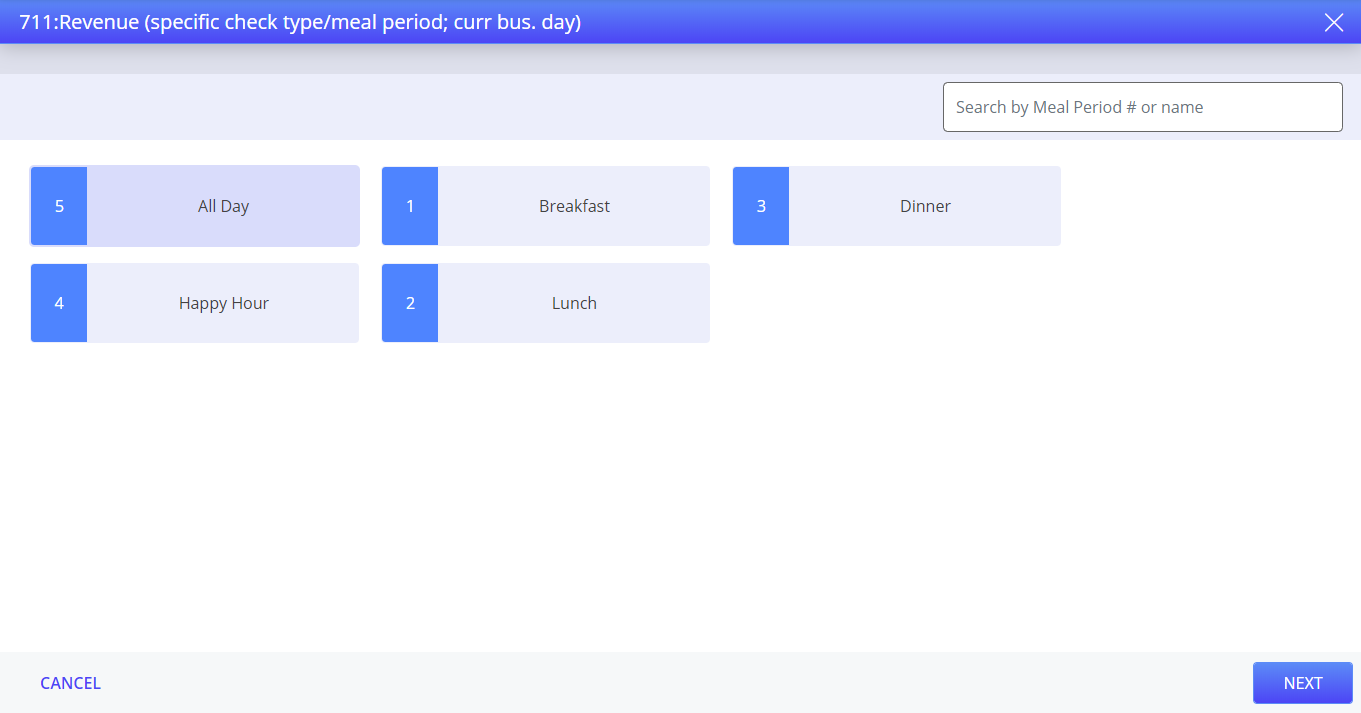
Select the meal period and select Next. The check types associated with the terminal group appear.
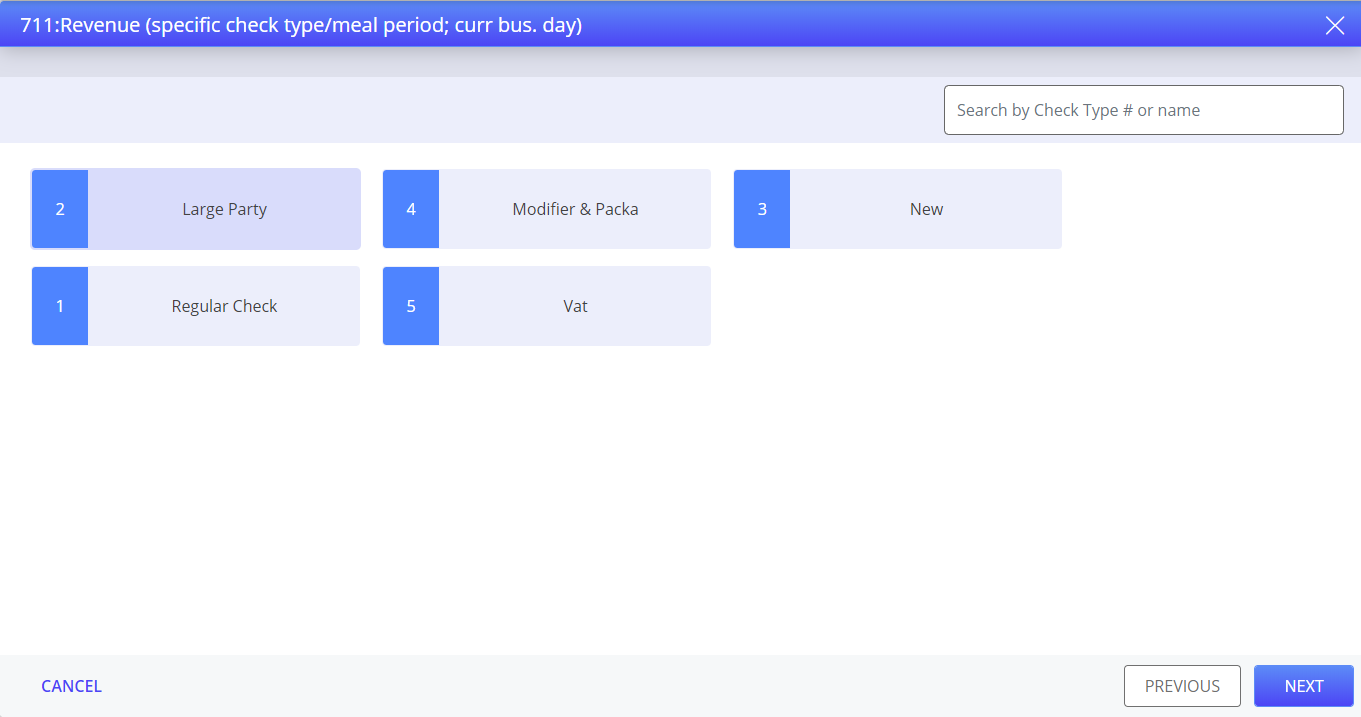
Select the check type and select Next. The report is generated.
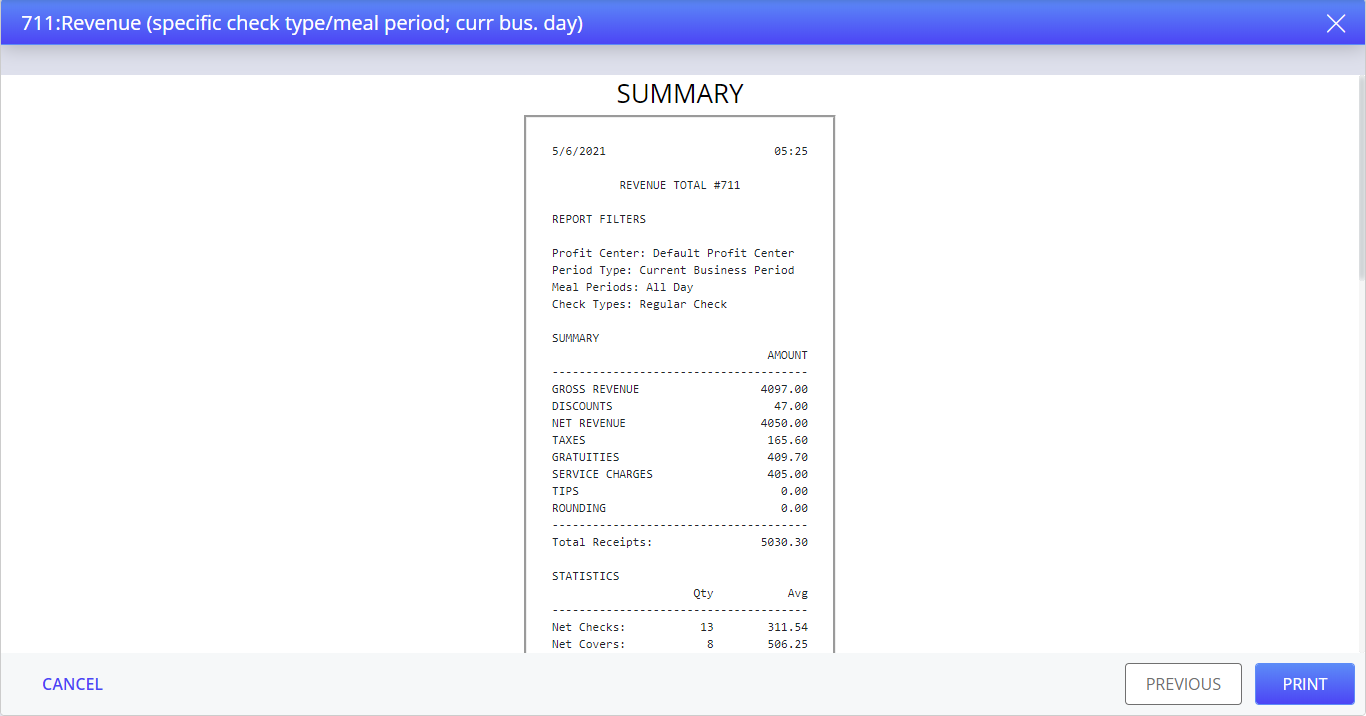
Select Print to print the report.
Revenue (specific check type/meal period; prev bus. day)
The Revenue (specific check type/meal period; prev bus. day) lists the total revenue for the selected check type and meal period in the previous business day.
Navigate to Reports screen.
Select Revenue (specific check type/meal period; prev bus. day). The Revenue (specific check type/meal period; prev bus. day) wizard appears.
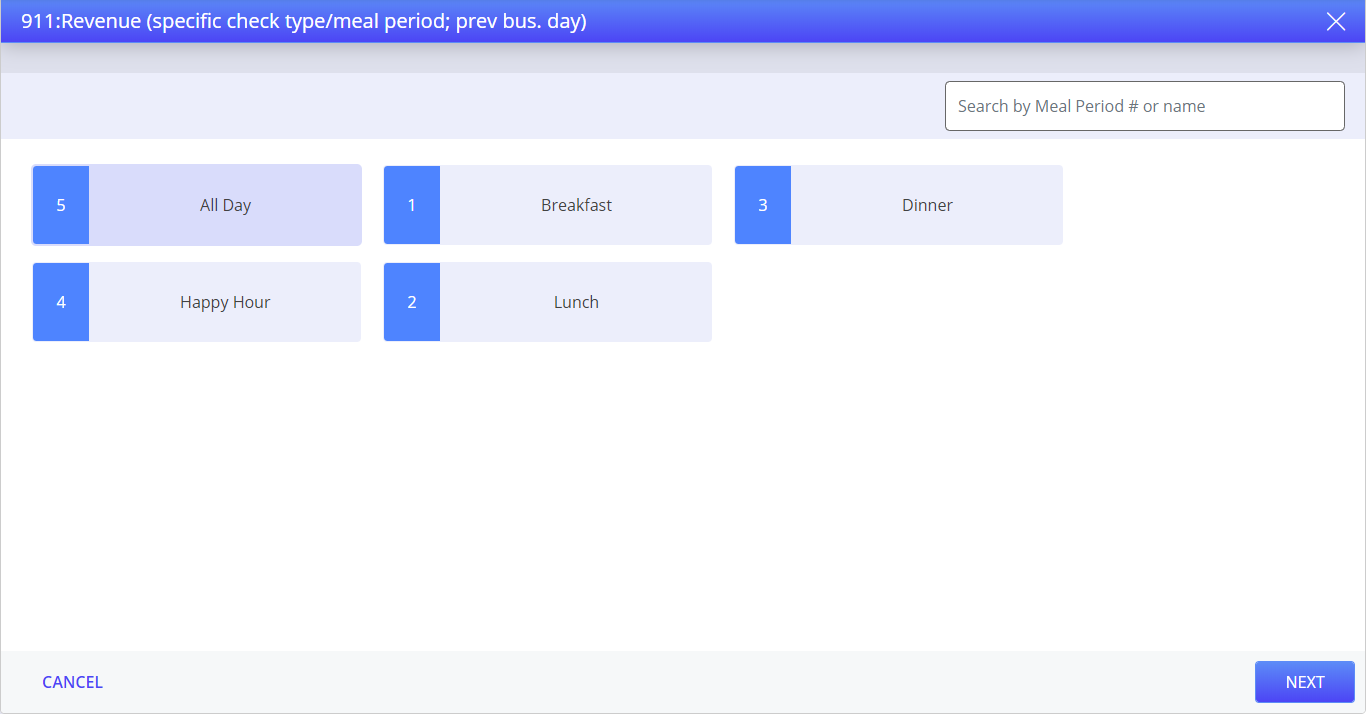
Select the meal type and select Next. The check types associated with the terminal group appear.
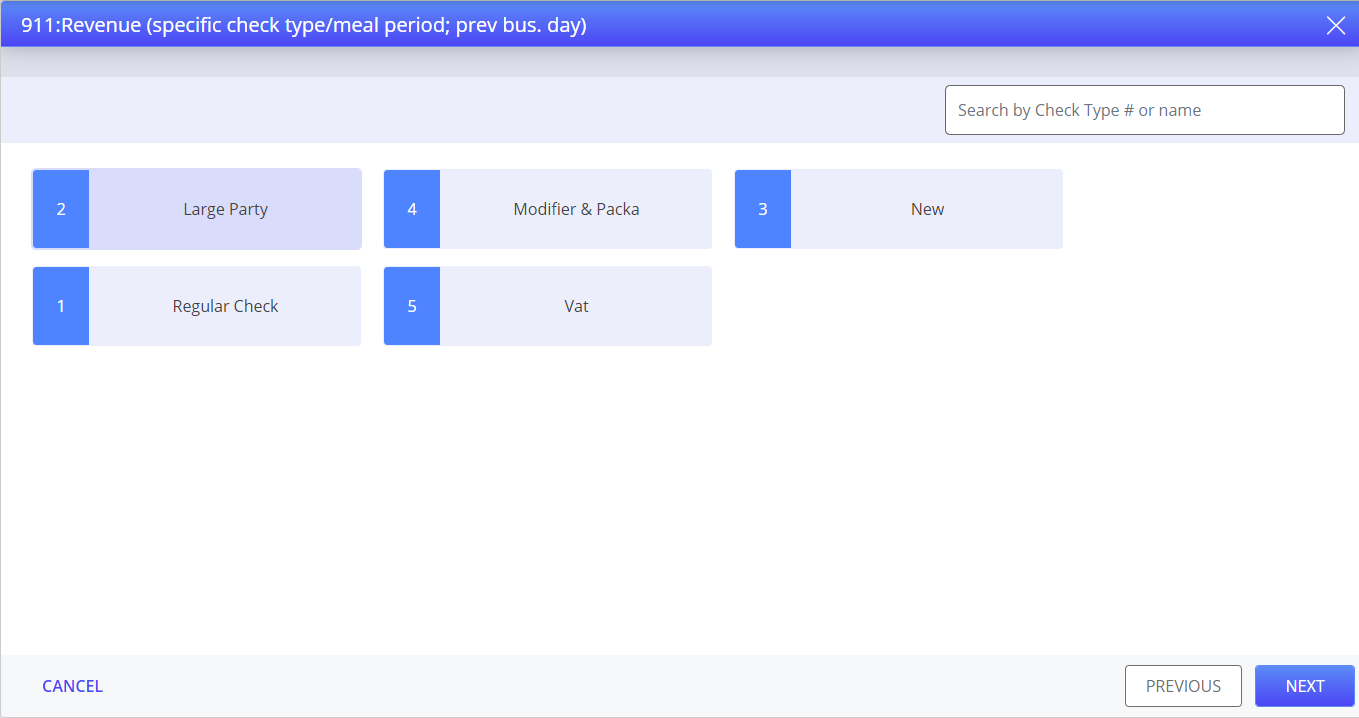
Select check type and select Next. The report appears.
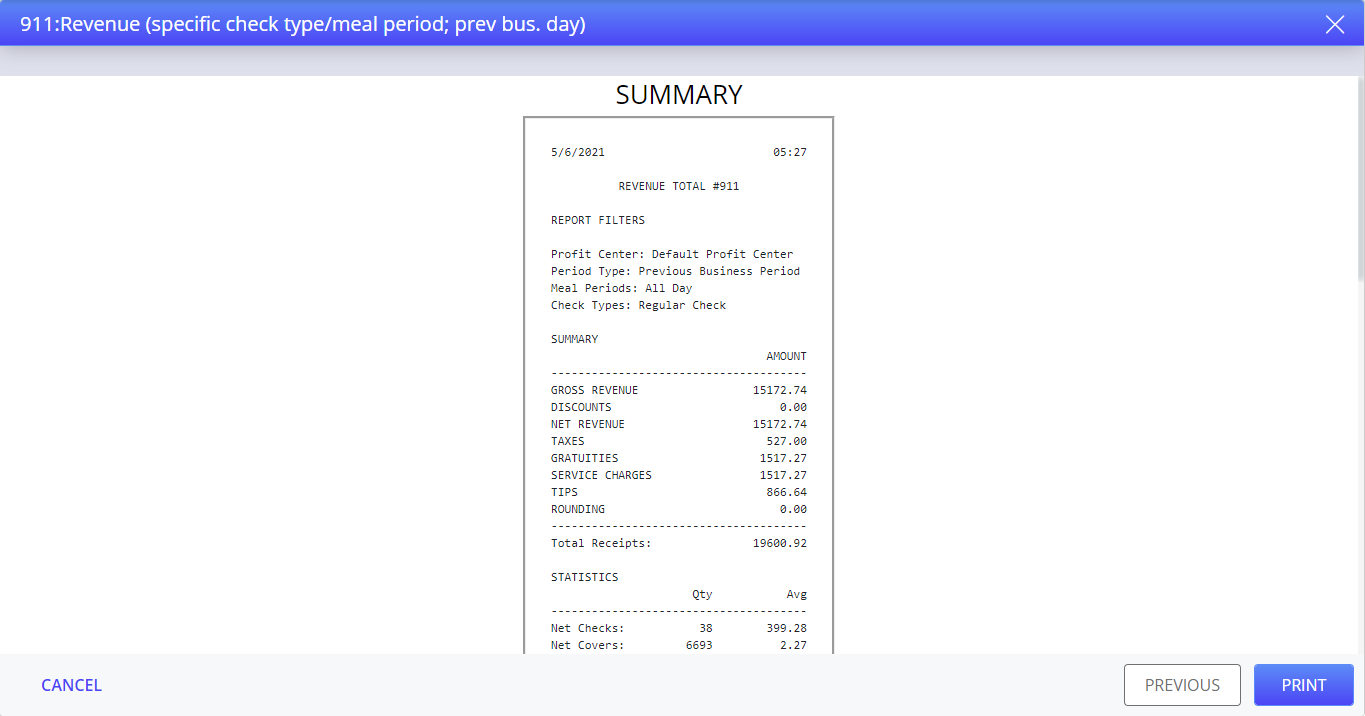
Select Print to print the report.
Terminal Tender (specific terminal; current bus. day)
The Terminal Tender (specific terminal; current bus. day) lists the tender information for the selected terminal in the current business day.
Navigate to Reports screen.
Select Terminal Tender (specific terminal, current bus. day). The Terminal Tender (specific terminal, current bus. day) wizard appears.
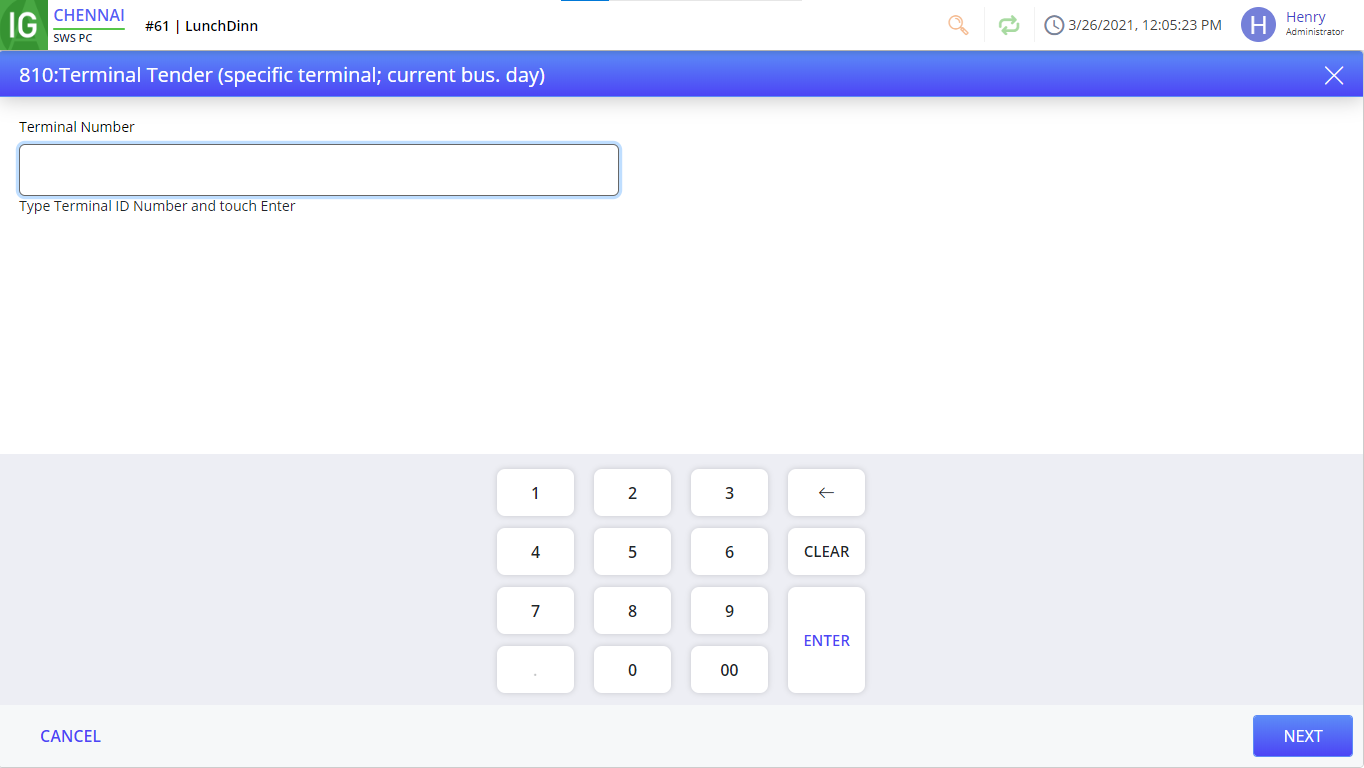
Enter the terminal number and select Next. The report is generated.
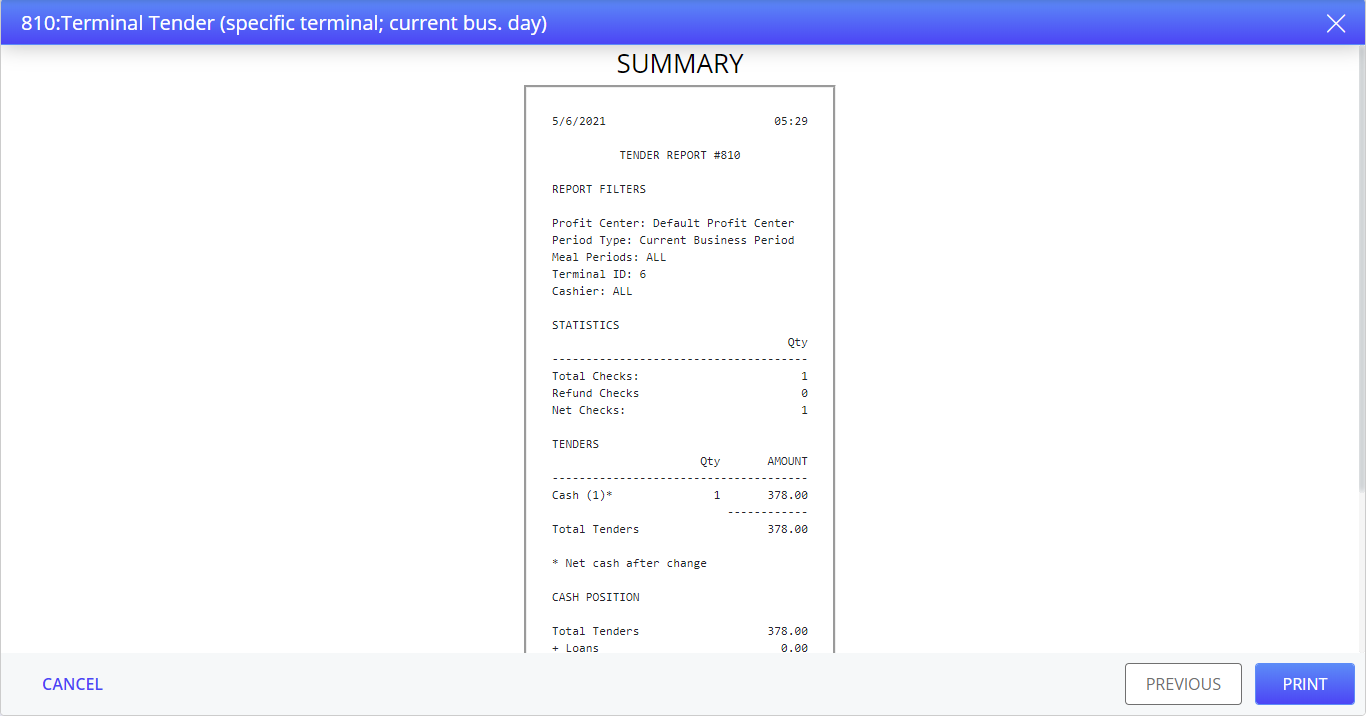
Select Print to print the report.
Tender (specific terminal; meal period; curr bus. day)
The Tender (specific terminal; meal period; curr bus. day) lists the specific terminal and meal period in the current business day.
Navigate to Reports screen.
Select Tender (specific terminal; meal period; curr bus. day). The Tender (specific terminal; meal period; curr bus. day) wizard appears.
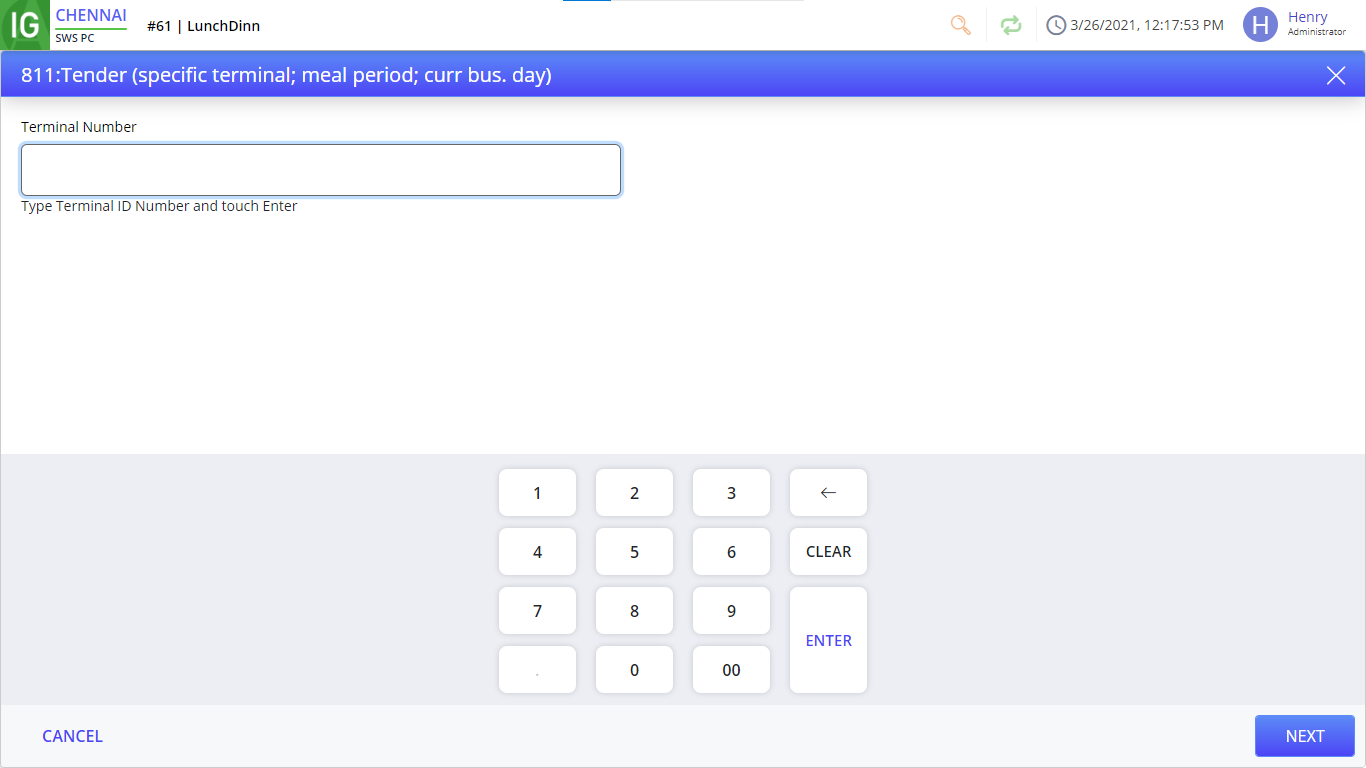
Enter the terminal number and select Next. The meal periods associated with the terminal appear.
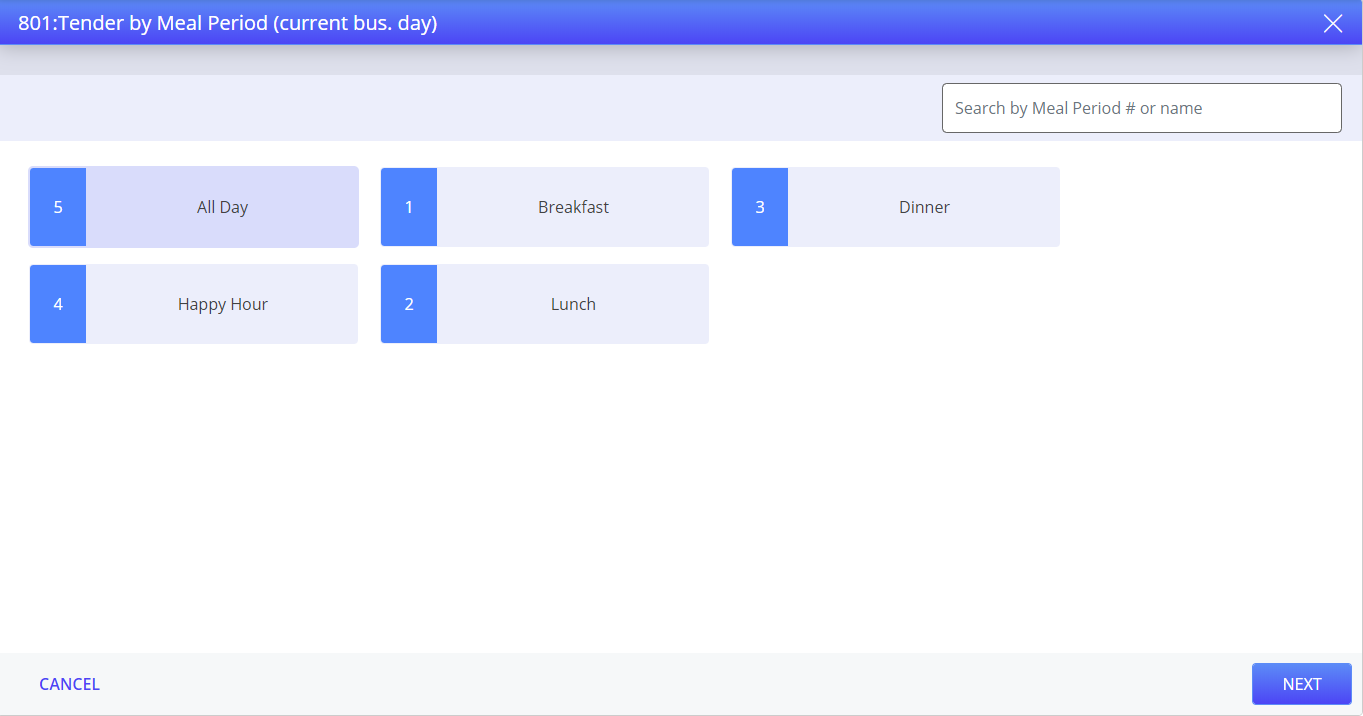
Select meal period and select Next. The report is generated.
Select Print to print the report.
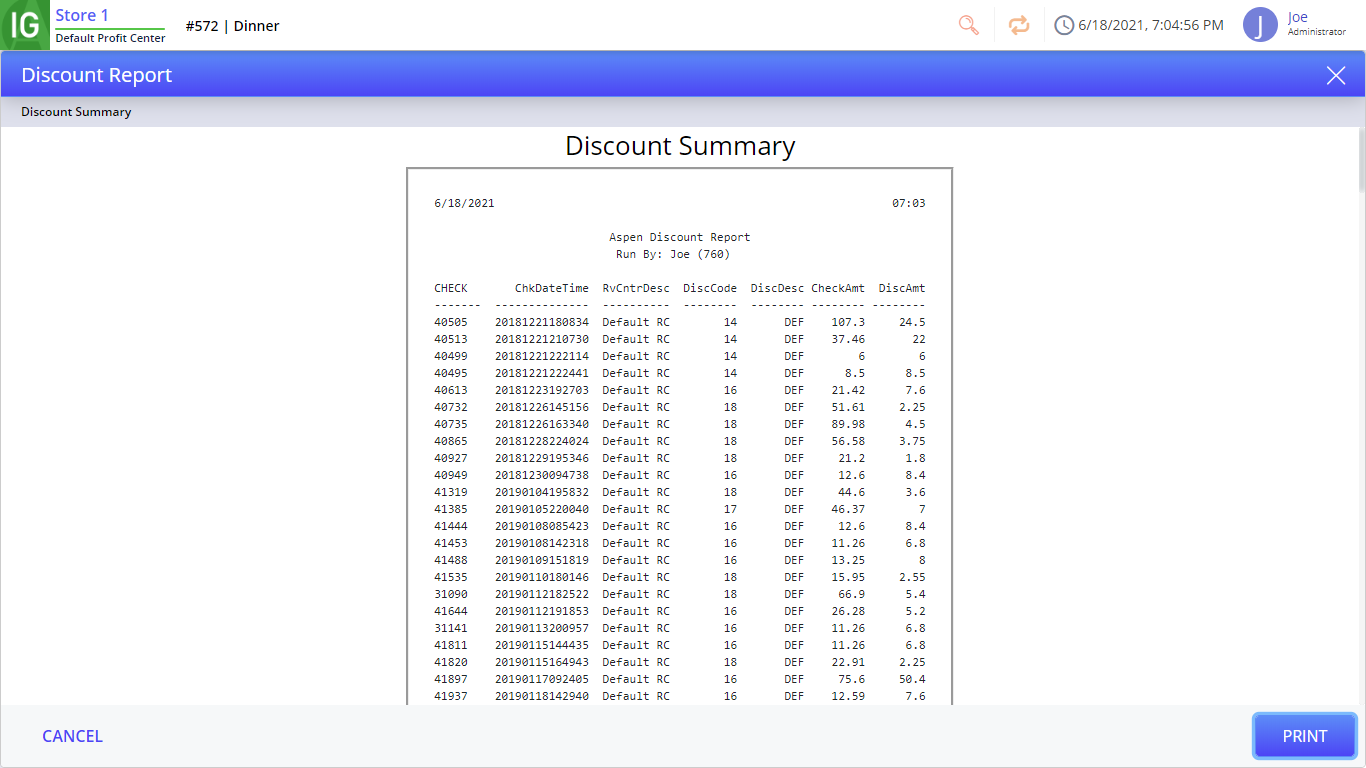
Aspen Transaction Summary Report
The Aspen Transaction Summary Report enables the users to view the transactions made against a specific account.
Navigate to Reports screen.
Scroll to the Other section in the Report Screen.
Select Aspen Transaction Summary Report. The Discount Report screen appears.
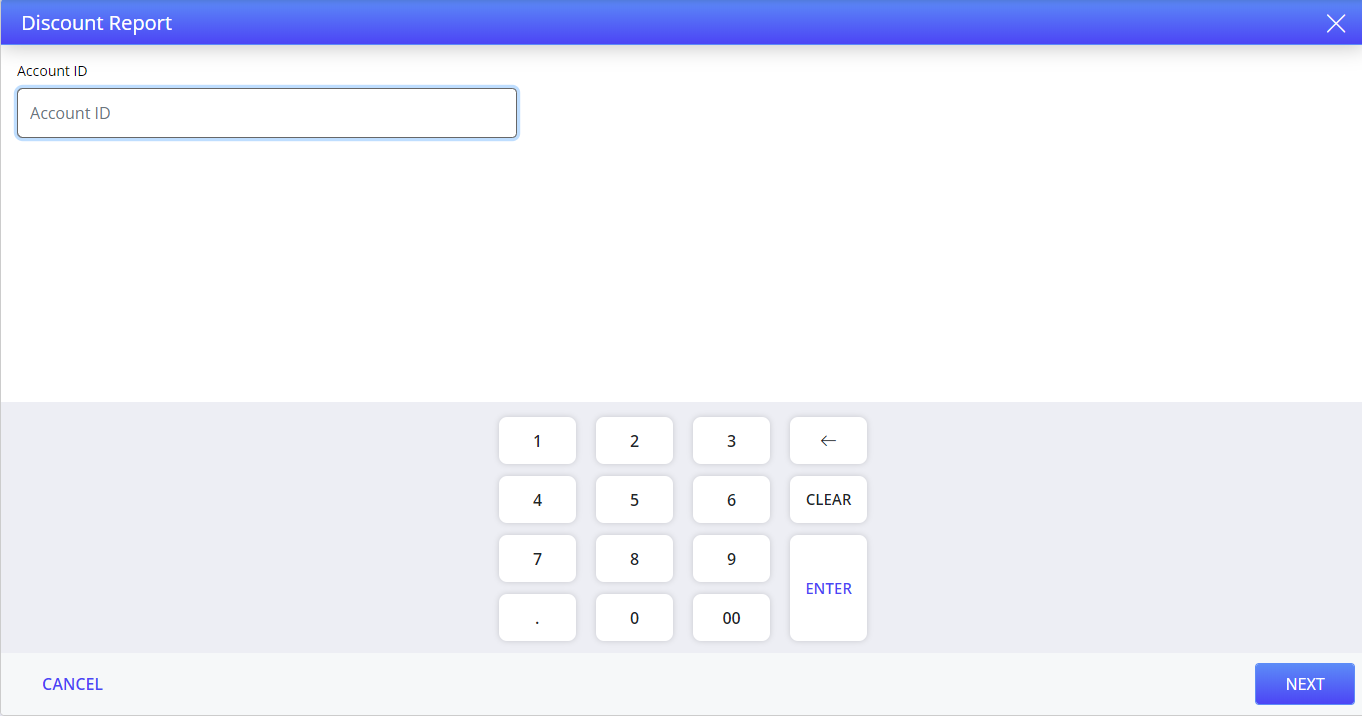
Enter the appropriate Account ID and select Next.
X Offline Terminal Shift Report
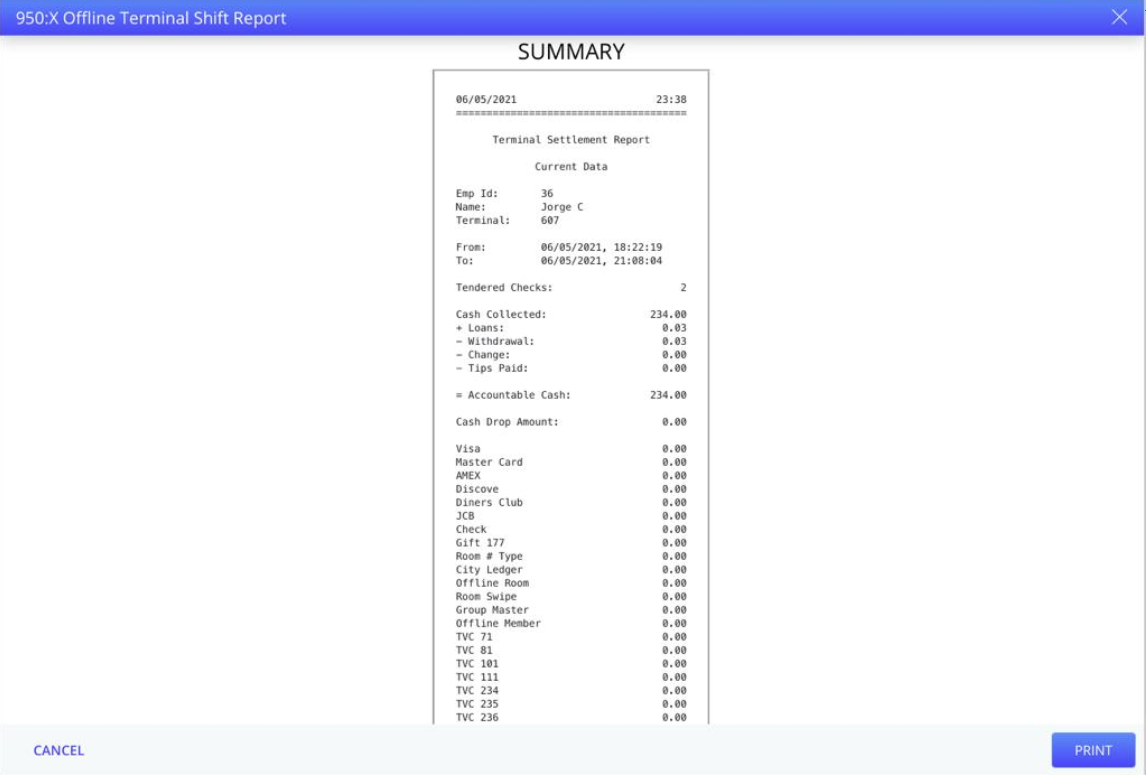
The X Offline Terminal Shift Report lists accumulated terminal totals from both online and offline operation since the last Terminal Z Reset. The X report must be generated only after running the Z Offline Terminal Shift Reset and Report.
Navigate to Reports screen.
Select X Offline Terminal Shift Report. The X Offline Terminal Shift Report wizard appears. The Choose X Report prompt appears.
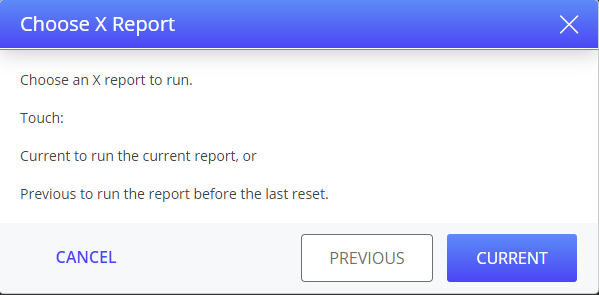
Select Current to generate the current report since the last Terminal Z Reset and Previous to generate the previous report since the last Terminal Z Reset.
Z Offline Terminal Shift Reset and Report
The Z Offline Terminal Shift Reset and Report lists accumulated terminal totals from both online and offline operation.
Navigate to Reports screen.
Select Z Offline Terminal Shift Reset and Report. The Reset Report prompt appears.
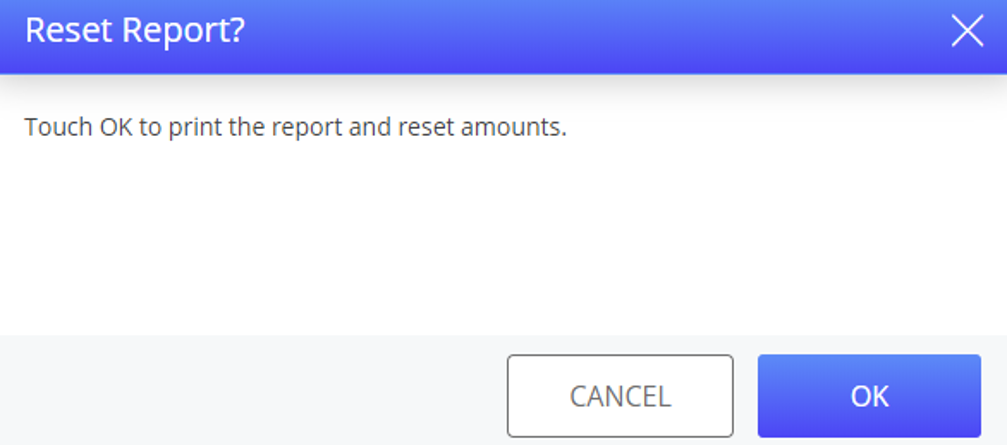
Select OK to generate the report.
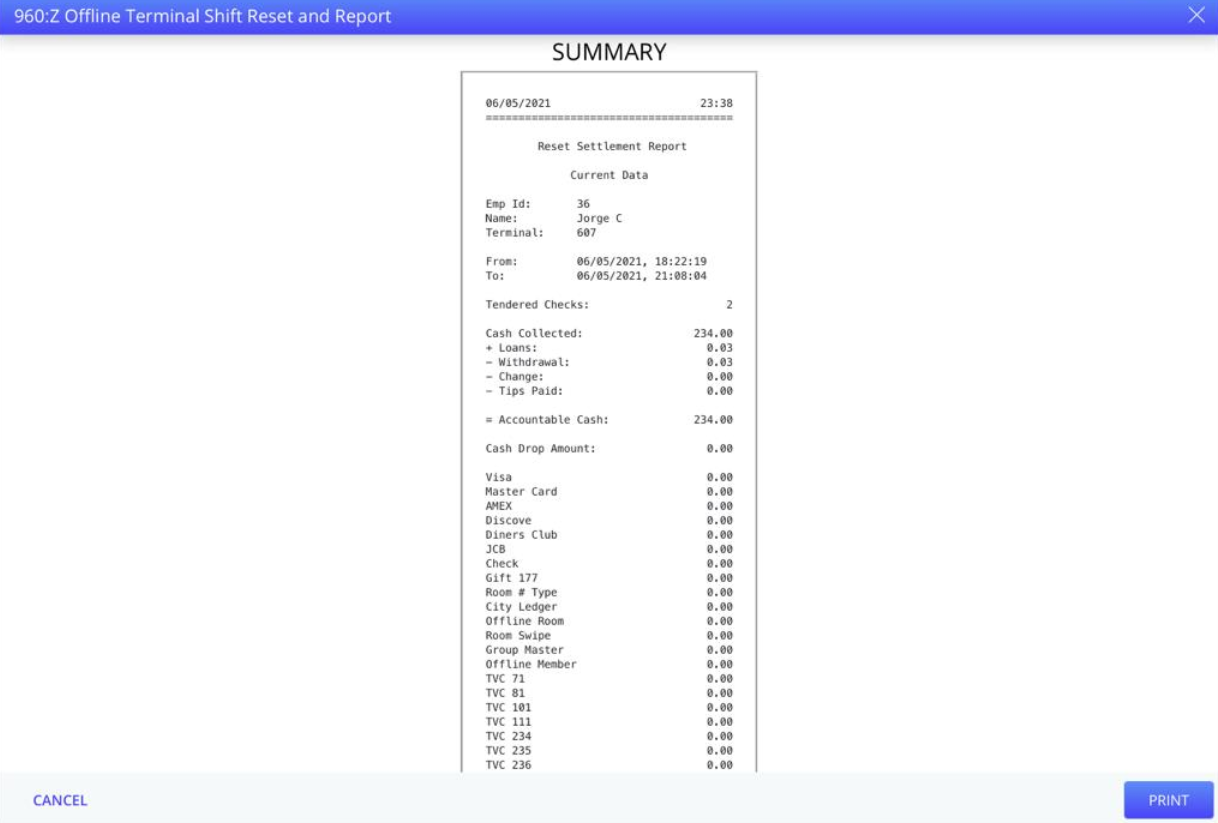
Select Print to print the report.
Important Points
Except for the Z Offline Terminal Shift Reset and Report and X Offline Terminal Shift Report, no other report can be generated when the POS terminal is offline or in the LSS mode.
For more information on terminal reports, refer to the Agilysys InfoGenesis POS Reports document.
Item Countdown Report
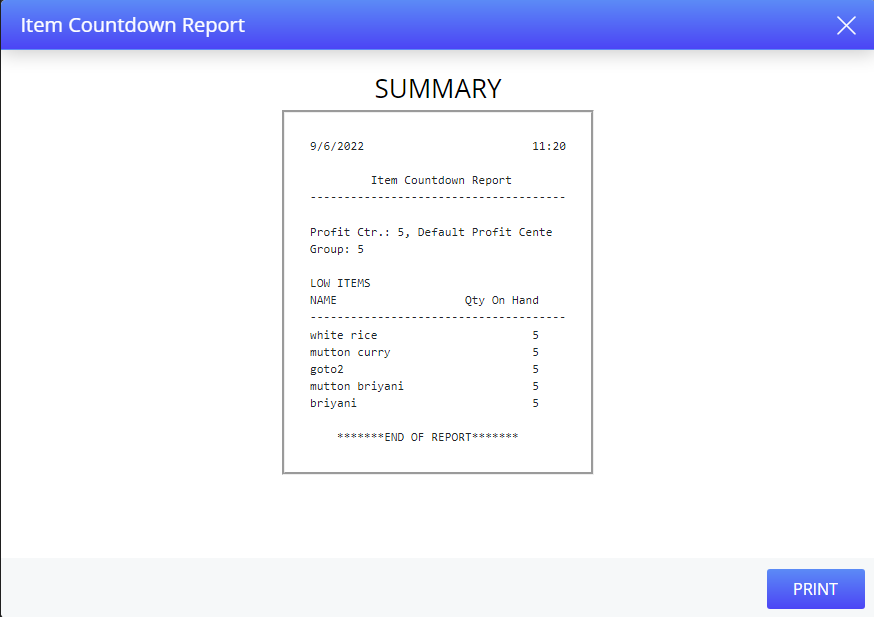
The Item Countdown Report lists the items available in the default countdown group.
Navigate to Reports screen.
Select Item Countdown Report. The report is generated.
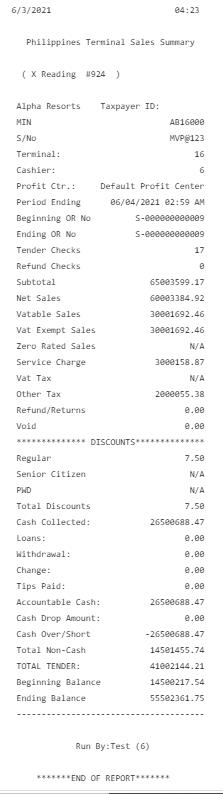
Philippines Terminal Sales Summary (X Reading)
The Philippines Terminal Sales Summary (X Reading) Report shows summarized daily financial totals of the transactions performed by the employee who has logged-in at a terminal.
Navigate to Reports screen.
Select Philippines Terminal Sales Summary (X Reading) Report. The Employee Selection prompt appears.
Enter the Server ID and Password in the respective fields and select Enter. The user can also enter their won employee ID here. The report is generated.