


Release 12.3.14
12.3.14 (12.x Server Only)
Track Fired Items with Date and Time from Terminal
InfoGenesis POS has been enhanced to allow users to track items fired to the kitchen directly from the terminal. With this enhancement, users can view the kitchen status, date, and time the item was added and fired to the kitchen.
-
The Check Summary screen displays the kitchen status of each item.
-
When the user long presses an item in the check, the date and time the item ordered and fired, along with the kitchen status will be displayed on the Quick Action window.
To support this, the following icons have been introduced:
|
Field |
Description |
|
|---|---|---|
|
|
Cooking icon |
This icon is displayed when cooking is in progress. |
|
|
Cooking completed icon |
This icon is displayed when cooking is completed. |
|
|
Failed icon |
This icon is displayed when the printer or the expo status is Failure. |
|
|
Success icon |
This icon is displayed when printer status is Success. |


Refer to the following table for the status and icons displayed when an item is mapped to:
-
Kitchen Printer
-
Expo
-
Both Printer and Expo
Kitchen Printer
|
Status |
Quick Action Window |
Check Summary screen |
|---|---|---|
|
Success |
Success status |
Success icon |
|
Failure |
Failure status |
Failed icon |
|
Pending |
Pending status |
Fired icon |
Expo
|
Status |
Quick Action Window |
Check Summary screen |
|---|---|---|
|
Pending |
Pending status |
Fired icon |
|
Yet to Start |
Pending status |
Fired icon |
|
Queue |
Pending status |
Fired icon |
|
Cooking |
Cooking status |
Cooking icon |
|
Completed |
Completed status |
Cooking completed icon |
|
Prep Close |
Completed status |
Cooking completed icon |
|
Master Close |
Completed status |
Cooking completed icon |
|
Close |
Completed status |
Cooking completed icon |
|
Failed |
Failure status |
Failed icon |
Both Expo and Kitchen Printer
|
Expo Status |
Printer Status |
Quick Action Window |
Check Summary screen |
|---|---|---|---|
|
Pending |
Success |
Pending status |
Fired icon |
|
Yet to start |
Success |
Pending status |
Fired icon |
|
Cooking |
Success |
Cooking status |
Cooking icon |
|
Completed |
Success |
Completed status |
Cooking Completed icon |
|
Failed |
Success |
Failure status |
Failed icon |
|
Pending |
Failed |
Failure status |
Failed icon |
|
Yet to start |
Failed |
Failure status |
Failed icon |
|
Cooking |
Failed |
Failure status |
Failed icon |
|
Completed |
Failed |
Failure status |
Failed icon |
|
Failed |
Failed |
Failure status |
Failed icon |
|
Pending |
Pending |
Pending status |
Fired icon |
|
Yet to start |
Pending |
Pending status |
Fired icon |
|
Cooking |
Pending |
Pending status |
Fired icon |
|
Completed |
Pending |
Pending status |
Fired icon |
|
Failed |
Pending |
Pending status |
Fired icon |
Sample Screen
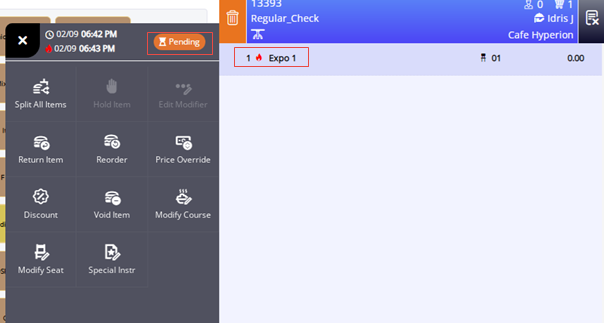
Order Source: : InfoGenesis POS Terminal 12UX
Important Points
-
It is not supported for Nexus mode.
-
It is not applicable to view only mode in the terminal.
-
It is not supported for scheduled orders.
-
Reopened checks are not supported.
-
Item status will not be displayed in split check view.
-
Split checks and combined checks are supported.
-
This feature is supported only when orders are routed to printers using the Use Revelation Data For Modernized Server option under the Feature Controls section in the Kitchen submenu of the Store menu (POS Configuration ➜ Administration ➜ Store ➜ Kitchen).
-
No separate status will be displayed when a check is delivered from the expo.
-
When both expo and printer are configured, no separate status will be displayed.
-
Status is supported only for Expo and Kitchen printers.
-
The time will be displayed in DD:MM format.
-
This feature is not supported for KSS.
-
The item mapped to non KVD item will print a Failed status.
-
The Cooking icon will not be displayed for individual items in terminal when the Start button is disabled for Shared Orders.
-
This feature is supported only when the following terminal options are enabled or disabled together:
-
Terminal Option 279 (Use Local Shift Services (LSS))
-
Terminal Option 1389 (Use Local Application Service (LAS) for Kitchen).
-
-
The time and status will be displayed only for items.
-
The Select an item to view its kitchen status prompt will be displayed in the Quick Action window.
-
If the system is temporarily unable to confirm the failure, the Failed to fetch status from kitchen prompt will be displayed.
-
Fired icon will be displayed for pending orders.
-
Pending status will be displayed only in the Quick Action window.
-
If an item is mapped to multiple printers, only the Primary, Backup, and Secondary printers are considered. Even if the item fails on any one of these printers, no error message will be displayed.
-
When additional printers are configured, item status may be inaccurate if any of the additional printers goes offline.
-
Item status will change from Failed to Printed when the primary printer is offline but the backup printer is online.
-
Status priority order:
-
Failure
-
Pending
-
Success
-
Changes Made in IGCM
To support this, a new terminal option, Terminal Option 1503 (Display Kitchen Item Status Icon in Check View and Quick Action Status), has been introduced:
-
When enabled, the item status icons are displayed along with the item added and fired time in the check view. The failed item status will be displayed in both the check view and quick action window.
-
When disabled, no item status icons are displayed in the check view. This option is disabled by default.
Configurations in IGCM
Configure Terminal Options
Navigate to POS Configuration ➜ Terminals ➜ Terminal Option Group.
Select the preferred record from the screen and select Edit to modify it.
Navigate to the Terminal Options submenu.
Enable the following terminal options:
-
Terminal Option 1503 (Display Kitchen Item Status Icon in Check View and Quick Action Status)
-
Terminal Option 1389 (Use Local Application Service (LAS) for Kitchen)
-
Terminal Option 147 (Use enhanced kitchen video)
-
Terminal Option 152 (Send orders to kitchen printers)
-
Terminal Option 279 (Use Local Shift Services (LSS)
Select Save.
Configure System Configuration
For OnPrem customers, the super admin user at the property must perform this configuration, while SaaS customers must contact Agilysys.
Navigate to Utilities ➜ Utilities ➜ System Configuration.
Navigate to the Kitchen Settings submenu.
Enable the SendLiveKitchenStatus checkbox.
Select Save.
Updated Documentation: Using InfoGenesis POS 12.3.14; InfoGenesis Configuration Manager for POS Terminal 12.3.14